If your Shopify payouts do not match your QuickBooks records, you are not alone. Many merchants face issues like missing transactions, payout differences, fees, and refunds that make reconciliation confusing. Learning how to reconcile Shopify in QuickBooks is key to fixing these mismatches and keeping your books accurate.
The challenge happens because Shopify tracks sales activity while QuickBooks focuses on accounting records, which can easily lead to differences. Still, proper reconciliation is important as it keeps your books clean, improves reporting, and simplifies taxes. But how to do it? Do not worry, here is the full guide.
This guide explains everything from why numbers differ to setup, recording sales, step-by-step reconciliation, common mistakes, and automation. Read on.
What It Means to Reconcile Shopify and QuickBooks
Reconciling Shopify and QuickBooks simply means checking that the numbers in both systems match correctly. In other words, you are making sure that every sale, refund, fee, and payout from Shopify is accurately recorded in QuickBooks without anything missing or incorrect.
It is not just about importing orders through a Shopify QuickBooks integration. The real goal is to ensure that the financial records in QuickBooks truly reflect what is happening in your Shopify store.
It is not simply about importing orders. It is about ensuring the financial story told in QuickBooks matches the financial reality of the Shopify store down to the last cent.
There are three layers to Shopify and QuickBooks reconciliation:
- Sales reconciliation confirms that every Shopify order is recorded in QuickBooks with the correct amounts for products, taxes, discounts, and shipping.
- Payout reconciliation helps confirm that the amount Shopify deposits into your bank account matches the related sales, fees, and refunds from that period. This is where most merchants struggle because Shopify does not deposit money per order. It batches transactions together and sends a single payout that includes sales minus fees, refunds, and adjustments.
- Fee and adjustment reconciliation ensures that Shopify’s transaction fees, payment processing fees, refunds, and chargebacks are all captured as expenses in QuickBooks, so the net revenue figure is accurate.
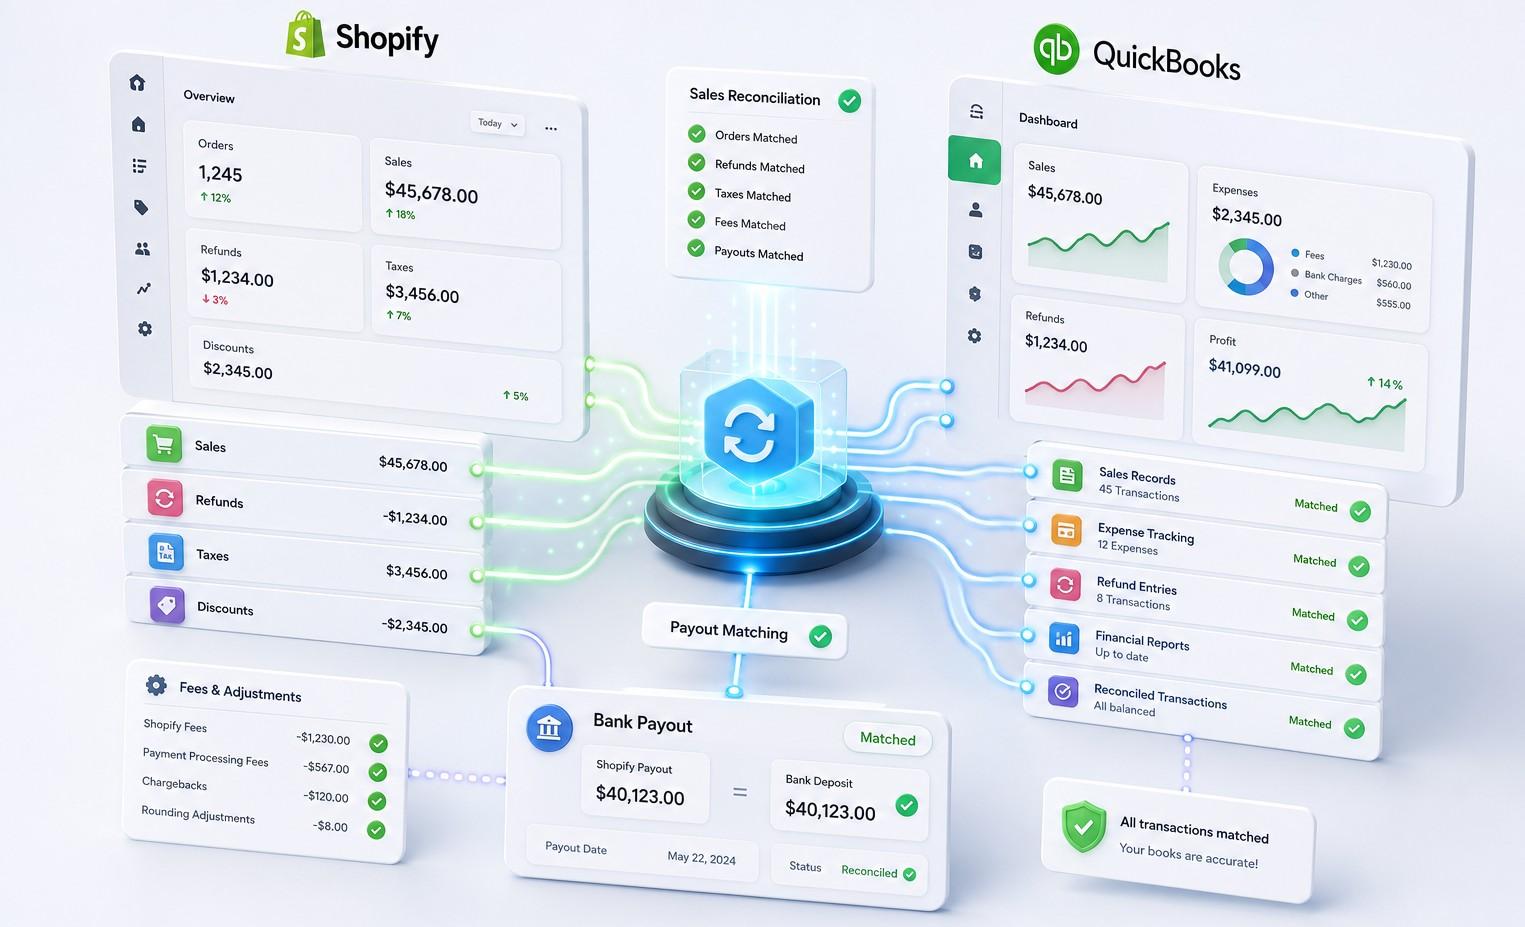
When all three of these layers are reconciled correctly, the bank statement, QuickBooks, and Shopify all tell the same story. That is the goal.
Key Reasons Your Shopify & QuickBooks Numbers Do Not Align
Before reconciling Shopify in QuickBooks, it is important to understand why the numbers stop matching in the first place. In most cases, the issue is not caused by missing data or broken software.
Instead, it happens because Shopify and QuickBooks handle transactions differently, which naturally creates gaps between the two systems.
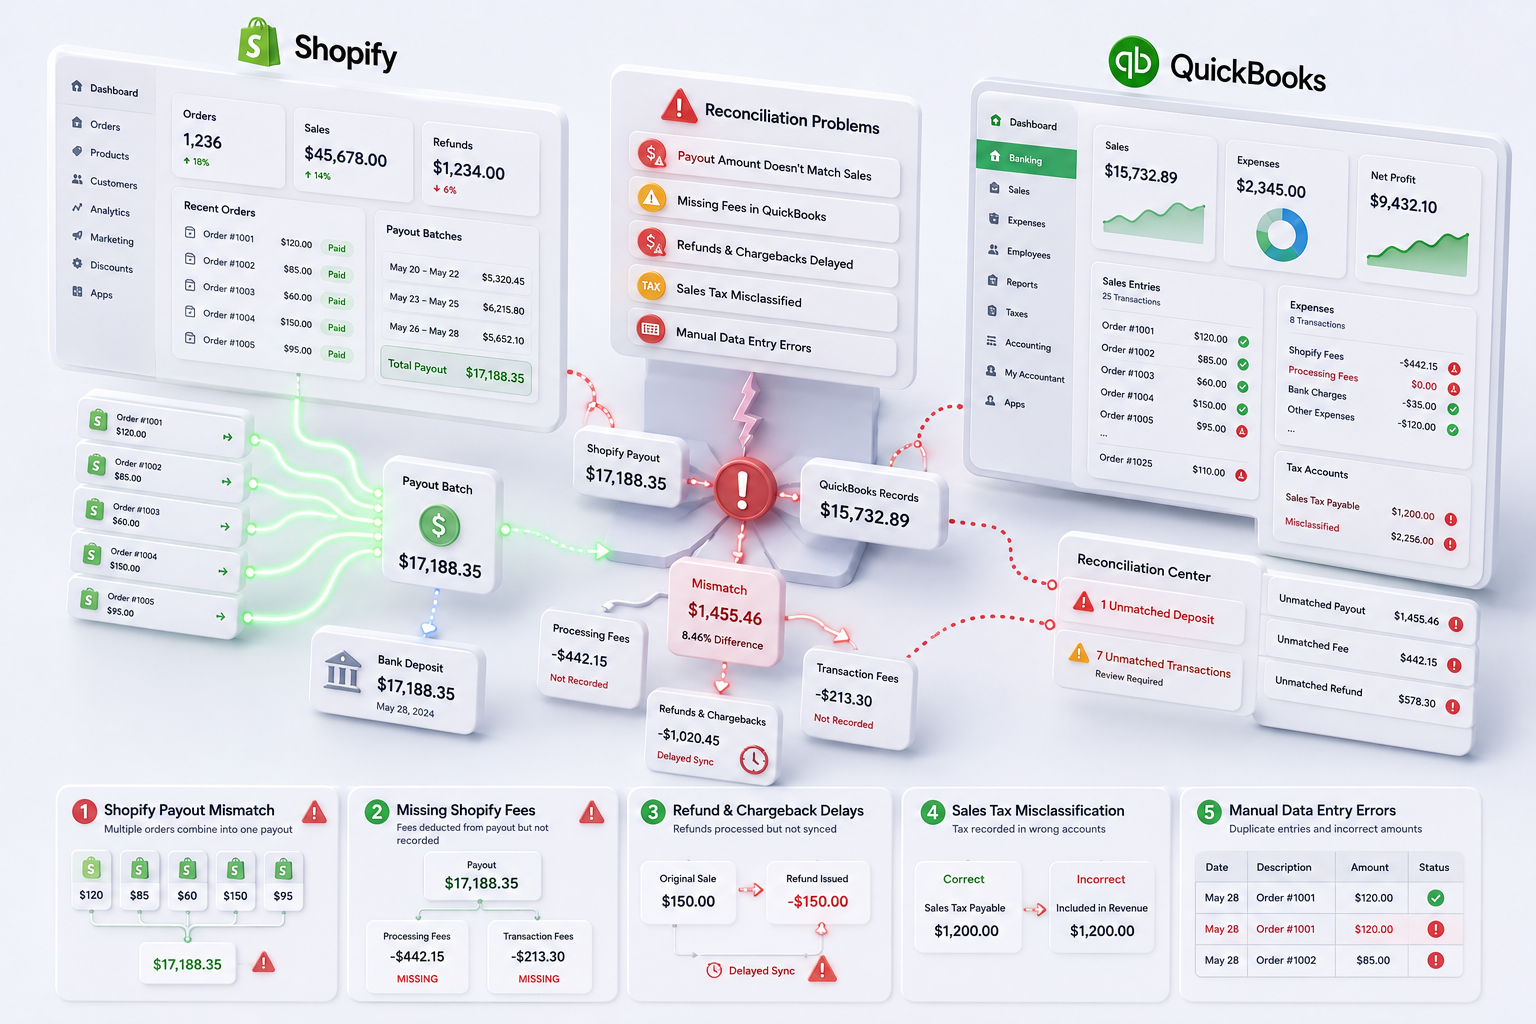
Shopify pays in payouts, not per order:
One of the biggest causes of reconciliation issues is the way Shopify sends payouts. When a customer places an order on Shopify, that revenue does not immediately appear as a clean deposit in the bank. Shopify batches transactions over a payout period, typically one to three business days, deducts its fees, accounts for any refunds, and then sends a single net amount to the merchant’s bank account.
As a result, the deposited amount rarely matches an individual order total. Because of this, reconciliation becomes difficult when QuickBooks records every order separately while the bank only receives one combined payout amount.
Shopify fees are not shown separately in the order data:
Shopify deducts various fees from every payout, including transaction fees and payment processing charges. However, these deductions are not always clearly separated in basic Shopify reports or exports.
If those fees are not properly recorded as expenses in QuickBooks, revenue figures can appear higher than the actual amount deposited into the bank account. Over time, even small unrecorded fees can create significant discrepancies in financial reports.
Refunds and Chargebacks Create Delays:
Refunds and chargebacks can also cause timing differences between Shopify and QuickBooks. For example, a refund issued today may affect a payout that is processed several days later.
If refunds are not recorded accurately and linked to the correct transactions, account balances will no longer align. This often leads to confusion during monthly reconciliation.
Sales Tax Can Be Misclassified:
In many regions, Shopify collects sales tax from customers during checkout. However, those tax amounts should not be treated as business income. Instead, they usually need to be recorded in a separate sales tax liability account inside QuickBooks.
Without proper mapping, tax amounts may accidentally inflate revenue figures or disappear from reports entirely, making reconciliation even more complicated.
Manual data entry errors:
Manual bookkeeping is another major reason Shopify and QuickBooks records drift apart. Entering transactions by hand increases the risk of duplicate entries, incorrect dates, missing fees, or simple typing mistakes.
Even a small error, such as a misplaced decimal or skipped transaction, can throw off an entire month of reconciliation and require hours of investigation to fix.
Understanding these causes is essential before starting the reconciliation process. Once you know why the numbers differ, it becomes much easier to identify discrepancies, organize records correctly, and maintain accurate financial reporting month after month.
What You Need Before Reconciling Shopify in QuickBooks
Many reconciliation problems happen because merchants begin the process without proper preparation. Missing payout reports, incorrectly mapped accounts, or inconsistent date ranges can quickly turn a simple reconciliation into hours of manual troubleshooting.
To avoid that, make sure everything mentioned below is ready before reconciling Shopify in QuickBooks.
Access to Both Shopify and QuickBooks:
Start by confirming that you have full access to both platforms. You will need access to the Shopify admin dashboard as well as the QuickBooks account being used for bookkeeping.
If you are using QuickBooks Desktop, make sure the correct company file is open, updated, and backed up before making any reconciliation changes.
Shopify Payout Reports:
Payout reports are one of the most important documents in the reconciliation process. In Shopify, go to Finances, then Payouts, and download the payout reports for the period you want to reconcile.
These reports show exactly how each payout was calculated, including:
- Gross sales
- Refunds
- Processing fees
- Adjustments
- Net payout amounts
Since Shopify deposits payouts as a single combined amount, these reports act as the bridge between Shopify transactions and bank deposits.
Shopify Finance Summary or Transaction Reports:
Next, download Shopify’s Finance Summary or transaction reports from the Analytics section. These reports provide a broader overview of store activity and help verify totals during reconciliation.
They typically include details such as:
- Total sales
- Taxes collected
- Shipping charges
- Discounts
- Refunds
- Order adjustments
Having both payout reports and financial summaries makes it much easier to identify mismatched figures later in the process.
Properly configured Chart of Accounts in QuickBooks:
QuickBooks must be set up correctly before importing or matching Shopify transactions. Without the right account structure, sales, taxes, fees, and refunds can easily end up in the wrong categories.
At a minimum, the following accounts should be created:
- Shopify Sales Income Account – records gross sales revenue
- Shopify Fees Expense Account – tracks transaction and processing fees
- Sales Tax Payable Account – stores collected sales tax as a liability
- Shopify Clearing Account – temporarily holds Shopify transactions before payouts reach the bank
- Refunds and Returns Account – records refunds, returns, and adjustments
A properly organized chart of accounts keeps reconciliation cleaner and prevents reporting errors later on.
The correct accounting method confirmed:
Before reconciling, verify whether the business uses cash basis or accrual basis accounting. This matters because Shopify and QuickBooks may recognize revenue at different times depending on the accounting method being used.
If the accounting method is unclear, reconciliation differences can appear even when the underlying transactions are correct.
Define the reconciliation period:
Finally, decide the exact date range you want to reconcile. Most businesses reconcile monthly, while others reconcile by the Shopify payout period. Whatever method you choose, consistency is important. Mixing payout dates, bank dates, and order dates within the same reconciliation period is one of the most common causes of confusion and mismatched balances.
Once these records, reports, and accounts are properly prepared, the actual reconciliation process becomes significantly faster, cleaner, and easier to manage.
Methods to Record Shopify Sales in QuickBooks (Online and Desktop)
This step is extremely important because reconciliation only works when the underlying transaction data is accurate. If sales, taxes, refunds, or fees are recorded incorrectly from the beginning, the numbers will continue to mismatch no matter how carefully you reconcile later.
The process, however, depends on whether you are using QuickBooks Online or QuickBooks Desktop, since both versions handle Shopify data differently.
How to Record Shopify Sales in QuickBooks Online:
QuickBooks Online is the preferred option for many Shopify merchants because it supports cloud access, real-time integrations, and automated syncing tools. Depending on your order volume, you can either record transactions manually or automate the process entirely.
Option 1: Manual Entry Using Sales Receipts
For stores with fewer orders, Shopify sales can be entered manually in QuickBooks Online using Sales Receipts. Follow these steps:
- Open QuickBooks Online and click the + New button
- Select Sales Receipt
- Choose a customer name
- Many Shopify merchants use a generic customer profile, such as “Shopify Customer” for summary-level entries
- Add the products sold or enter a summarized sales total for the day or payout period
- Create separate line items for:
- Shipping income
- Discounts
- Sales tax collected
- In the Deposit To field, select the Shopify Clearing Account instead of the bank account
- Save the Sales Receipt
Using the Shopify Clearing Account is one of the most important parts of the process. Instead of sending transactions directly to the bank account, the clearing account temporarily holds Shopify activity until the actual payout arrives. This makes reconciliation significantly easier later on.
Option 2: Using a Shopify QuickBooks integration
As order volume grows, manual data entry quickly becomes inefficient and error-prone. In that case, using a Shopify QuickBooks integration tool is usually the better approach.
Automation tools such as QuickSync can automatically send Shopify transactions into QuickBooks Online in real time. Depending on the setup, the system can create:
- Sales Receipts
- Invoices
- Refund Receipts
- Fee entries
- Tax mappings
This reduces manual work while also improving accuracy and consistency across reports.
For most growing Shopify stores, combining automated syncing with a Shopify Clearing Account creates the cleanest and most scalable reconciliation workflow
How to Record Shopify Sales in QuickBooks Desktop
Unlike QuickBooks Online, QuickBooks Desktop does not support live cloud integrations in the same way. Because of that, the process is usually more manual unless third-party synchronization tools are used.
Still, Shopify sales can be recorded effectively with the right workflow in place.
Option 1: Manual Entry Using Sales Receipts or Journal Entries
To manually record Shopify sales in QuickBooks Desktop:
- Open QuickBooks Desktop
- Go to Customers → Enter Sales Receipts
- Select or create a customer profile
- Many businesses use a general customer name, such as “Shopify Sales” for summarized entries
- Enter the gross sales amount and map it to the Shopify Sales Income Account
- Add separate entries for:
- Shipping income
- Discounts
- Sales tax
- Set the Deposit To field to the Shopify Clearing Account
- Save the transaction
Some accountants prefer using journal entries instead of Sales Receipts. In that case, the Shopify Clearing Account is typically debited while the related income, tax, and liability accounts are credited accordingly.
Option 2: Import Shopify Data Through CSV Files:
Shopify also allows merchants to export order data as CSV files. These files can then be imported into QuickBooks Desktop using IIF files or third-party import tools.
Although the initial setup requires account mapping and formatting, the process becomes much faster after the first configuration is complete. This method works well for businesses handling moderate transaction volumes.
Option 3: Use Third-Party Sync Tools (QuickSync)
For businesses processing a large number of orders, automation is usually the most efficient solution. There comes QuickSync.pro tha that you use for integration and sync Shopify and QuickBooks effortlessly. QuickSync can automatically transfer Shopify sales data into QuickBooks while handling account mapping, taxes, fees, and transaction categorization. QuickSync also provides real-time order syncing to help you fulfill orders perfectly.
This approach not only saves time but also reduces the risk of manual bookkeeping errors that commonly affect reconciliation accuracy.
Once Shopify sales are being recorded properly in QuickBooks, the actual reconciliation process becomes much more manageable. At this stage, the goal should not just be about entering transactions but also making sure every sale, payout, fee, refund, and tax amount matches across Shopify, QuickBooks, and the bank account.
How to Reconcile Shopify in QuickBooks Step by Step
This is where many businesses either gain confidence in their financial records or discover inconsistencies that have been building for months. Fortunately, when the process is followed step by step, reconciliation becomes far more structured and predictable.
Below, we have explained the full workflow from sales through payouts, fees, refunds, and taxes.
Step 1: Compare Shopify Sales With QuickBooks Income
Start by verifying that total sales recorded in Shopify match the income recorded in QuickBooks for the same date range. This creates the foundation for the rest of the reconciliation process.
Here is how to check:
- Download the Shopify Finance Summary for the reconciliation period
- In QuickBooks, run a Profit and Loss Report for the same dates
- Compare the total gross sales figures from both systems
If the totals match, you can move to the next step. However, if they do not match, the discrepancy is usually caused by:
- Missing orders
- Duplicate entries
- Incorrect imports
- Timing differences between Shopify and QuickBooks
Before continuing, investigate and correct these differences so the reconciliation process starts with accurate sales data.
Step 2: Record and Match Shopify Payouts
This is the most important step in learning how to reconcile Shopify in QuickBooks, and the one most merchants get wrong.
Open the Shopify Payout Report for the reconciliation period. Each payout typically includes:
- Gross sales
- Refunds
- Shopify fees
- Adjustments
- Net payout amount
Next, create or review the corresponding deposit in QuickBooks.
In QuickBooks Online or Desktop:
- Go to the Banking section or Make Deposits
- Select the Shopify Clearing Account as the source account
- Include all Sales Receipts related to that payout period
- Add negative line items for:
- Shopify processing fees
- Refunds or adjustments
- Confirm that the final deposit total exactly matches the net payout amount shown in Shopify
Once the deposit amount in QuickBooks matches the actual Shopify bank deposit, you can match it against the bank transaction and complete the payout reconciliation for that period.
This step is critical because it connects Shopify orders, fees, and refunds to the actual money deposited into the bank account.
Step 3: Record Shopify Fees as Expenses
Shopify charges two types of fees that need to be in QuickBooks as expenses:
Subscription fees – These are the recurring monthly charges for the Shopify plan itself. Record them as operating expenses under accounts such as:
- Software Expenses
- Platform Fees
- Shopify Subscription Fees
Transaction and processing fees – These fees are deducted directly from Shopify payouts and should already appear during payout reconciliation. Make sure they are mapped to the Shopify Fees Expense Account instead of being combined with revenue figures.
Proper fee tracking helps ensure income reports reflect true sales revenue instead of net deposits.
Step 4: Record Refunds and Returns
Refunds must also be recorded correctly so QuickBooks reflects the same balances shown in Shopify. Otherwise, payout totals and income reports will quickly fall out of sync.
In QuickBooks Online:
- Create a Refund Receipt for the original sale
- Map the refund to the same income account used for the original transaction
- Apply the refund against the Shopify Clearing Account
In QuickBooks Desktop:
- Create a Credit Memo linked to the original Sales Receipt
- Apply the adjustment to the Shopify Clearing Account
If you use an automation tool such as QuickSync, refund transactions are usually synced automatically, which reduces manual work and improves accuracy.
Step 5: Reconcile Sales Tax
Sales tax collected through Shopify should never be mixed into revenue. Instead, it should be recorded in a dedicated Sales Tax Payable liability account inside QuickBooks.
To verify tax reconciliation:
- Check the total sales tax collected in the Shopify Finance Summary
- Compare that figure with the Sales Tax Payable balance in QuickBooks
- Confirm both amounts match for the same reporting period
If they do not match, review the Sales Receipts or imported transactions to ensure tax amounts were mapped correctly.
Step 6: Match the Bank Statement
The final step is confirming that QuickBooks matches the actual bank statement. This verifies that every payout, fee, expense, and adjustment has been recorded correctly.
To reconcile the bank account:
- Open the Reconcile section in QuickBooks
- Select the business bank account
- Enter the statement ending date and ending balance from the bank statement
- Match all deposits and withdrawals against the bank records
When reconciliation is complete, the difference should be zero.
If still a balance remains, it usually points to missing transactions, duplicate entries, incorrect fee mapping, or timing differences – all of which are covered in the next section.
Mistakes to Avoid During Shopify QuickBooks Reconciliation
Even when everything is set up correctly, reconciliation issues can still appear. In most cases, these are not accounting problems but simple workflow mistakes that accumulate over time.
Fortunately, these mistakes tend to follow clear patterns. Understanding them helps you detect issues quickly and maintain accurate books with less effort.
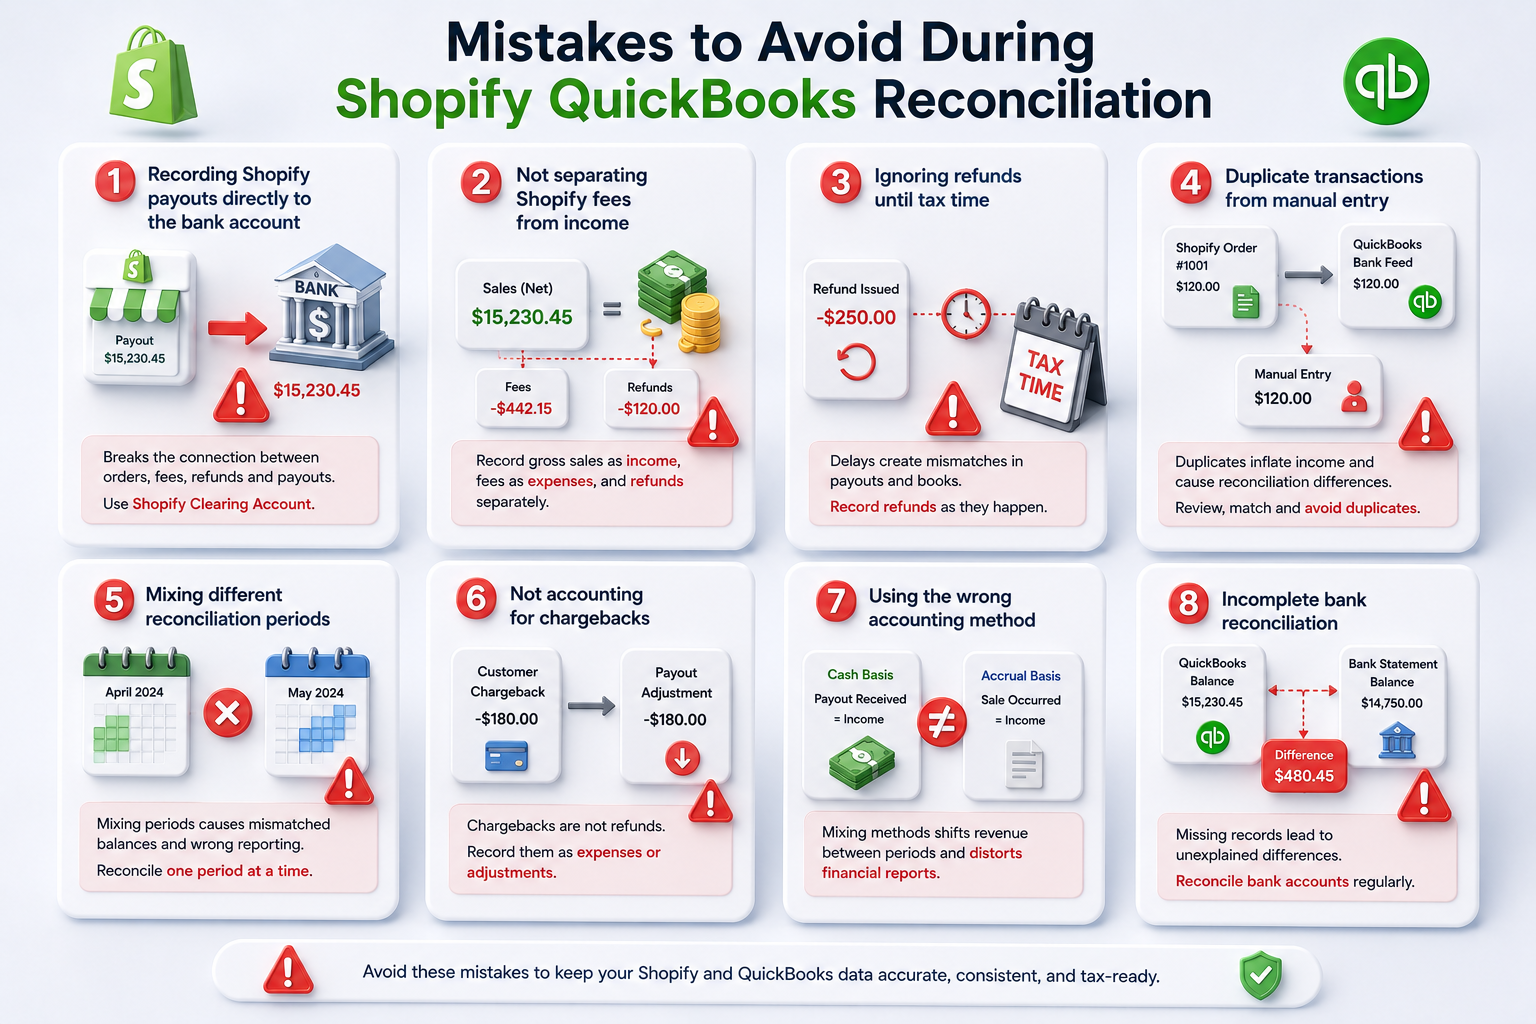
Recording Shopify payouts directly to the bank account:
One common mistake is recording Shopify payouts directly into the bank account without using a Shopify Clearing Account.
While this may seem easier at first, it breaks the connection between individual orders and the final payout. Since Shopify combines sales, fees, refunds, and adjustments into one net deposit, the Clearing Account is needed to track everything properly.
Without it, reconciliation becomes confusing and harder to manage. If this issue already exists, the best solution is to switch to a proper Clearing Account setup and rebuild the workflow correctly.
Not separating Shopify fees from income:
Another common issue is recording only the net payout amount as income. While this may make the bank balance look correct temporarily, it understates revenue and hides important business expenses.
Instead, always record:
- Gross sales as income
- Shopify fees as expenses
- Refunds separately
This approach keeps financial reports accurate and provides a clearer picture of actual business performance.
Ignoring refunds until tax time:
Some businesses wait until month-end or tax season to record refunds. Unfortunately, this creates ongoing mismatches between Shopify payouts and QuickBooks balances.
Because refunds directly affect payout amounts, delaying their recording makes reconciliation increasingly difficult over time.
To avoid this problem, record refunds as soon as they happen or use an automated syncing tool that updates refund transactions automatically.
Duplicate transactions from manual entry:
Duplicate transactions are especially common in QuickBooks Online because bank feeds import deposits and withdrawals from the connected bank account automatically.
If Shopify orders are also entered manually or synced through an integration, the same transaction may appear twice. As a result, income totals become overstated, and reconciliation differences start appearing.
To prevent duplicates:
- Review imported bank transactions carefully
- Match existing deposits instead of adding new ones
- Exclude transactions already recorded through Sales Receipts or integrations
Consistent transaction review is essential for keeping records clean
Mixing different reconciliation periods:
Trying to reconcile multiple months at once is another major source of confusion. Problems also occur when transactions from one payout period are accidentally included in another reporting period.
This makes discrepancies much harder to trace because the numbers no longer align across Shopify reports, QuickBooks records, and bank statements.
To keep reconciliation manageable:
- Reconcile one period at a time.
- Use consistent start and end dates.
- Apply the same date filters across Shopify and QuickBooks reports.
Maintaining consistent reporting periods makes discrepancies easier to identify and resolve.
Not accounting for chargebacks:
Chargebacks are often confused with refunds, but they are treated differently in Shopify payout reports.
Instead of reducing sales directly, chargebacks usually appear as payout adjustments and should be recorded separately in QuickBooks as expenses or dispute-related deductions.
If chargebacks are ignored, the payout amount in QuickBooks will not match the actual bank deposit, leaving unexplained differences during reconciliation.
Using the wrong accounting method:
Using inconsistent accounting methods can create major reconciliation issues. Under cash basis accounting, income is recorded when the Shopify payout reaches the bank account. Under accrual basis accounting, income is recorded when the sale occurs.
Mixing both methods in the same QuickBooks file can shift revenue between periods and create reporting inaccuracies. To avoid this, use one accounting method consistently across all Shopify and QuickBooks records.
By preventing these common mistakes, reconciliation becomes more accurate, organized, and easier to manage over time.
How QuickSync Simplifies Shopify QuickBooks Reconciliation
The step-by-step process outlined above works, but it requires a significant amount of manual effort, careful attention to detail, and a solid understanding of how Shopify’s payout structure interacts with QuickBooks’ accounting logic. For merchants processing dozens or hundreds of orders daily, doing this manually every month is not sustainable.
This is where QuickSync comes in. QuickSync connect Shopify and QuickBooks at a structural level, meaning it does not simply push raw data from one platform to the other. It transforms Shopify transactions into properly structured accounting documents that QuickBooks can use directly.
Here is what that looks like in practice:
Every Shopify order becomes a properly structured QuickBooks document. Sales Receipts, Invoices, and Refund Receipts are created automatically in QuickBooks with the correct line items, account mappings, tax treatment, and customer details. The manual Sales Receipt entry process described earlier in this guide is eliminated.
Product syncs completely. Product names, variants, variant images, descriptions, SKUs, retail prices, taxes, and images all sync between Shopify and QuickBooks. This means the line items on every Sales Receipt in QuickBooks match the actual products sold in Shopify, not a generic summary entry.
Refunds are handled automatically. When a refund is processed in Shopify, QuickSync creates the corresponding Refund Receipt in QuickBooks immediately. Refunds no longer accumulate as unrecorded adjustments that only get noticed at reconciliation time.
Order cancellations are reflected correctly. Cancelled orders that were previously synced are updated in QuickBooks, so revenue from unfulfilled orders does not sit in the books incorrectly.
Inventory stays accurate across both platforms. QuickSync syncs inventory levels between Shopify and QuickBooks in real time, so stock figures in QuickBooks reflect actual sales activity rather than falling further behind with each order.
Deduplication is built in. QuickSync automatically prevents duplicate transactions caused by overlapping data sources, helping you avoid one of the most damaging reconciliation problems.
The result is that when reconciliation time comes, the data in QuickBooks is already clean, complete, and structured correctly. The reconciliation process becomes a verification exercise rather than a data correction exercise, which is exactly what it should be.
For Shopify merchants, QuickSync is the automation layer that makes this possible without requiring any technical setup or developer involvement.
Final Words: What Next
Reconciling Shopify in QuickBooks is essential for keeping your financial data accurate and reliable. Understanding how to reconcile Shopify in QuickBooks helps you track taxes, profits, and store performance with confidence. While payouts, fees, refunds, and timing differences can add complexity, the process becomes simple with the right setup and consistent workflow.
Over time, it turns into a routine task. QuickSync can automate this process by syncing Shopify transactions directly into QuickBooks in a clean, structured format, saving time and reducing errors.