
Setting up Clover inventory is simple when your business sells from one counter, one location, and one POS system. You add your items, enter stock quantities, organize categories, and start selling.
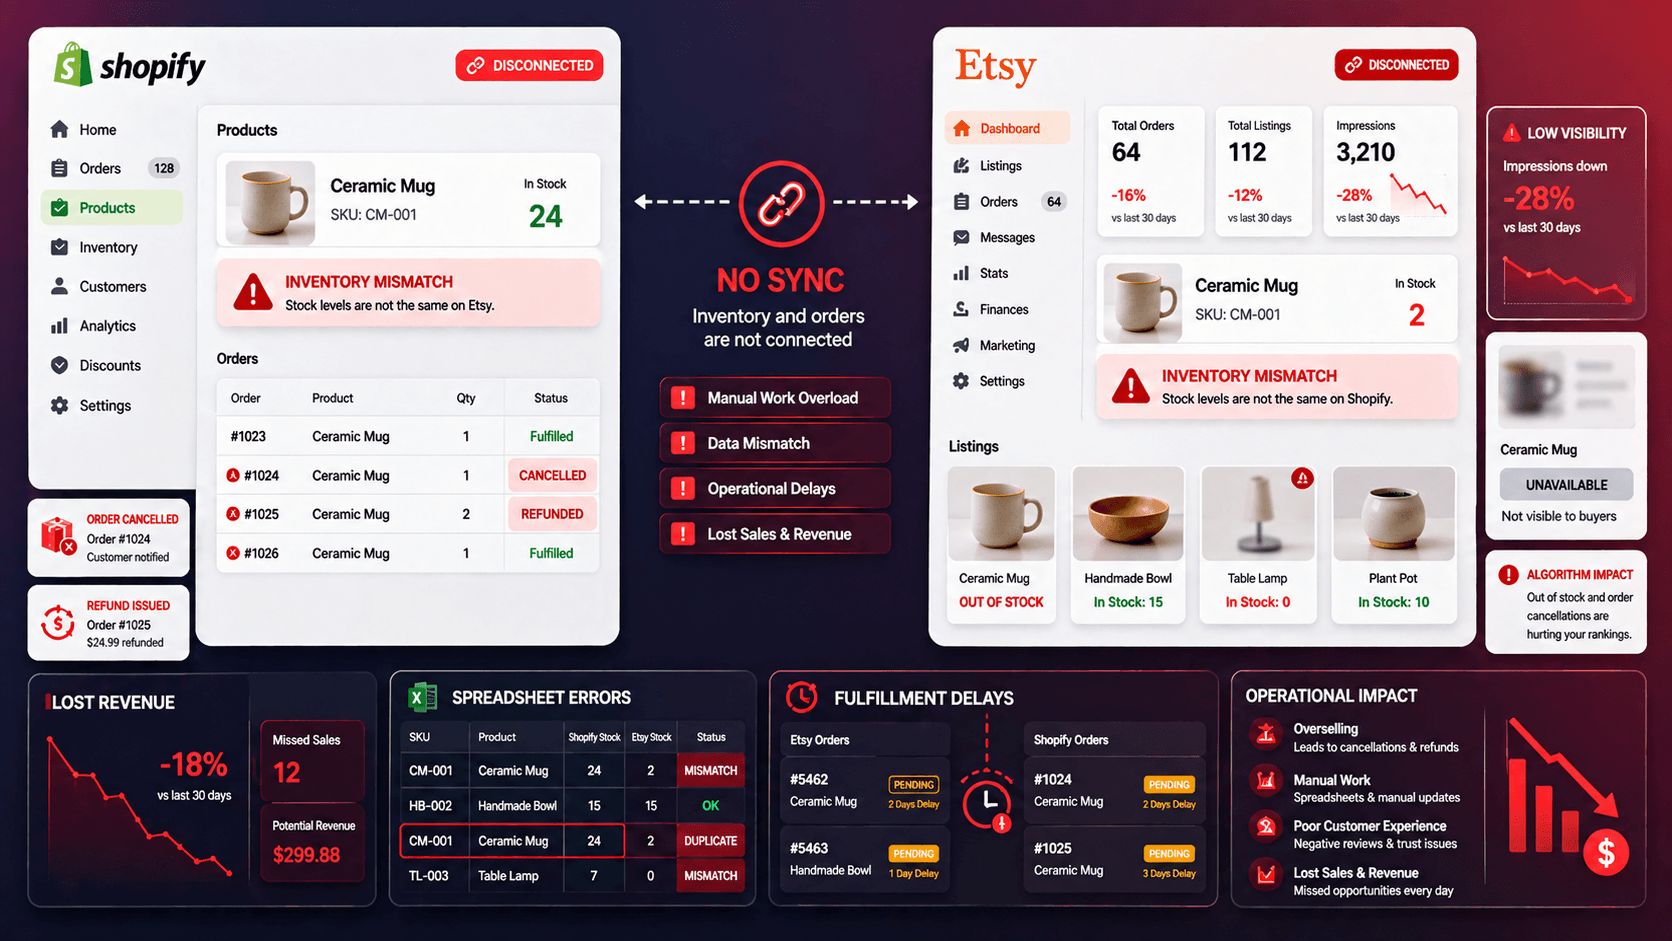
But inventory management becomes more difficult when your products are moving through different places at the same time. One sale happens at your Clover register. Another order comes from Shopify. A marketplace order comes from Etsy or Amazon. A return comes back from an online customer.
This creates inventory mismatches, overselling risk, order cancellations, and confusion for your team.
This is a serious operational problem. NetSuite reports that the average inventory accuracy rate for businesses was only 83%. It means many businesses still operate with stock records that do not fully match their actual inventory.
This is why modern merchants need a proper third-party Clover inventory management tool that connects Clover with online stores and marketplaces, so stock counts sync automatically across every sales channel.
In this guide, you will learn what Clover inventory management includes, where Clover’s built-in inventory tools fall short, the different ways to manage Clover inventory successfully, and why tools like QuickSync can help merchants automate inventory across POS and ecommerce channels.
What Is Clover Inventory Management
Clover inventory management is the process of tracking, organizing, and updating products inside the Clover POS system. Clover comes with built-in inventory management features that help merchants manage items, prices, categories, stock quantities, modifiers, and product availability directly from Clover devices or the Clover dashboard.
In simple words, Clover’s built-in inventory management helps businesses keep their POS product catalog organized. You can add new items, assign SKUs, set prices, create categories, update stock levels, and track what is available for sale. This makes checkout faster for your staff and helps you understand which products are selling.
For different types of businesses, Clover inventory management can be used in different ways:
A retail store can add products to Clover, assign SKUs, set prices, create categories, and track available stock.
A restaurant or cafe can manage menu items, modifiers, item groups, add-ons, and item availability.
A service-based business can list service items, add prices, and process them through Clover checkout.
For a single physical store, these built-in Clover inventory features are helpful. You can see what is selling, update products, adjust quantities, and keep your checkout system organized from one place.
However, Clover inventory management works best when your business mainly sells through Clover POS. Once you start selling the same products on Shopify, Etsy, WooCommerce, eBay, or other online channels, Clover’s built-in inventory tools may not be enough on their own. At that stage, you need a proper inventory sync tool.
How to Do Clover Inventory Setup (Step-by-Step Guide)
If you just got a Clover POS system, setting up your inventory correctly from day one can save you hours of confusion later. Clover’s built-in Inventory app lets you add products, track stock levels, set low-stock alerts, and organize items by category, all in one place.
Whether you run a retail store, a restaurant, or a service-based business, a clean inventory setup means faster checkouts, fewer stockouts, and more accurate sales reports. The good news is that Clover makes the process beginner-friendly, even if you have never used a POS system before.
This step-by-step guide will walk you through everything you need to get your Clover inventory up and running quickly.
Step 1: Open the Inventory App
Log in to your Clover dashboard and open the Inventory app. You can do this from your Clover Station, Clover Flex, or Clover web dashboard.
Once inside, you’ll see options to add, edit, or update items. The interface is straightforward, but it’s worth taking a moment to explore the menu before adding your first product.
Step 2: Add Your First Inventory Item
To add a product:
Click “Add Item.”
Set the product name, price, and cost.
Assign the product to a category for better organization.
Add a SKU or barcode if applicable.
Upload an image so staff can quickly identify it at the register.
Consistency is key. Using the same naming conventions for all your items makes tracking and reporting much easier later.
Step 3: Set Stock Quantities
Once your item is created, you’ll want to set the starting stock level. This is essential for tracking how many units you’ve sold and when you need to reorder.
You can also enable low-stock alerts so you know when an item is running low. This helps you manage orders more effectively and avoid losing sales due to stockouts.
Step 4:Organize with Categories and Modifiers
Grouping your items into categories makes it easier for staff to find them during checkout and for you to run reports later.
For example:
A clothing store might use categories like Shirts, Pants, and Accessories.
A coffee shop might use categories like Hot Drinks, Cold Drinks, and Pastries.
Modifiers allow you to add variations without creating separate listings for each. For example, a t-shirt might have size modifiers (Small, Medium, Large) or a coffee might have milk and syrup options.
Step 5: Track and Update Inventory
Once you start selling, Clover will automatically log each sale and deduct it from your inventory count.
However, you’ll still need to update inventory for:
Returns or exchanges
Damaged or expired products
Manual adjustments after stock counts
Regularly reviewing your sold items and making adjustments ensures your data stays accurate.
Common Problems with Built-in Clover Inventory Management
The built-in Clover inventory management becomes more complex when Clover is not the only place where sales happen. If your business also uses Shopify, WooCommerce, Etsy, TikTok Shop, Amazon, or multiple Clover accounts, then you need an inventory sync tool.
Here are the main reasons Clover’s native inventory management may not be enough for growing businesses.
Clover Works Best Inside Clover
Clover inventory works smoothly when sales happen inside Clover. But if a product is sold on Shopify, Etsy, WooCommerce, TikTok Shop, or Amazon, Clover does not automatically know about that sale unless you use a Clover integration. This creates a gap between your POS inventory and your e-commerce inventory. This is how overselling starts.
Manual Updates Become Risky
Many small businesses start by updating Clover inventory manually. They check online sales, reduce stock in Clover, and change quantities in spreadsheets. This works when you have 20 products and a few orders per week. Manual inventory updates create errors. One missed update can lead to overselling. One wrong quantity can create stockouts.
Stock Adjustments Do Not Always Reflect Everywhere
Inventory is not only reduced when a sale happens. Stock also changes because of returns, exchanges, damaged products, supplier restocks, manual corrections, and physical stock counts. Clover can help you adjust inventory inside the POS. But if those changes do not sync with your online channels, your stock numbers will still be different across platforms.
Product Variants Can Become Difficult to Manage
Many businesses sell products with variants, such as size, color, flavor, material, or style. Managing these variants inside Clover may work for basic POS selling. But it becomes harder when the same variants also exist on Shopify, WooCommerce, Etsy, Amazon, or eBay. This creates fulfillment mistakes, incorrect stock counts, and customer complaints.
Multi-Location Inventory Gets Complicated
Clover can support inventory organization, but multi-location inventory is harder when each store, register, or account needs accurate stock visibility. A business with two or more physical locations needs to know where each product is available. Stock in one Clover location should not be confused with stock in another location.
How Inventory Sync Tools Improve Clover Inventory Management
As your business grows, the built-in Clover inventory management features don’t work. You need a proper inventory sync tool to connect Clover with your online stores and marketplaces.
The reliable third-party Clover inventory sync tool keeps inventory data updated automatically. It reduces manual work, prevents stock mistakes, and gives merchants better control over products, orders, and stock movement.
Here are the main ways third-party Clover inventory sync tools make inventory easier for growing businesses.
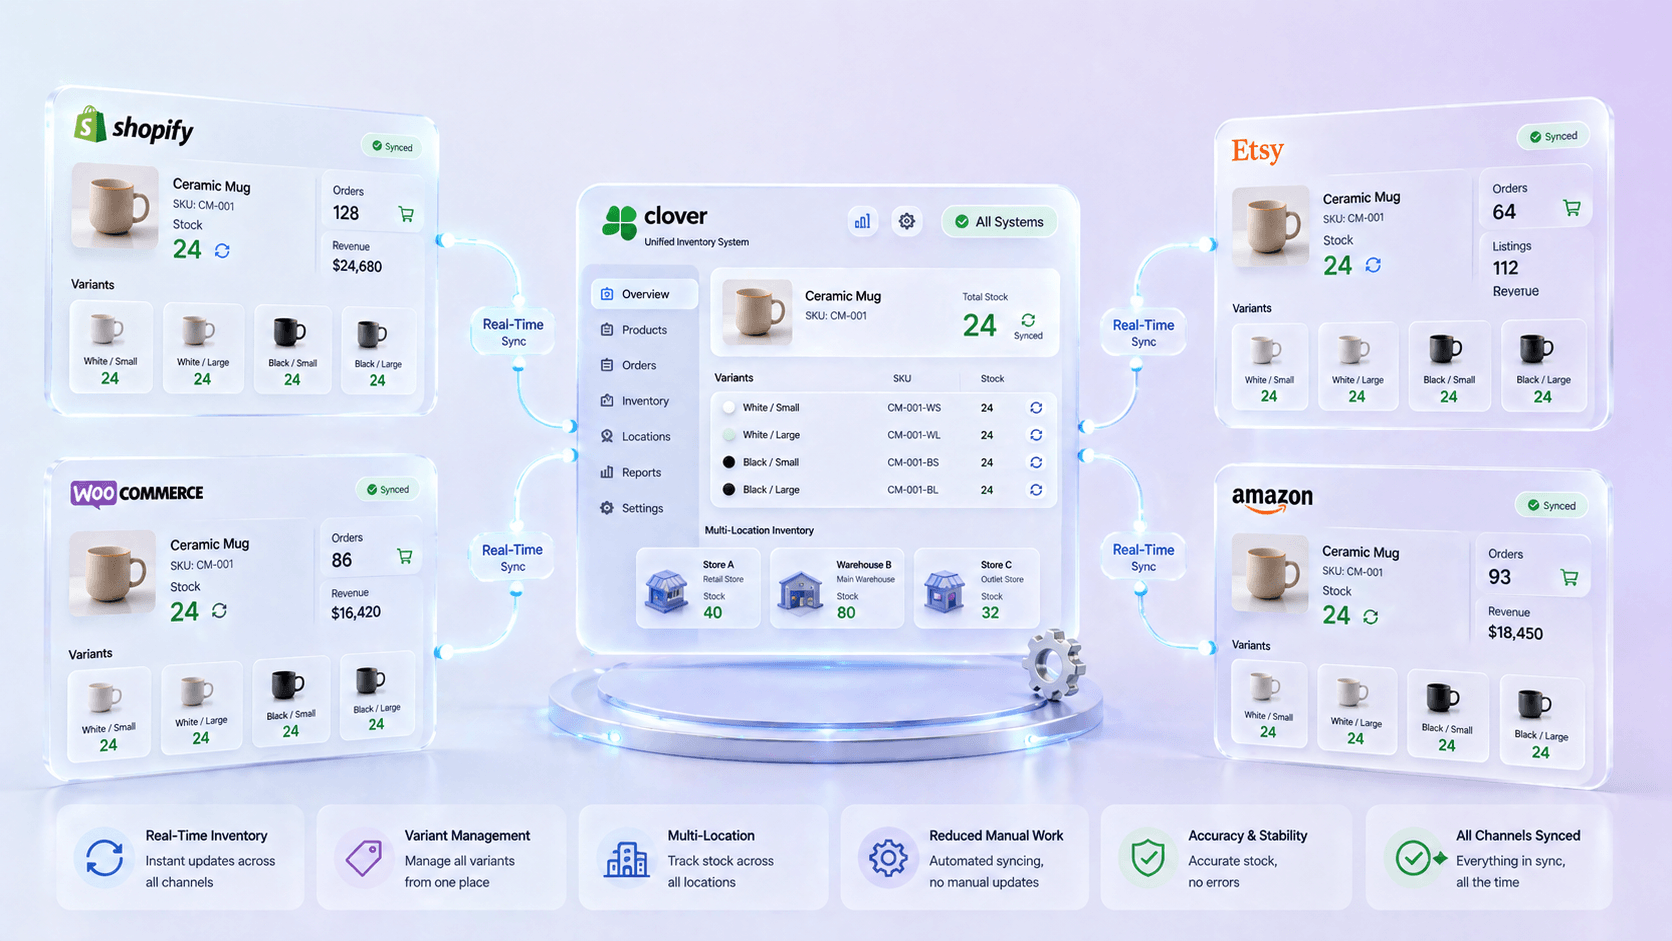
Real-Time Stock Updates Across Channels
A Clover inventory management tool keeps stock updated whenever a sale happens on any connected channel. If a product sells through Clover POS, the stock can update on Shopify, Etsy, WooCommerce, Amazon, or other platforms automatically.
This helps prevent overselling because every channel shows the latest available quantity. Your team does not have to manually reduce stock after every sale.
Less Manual Data Entry
Manual inventory updates take time and often lead to mistakes. A proper inventory management tool reduces repetitive work by syncing stock counts, SKUs, and order data between Clover and other platforms.
This saves time for store owners and staff. Instead of updating the same product in multiple systems, your team can focus on sales, fulfillment, and customer service.
Better Control Over Product Variants
If you sell products with sizes, colors, flavors, or styles, variant-level inventory can become difficult to manage manually. A Clover inventory management tool helps keep each variant synced with the correct stock count across sales channels.
This means the medium blue shirt, large black shirt, or vanilla flavor item can each have accurate inventory. It reduces fulfillment errors and helps customers see the correct availability online.
Easier Multi-Location Inventory Management
For businesses with multiple stores, warehouses, or Clover locations, inventory visibility becomes more important. A good Clover inventory management tool helps track stock across different locations. It keeps each location’s inventory separate.
This helps merchants know where products are available and which locations need restocking. It helps in making better purchase decisions for the future.
No More Overselling and Stockout Issues
When stock updates are delayed, businesses can sell products they no longer have or run out of popular items without noticing. Clover inventory management tools help reduce these problems by keeping inventory synced more accurately.
With better stock visibility, merchants can avoid canceled orders and reduce customer complaints. Merchants can make smarter restocking decisions.
How QuickSync Streamlines Clover Inventory Management with Other Sales Channels
If you are selling on Clover and other platforms like Shopify, Amazon, Etsy, and eBay, you need a reliable inventory sync method for keeping your stock count accurate.
That’s what QuickSync is designed for. QuickSync is an inventory sync tool built specifically for Clover sellers who are also on Shopify, Etsy, Amazon, etc. QuickSync automatically syncs inventory across all your connected sales channels whenever a sale happens.
With QuickSync, merchants don’t need to maintain any spreadsheets. You don’t need to do any manual work. Besides inventory sync, QuickSync also offers product sync and order sync features.
Here’s why QuickSync is best for maintaining Clover and other stores’ inventory:
Real-time syncing: Sales updates instantly across all channels. A customer buys on Clover. Your Shopify, Etsy, and eBay updates stock automatically. No delays. No gaps. No overselling.
Variant syncing: Inventory sync works at the variant level, also. Different colors and sizes sync automatically. If you sell blue and red versions, each one tracks its own inventory independently.
Inventory spoofing: Control what you display without manual updates. Your real Clover inventory is 100 units, but you only want customers to see 5 available. QuickSync shows what you want while managing actual stock in the background.
Stock initialization: New products start at zero inventory. When you push products to Clover, they initialize cleanly. Actual stock syncs separately, so nothing gets double-counted.
Bi-directional stock sync: Sell on Clover, and your Shopify stock updates. Sell on Shopify, and your Clover register knows instantly. Stock updates flow in both directions automatically.
Automatic SKU assignment: Stop manually managing product codes across platforms. QuickSync automatically assigns and syncs SKUs so each product has one consistent identifier everywhere.
Product sync across channels: New products get pushed to all your connected channels automatically. Create a product in Clover. It appears in Shopify, Amazon, and Etsy with the correct inventory levels.
Order sync and consolidation: Orders from all your channels flow into one place. A customer orders on Amazon. Another order on Shopify. Both orders appear in your QuickSync dashboard for unified fulfillment.
Manual spreadsheets waste 5-10 hours weekly and cause mistakes. Clover’s built-in tools only work for single channels. QuickSync is built for multi-channel retailers. It eliminates overselling permanently. It saves your team hours every week. It lets you scale to new channels without adding chaos.
This is exactly what retailers need who sell on multiple platforms. For growing merchants, QuickSync turns Clover inventory management into a connected system instead of a manual task.
Best Practices for Smoothly Managing Clover Inventory
Whether you use Clover alone or connect it with QuickSync, strong inventory management still requires good processes. Here are the best practices merchants should follow for smooth inventory management.
Keep SKUs Clean and Consistent
SKUs are the foundation of inventory accuracy. Use the same SKU for the same product across Clover, Shopify, WooCommerce, Etsy, Amazon, and every other channel. Avoid duplicate SKUs, missing SKUs, or random naming systems. A clean SKU structure helps integrations match products correctly.
Set Clear Reorder Points
Do not wait until a product reaches zero. Set reorder points based on supplier lead time, average sales speed, and seasonal demand. This helps prevent stockouts. It also gives your team enough time to restock.
Count Inventory Regularly
Even with automation, physical inventory counts are still important. Products can be damaged, stolen, returned incorrectly, or transferred without proper updates. Regular cycle counts help keep system inventory close to physical reality.
Monitor Sync Errors
If you use an integration, review sync status regularly. Failed syncs can happen because of missing SKUs, product conflicts, deleted variants, permission issues, or platform changes. A good process helps you catch these issues early.
Train Your Staff for the Sync Tool
Inventory accuracy is not only a software issue. Staff behavior matters. Your team should know how to process sales, returns, exchanges, transfers, and product edits correctly. One wrong workflow can create inventory errors across multiple channels.
Conclusion
Clover inventory management is a good starting point for businesses that need basic POS stock control. It helps merchants create products, organize categories, track quantities, and manage items inside Clover.
But as soon as a business starts selling online, managing multiple locations, or handling larger product catalogs, Clover’s built-in inventory tools can become limited. That is why successful Clover inventory management requires a stronger system.
QuickSync gives merchants a better way to manage Clover inventory by automating product, inventory, and order syncing between Clover and ecommerce platforms. Instead of relying on manual updates, disconnected dashboards, and spreadsheets, merchants can keep everything aligned automatically.
If your business is growing beyond one Clover POS system, QuickSync can help you manage inventory with more accuracy, less manual work, and better control across every sales channel.


