So, you’ve finally decided to sell on Etsy?
That’s exciting. It also means you’re one step closer to turning your ideas into a real business. But before you start dreaming about your first sale, there’s one thing you need to get right: creating your Etsy account.
Sounds simple, doesn’t it? Well, here’s where many new sellers get stuck.
They create an account, click through a few pages, and suddenly Etsy asks for identity verification, bank details, payment information, shop preferences, and tax details. Within minutes, what looked like a five-minute signup starts feeling confusing.
I’ve seen this happen more times than I can count. The biggest mistake isn’t creating an Etsy account. It’s creating one without understanding what comes next.
Here’s the truth most guides don’t tell you.
Creating an Etsy account is only the first step. You also need to create your Etsy seller account, open your Etsy shop, configure the right settings, and publish listings that buyers can actually discover through Etsy search.
In this guide, I’ll walk you through how to create an Etsy account, activate your Etsy seller account, and open your Etsy shop.
Key Takeaways 📌
- Creating an Etsy account is free, but you’ll need to complete seller verification before you can start accepting orders.
- Preparing your ID, bank account, payment card, and tax details in advance makes the Etsy shop setup much faster.
- Well-optimized listings with strong titles, photos, descriptions, and all 13 tags have a much better chance of ranking in Etsy search.
- Understanding Etsy’s listing, transaction, payment processing, and optional advertising fees helps you price products profitably.
- Managing inventory, processing orders quickly, and responding to customers consistently are key to earning positive reviews and repeat sales.
- As your business grows across Shopify, Amazon, WooCommerce, Square, Clover, or other channels, manual updates become difficult and increase the risk of overselling.
- Using an Etsy integration tool like QuickSync helps keep your products, inventory, orders, images, and videos synchronized automatically, making it easier to scale your business.
Why Sell on Etsy in 2026?
Etsy remains one of the best places to sell handmade products, vintage items, craft supplies, and personalized goods. Here are some of the reasons why it’s worth it to sell on Etsy.
Millions of Buyers Already Search on Etsy
One of Etsy’s biggest strengths is its audience. The marketplace attracts millions of active buyers every year. Many of them already know what they want to buy. They search for handmade gifts, home décor, craft supplies, and custom products instead of browsing randomly.
You Can Start Selling Without a Large Investment
Launching an online store often takes time and money. With Etsy, the process is much simpler. You don’t need to build a website or hire a developer before selling. Once your account is ready, you can open your shop, add products, and begin accepting orders.
Etsy Offers Good Profit Potential for Unique Products
Etsy buyers are often willing to pay more. Unlike mass-market platforms where sellers compete mainly on price, Etsy allows you to highlight the value of your products, craftsmanship, and customization options. This gives small businesses a chance to maintain healthy profit margins.
Etsy Helps New Sellers Build Trust Faster
Winning a customer’s trust isn’t always easy. Etsy already has a strong reputation among online shoppers. Buyers feel comfortable purchasing from independent sellers because the platform offers secure payments, verified reviews, and clear shop policies.
Etsy Gives Small Businesses Room to Grow
Many successful brands started with a single Etsy shop. They used Etsy to test products, understand customer demand, and build loyal buyers before expanding to other sales channels. You can follow the same path and sell on Etsy and Amazon, or Etsy with Clover, Etsy and eBay, etc.
Now that you know why Etsy remains a great place to sell, let’s look at everything you should prepare before creating your Etsy seller account.
What You Need Before Creating an Etsy Seller Account
Before you create your Etsy seller account, take a few minutes to gather the required information. Having everything ready will make the setup process faster.
Create a Valid Email Address for Your Etsy Account
Every Etsy account starts with an email address. Choose one that you check regularly, as Etsy uses it to send verification links, payment updates, order notifications, and important account alerts. You will need an active email address
Keep Your Mobile Phone Ready for Verification
Etsy may ask you to verify your phone number to keep your account secure. Completing this step helps protect your Etsy account. It reduces the risk of unauthorized access. You will require a valid mobile number
Prepare a Government-Issued ID
Etsy verifies your identity before allowing you to sell. Make sure your ID is valid, and the details match the information you provide during registration. You might need a passport or driver’s license, or a national ID card as ID card.
Keep Your Bank Account Details Ready
You’ll need to connect a bank account to receive payments from Etsy. Double-check your bank details to avoid delays in receiving your earnings. Keep your bank account number, routing number (if required), bank name, etc ready.
Add a Credit or Debit Card
Etsy requires a payment card to charge listing fees, transaction fees, and other seller charges. Use an active card such as a credit card, debit card, etc that supports online payments. Make sure you have online payments enabled.
Gather Your Business and Tax Information
Depending on your location, Etsy may ask for business and tax details during setup. Keeping this information ready makes the registration process much smoother. You will need individual or sole proprietorship details.
Also Read: How to Connect eBay to Etsy
How to Create an Etsy Account (Step-by-Step)
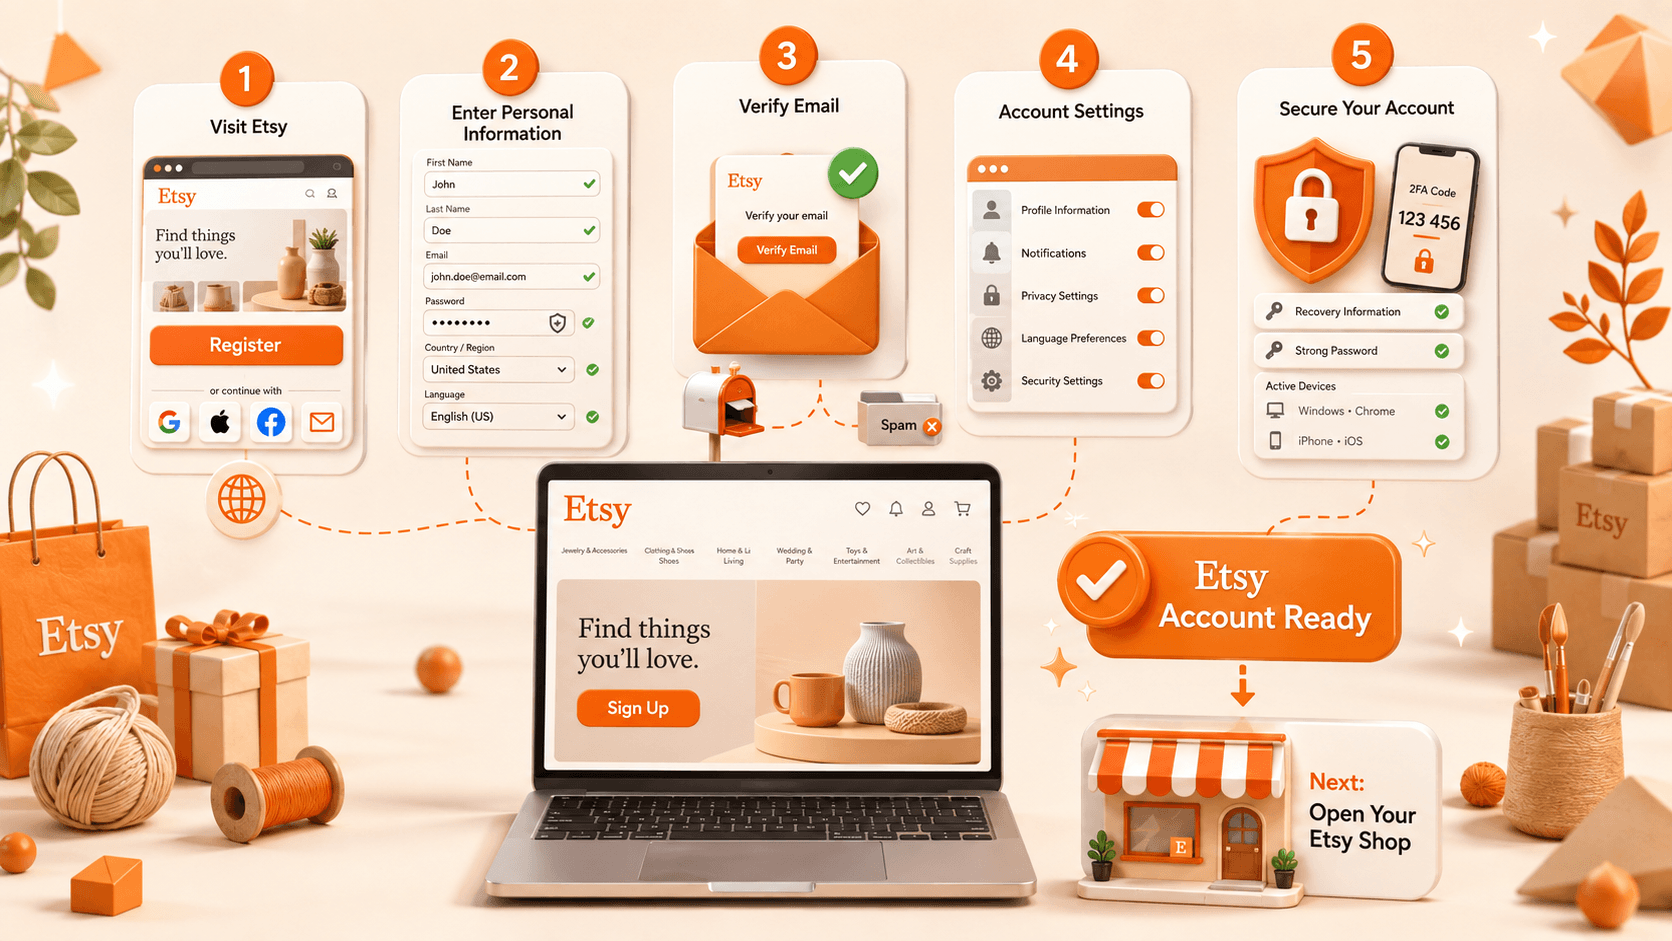
Now that you have everything ready, it’s time to create your Etsy account. The process is simple and usually takes only a few minutes. The important part is completing each step correctly. Let’s start with the first step.
Step 1: Visit Etsy and Start the Sign-Up Process
- Go to the official Etsy website.
- Click Sign in in the top-right corner of the homepage. A pop-up window will appear where you’ll see the option to Register if you’re creating a new account.
- You can create an Etsy account using your email address or continue with your Google, Apple, or Facebook account.
- Choose the method you’ll use regularly because you’ll need it every time you sign in.
Step 2: Enter Your Personal Information
- Once you’re on the registration page, enter the information required to create your Etsy account.
- Make sure every detail is accurate because Etsy will use it during verification and future account communication.
- Choose a strong password and avoid using the same password you use for other websites. A secure account is always easier to protect.
Information you’ll need:
- First and last name
- Email address
- Strong password
- Preferred language
- Country or region
Step 3: Verify Your Email Address
- After submitting your details, Etsy will send a verification email to the address you provided.
- Open the email and click the verification link to activate your Etsy account.
- If you don’t see the email within a few minutes, check your spam or promotions folder before requesting another verification email.
- Before moving ahead, make sure you open the verification email and click the confirmation link
- Activate your Etsy account and sign in successfully
Step 4: Review Your Etsy Account Settings
Once your account is active, take a few minutes to review your account settings. This is a good time to update your profile information and notification preferences before creating your Etsy seller account.
Completing these settings now makes managing your shop much easier later.
Recommended settings to review:
- Profile information
- Notification preferences
- Privacy settings
- Language preferences
- Security settings
Step 5: Secure Your Etsy Account
Before opening your Etsy shop, spend a minute securing your account. Adding extra security now helps protect your business as it grows.
I always recommend enabling two-factor authentication. It adds another layer of protection without making sign-in complicated.
Security checklist:
- Enable two-factor authentication
- Use a unique password
- Update recovery information
- Review active devices
Congratulations! Your Etsy account is now ready. Now comes the exciting part: turning it into an Etsy seller account so you can open your shop and start selling.
Also Read: How to Get Sellers for Ecommerce Website
How to Create an Etsy Seller Account
Your Etsy account is now active, but you still can’t sell products. To start selling on Etsy, you need to convert your regular Etsy account into an Etsy seller account. This unlocks Shop Manager, Etsy Payments, product listings, order management, and every tool you’ll need to run your Etsy business.
The setup only takes a few minutes if you follow each step carefully.
Step 1: Click “Sell on Etsy”
- After signing in, click Sell on Etsy from the Etsy homepage.
- You’ll be redirected to the seller onboarding page where Etsy guides you through the shop setup process.
- This is where your Etsy account officially becomes an Etsy seller account.
- From here, you’ll start entering the details needed to open your Etsy shop.
Step 2: Choose Your Shop Preferences
The next step is configuring your shop preferences. These settings tell Etsy where your business operates and how your listings should appear.
Take a moment to review each option carefully. Some settings can be changed later. Choosing the correct preferences from the beginning helps avoid unnecessary edits.
You’ll be asked to choose:
- Shop language
- Shop country
- Shop currency
Step 3: Verify Your Identity
Etsy requires seller verification before you can start selling. This step helps keep the marketplace secure and protects both buyers and sellers.
Follow the instructions carefully and make sure the information matches your government-issued ID. If your details don’t match, Etsy may ask you to verify them again.
You’ll typically need:
- Government-issued ID
- Legal name
- Date of birth
- Residential address
Step 4: Connect Your Bank Account
Next, you’ll connect the bank account where Etsy will send your earnings. Make sure the banking information is accurate because incorrect details can delay your payouts.
Many sellers prefer using a separate bank account for their business. It makes bookkeeping easier as sales increase.
You’ll need:
- Bank account number
- Routing number or equivalent
- Account holder name
- Bank details
Step 5: Set Up Etsy Payments
Etsy Payments lets you accept payments from customers using multiple payment methods, including credit cards, debit cards, Apple Pay, Google Pay, and Etsy gift cards.
Complete this step carefully because your shop can’t receive customer payments until Etsy Payments is fully configured.
Step 6: Review Your Seller Information
- Before continuing, review every detail you’ve entered. Correcting small mistakes now is much easier than updating them after your shop goes live.
- Check your shop preferences, payment information, bank details, and verification status one last time before moving to the next step.
- Once everything looks correct, you’re ready to create your Etsy shop and choose your shop name.
- This is where your business starts taking shape.
How to Open an Etsy Shop
Opening an Etsy shop is the next step after creating your Etsy account. It allows you to showcase your unique products to millions of buyers worldwide. In this section, you’ll learn how to set up your shop.
Choose Your Shop Language
Your shop language is the language buyers will see in your product listings, shop policies, and other store information. Choose the language you plan to use when writing your listings. This also helps Etsy show your products to the right audience.
Select Your Shop Country
Choose the country where your business is based. Etsy uses this information for taxes, shipping options, and payment settings. Make sure you select the correct country because changing it later can be more difficult.
Choose Your Shop Currency
Select the currency you want to use when selling on Etsy. It’s best to choose the same currency as your bank account whenever possible. This helps you avoid extra currency conversion fees and keeps payments simple.
Pick a Memorable Shop Name
Your shop name is an important part of your brand. Choose a name that is short, easy to remember, and relevant to what you sell. Make sure it’s unique so customers can easily find your shop. Take your time because changing it later is not always easy.
Complete Your Shop Preferences
Etsy will ask a few questions about your business, such as whether you sell full-time or part-time and how you plan to ship your products. These questions help personalize your seller dashboard. You can always update your business as it grows, so don’t worry about getting everything perfect on day one.
Also Read: How to Promote Etsy Shops on Social Media
How Long Does It Take to Open an Etsy Shop?
Most sellers can go from zero to a published listing in under an hour, but a few steps run on Etsy’s timeline rather than yours.
“Managing your Etsy shop effectively means treating it like a real business from day one. Consistency in updating listings, responding to customers, and monitoring performance is what separates successful sellers from those who struggle.” – Sarah Johnson, eCommerce Business Consultant
- Account creation time: Creating the account itself, from registration to email verification, usually takes five to ten minutes. This part is entirely in your control.
- Identity verification: Etsy sometimes requests a government ID before letting new shops accept payments, especially in regions with stricter financial regulations. This check can clear instantly or take up to 24 hours depending on your country.
- Bank verification: Connecting your bank account for payouts is usually instant through Etsy’s verification partner. But manual review adds a day or two if something doesn’t match automatically.
- Publishing your first listing: Once your shop is open, publishing a listing takes minutes if your photos and description are ready in advance. The bottleneck is almost always prep work, not the platform.
- Common delays: ID mismatches, incomplete bank details, and VPN use during sign-up are the three things most likely to slow you down. Complete registration from your actual location on a stable connection to avoid unnecessary holds.
How to Create Your First Etsy Listing
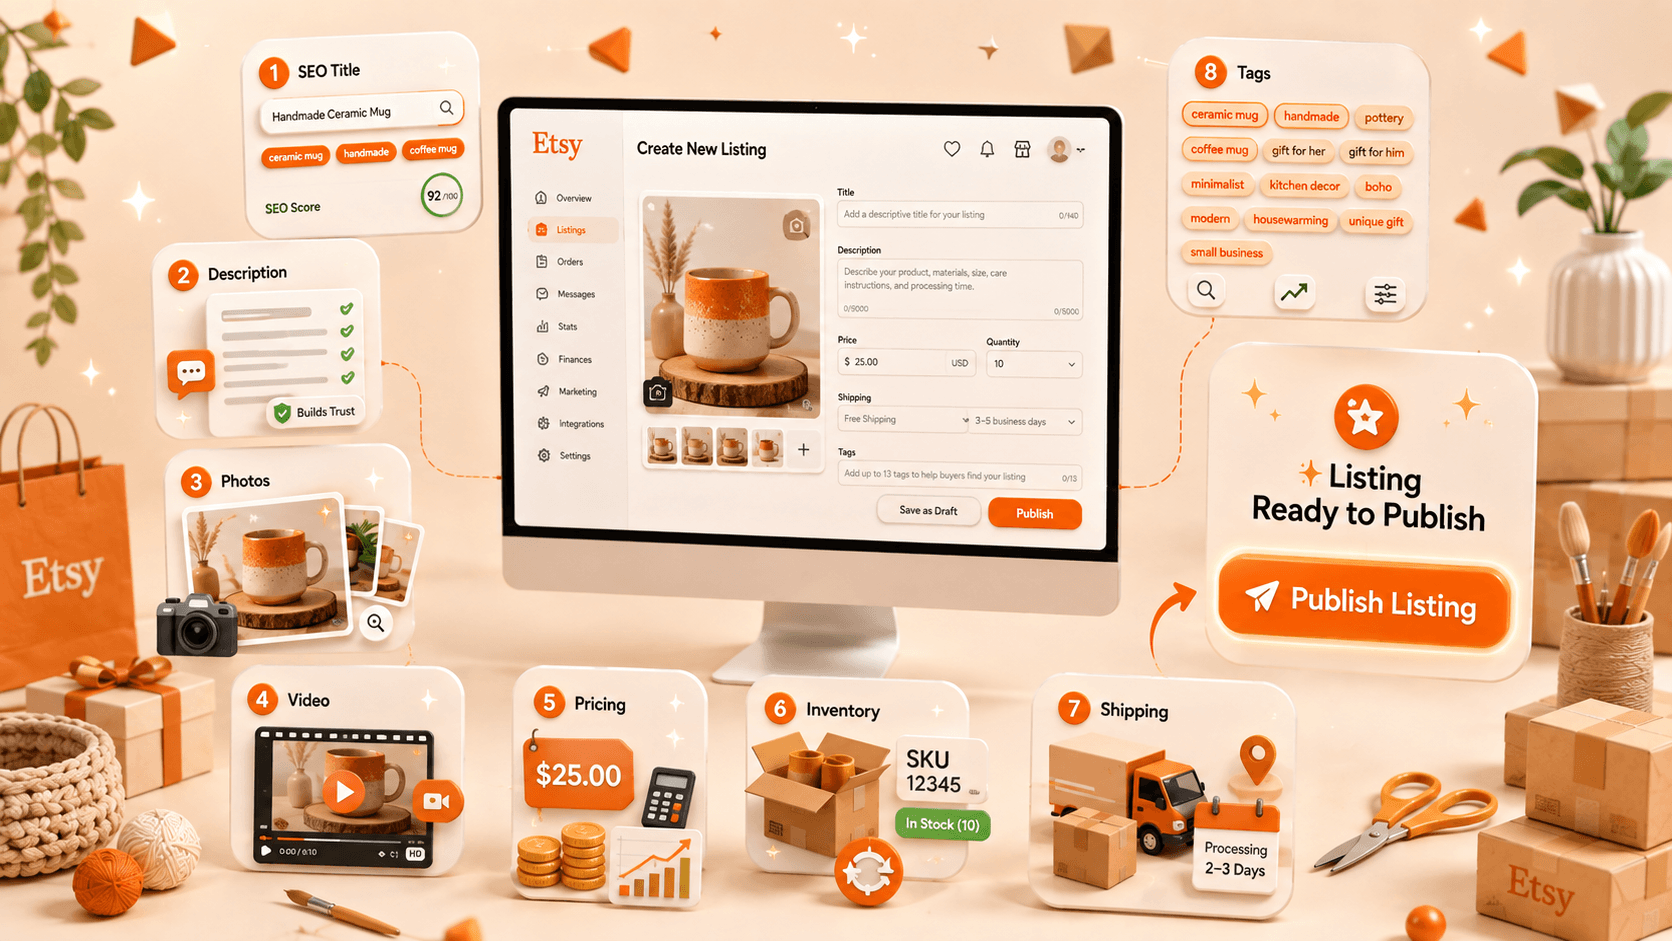
Your first listing is what actually starts generating sales, and Etsy’s search algorithm reads every field you fill in here. Rushing this step is the single most common reason new shops sit at zero views for weeks. Take the time to fill in each field properly instead of leaving Etsy’s defaults in place.
Write a Title Buyers Can Find
Your product title helps buyers discover your listing. Start with your main keyword because Etsy gives more importance to the first few words. Keep your title clear and natural. Include important details like the product type, material, size, or style, but don’t fill it with too many keywords.
Write a Description That Builds Trust
A good product description answers the questions buyers have before they purchase. Explain what the product is made of, its size, colors, and how long it takes to ship. Keep the first few lines clear because many buyers see only the beginning before opening the full description.
Add High-Quality Product Photos
Photos are one of the biggest reasons people click on a listing. Use at least five clear images from different angles. Make your first photo bright and simple because it appears in Etsy search results. Include a close-up and one photo that shows the product’s actual size.
Upload a Short Product Video
A short video helps buyers understand your product better. Show the product from different angles or demonstrate how it works. Even a simple 5- to 15-second video can make your listing stand out and increase buyer confidence. This added visual element can improve your chances of making a sale.
Set the Right Price
Choose a price that covers your product cost, Etsy fees, packaging, and your profit. Don’t lower your price just to compete with other sellers. A fair price helps you build a sustainable business while still offering value to customers. Remember to factor in the shipping price to avoid unexpected costs.
Update Your Inventory
Add the correct stock quantity for every product and variation, such as different sizes or colors. Keeping your inventory updated helps prevent overselling and reduces the chance of order cancellations. Regularly syncing your inventory across platforms ensures accuracy and saves time.
Set Your Shipping Details
Choose a processing time you can realistically meet. Add accurate shipping costs and delivery options for your customers. Clear shipping information helps buyers know when they can expect their orders and builds trust in your shop. Note that offering multiple shipping options can attract more customers.
Use All 13 Tags
Etsy gives you 13 tags for every listing. Use all of them to describe your product with words buyers are likely to search for. Choose specific phrases instead of single words to help your products appear in more relevant searches. Utilizing tags related to similar products can improve your shop’s visibility.
Understanding Etsy Fees Before You Start Selling
Opening an Etsy account is free, but selling on Etsy comes with a few marketplace fees. Understanding these costs before you publish your first listing will help you price your products correctly. You can protect your profit margins.
The table below covers the main Etsy fees every seller should know before starting their Etsy business.
| Etsy Fee | Current Cost | When It Applies |
| Listing Fee | $0.20 USD per listing | Charged each time you publish or renew a listing. Listings automatically renew after a sale if auto-renew is enabled. |
| Transaction Fee | 6.5% | Charged on the total sale amount, including the item price, shipping, and gift wrapping (where applicable). |
| Payment Processing Fee | Varies by country | Charged whenever a buyer pays through Etsy Payments. The percentage and fixed fee depend on your shop country. |
| Offsite Ads Fee | 12%–15% | Charged only when a customer purchases after clicking an Etsy Offsite Ad. The percentage depends on your annual sales. |
| Currency Conversion Fee | 2.5% | Applies when Etsy converts your funds into a different payout currency. |
| Etsy Shipping Labels | Varies | Optional fee if you purchase shipping labels directly through Etsy. Pricing depends on the shipping carrier and destination. |
Before setting your product prices, include these fees in your calculations. A product that looks profitable at first can generate much lower earnings after Etsy deducts its fees.
Now that you understand Etsy fees, let’s look at how you’ll actually receive your payments through Etsy Payments.
How Etsy Payments Work
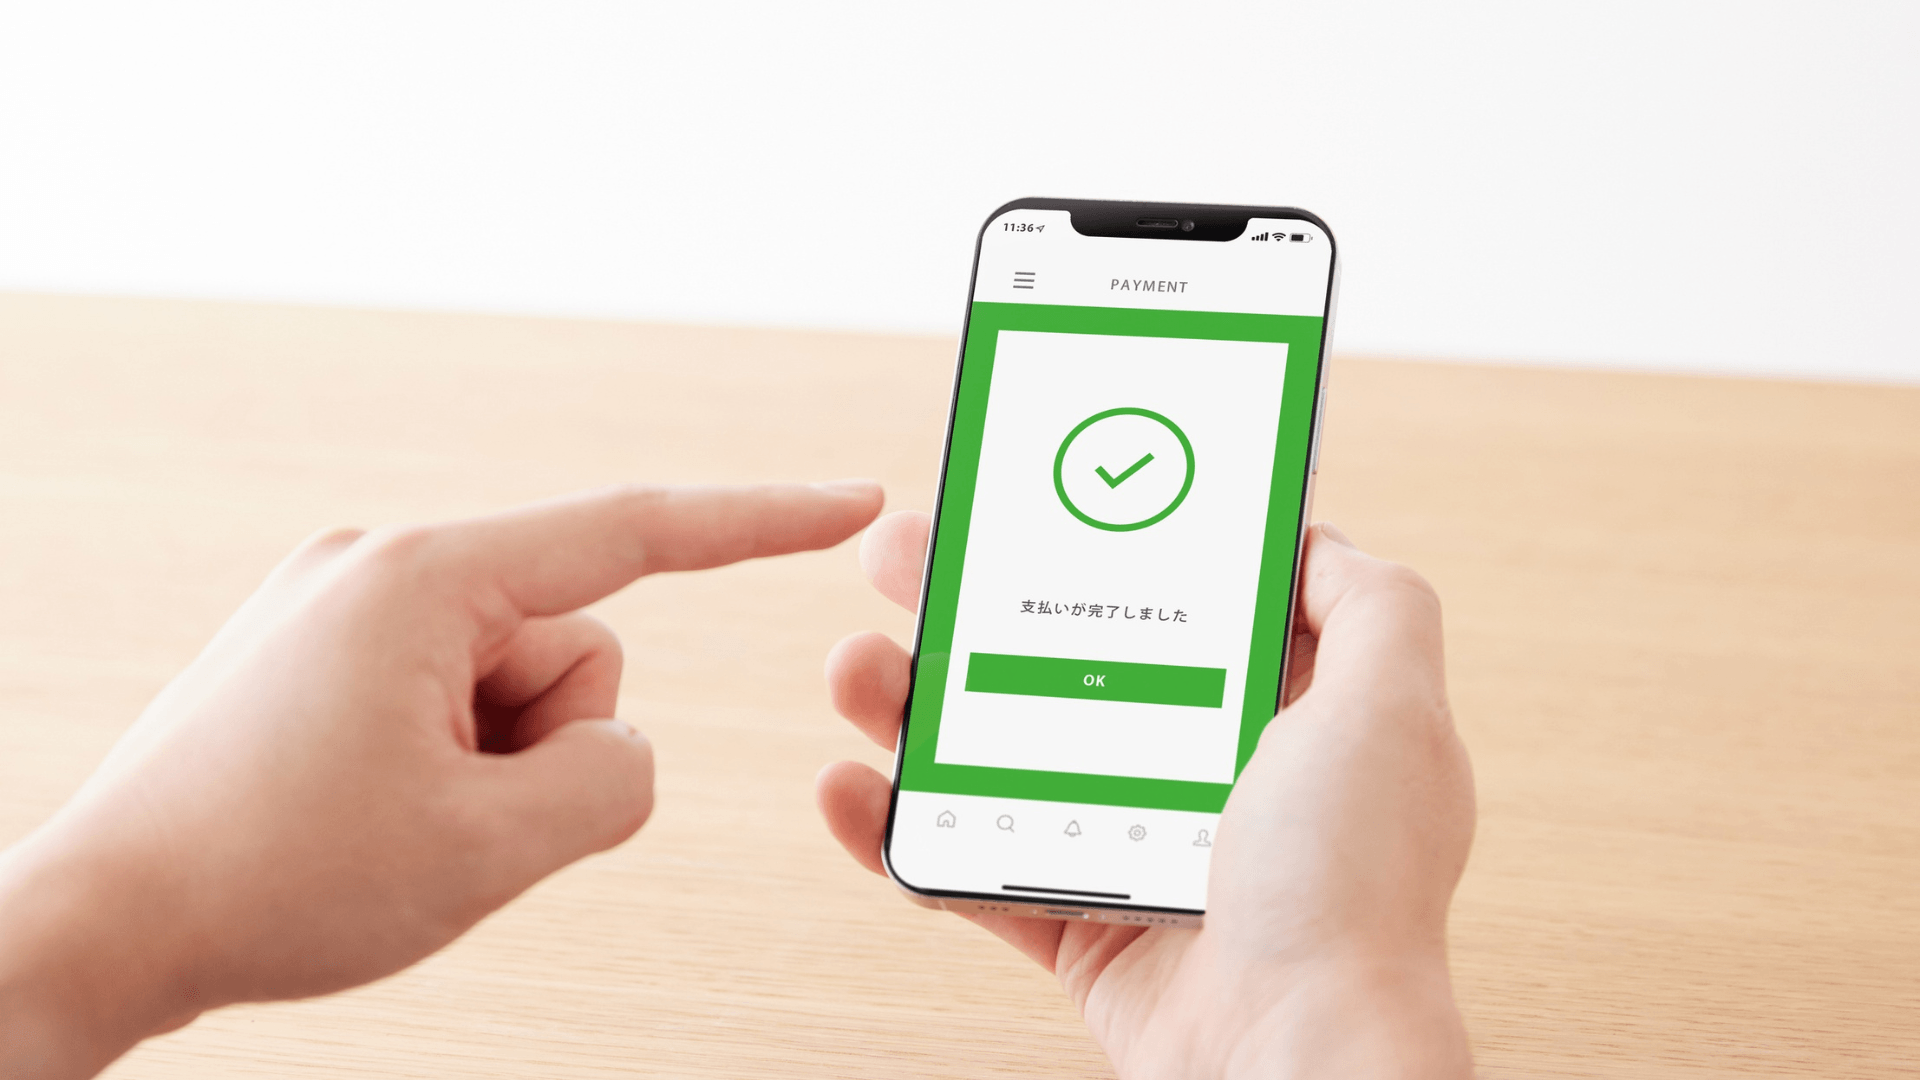
Etsy Payments is mandatory in most countries, so this isn’t really a choice. When someone buys, the money doesn’t go to your bank. It lands in your Etsy payment account, where Etsy deducts fees. And what’s left is deposited on your chosen schedule.
That gap trips up new sellers who watch a sale come in and check their bank in a panic. Nothing’s wrong. It’s sitting in Shop Manager under Finances until the next deposit. Set that to daily early on, for cash flow.
- Bank verification: Your bank account name must match your Etsy account name exactly. Mismatches trigger review and hold payouts.
- Payment schedule: Choose your deposit frequency in Finances. Daily suits most small shops.
- Apple Pay: On by default for eligible buyers, and it converts noticeably better on mobile.
- Google Pay: Also on by default. You don’t configure either one.
- Credit cards: All major cards run through Etsy Payments, which is what your processing fee covers.
- Payment reserves: New shops sometimes have a percentage of funds held up to 45 days. Normal, temporary, and nobody warns you.
- Updating bank details: Change them in Finances, and expect a short verification pause afterwards.
Also Read: How to Sync Etsy With QuickBooks for Automated Accounting
Etsy SEO Tips That Help New Shops Get Found
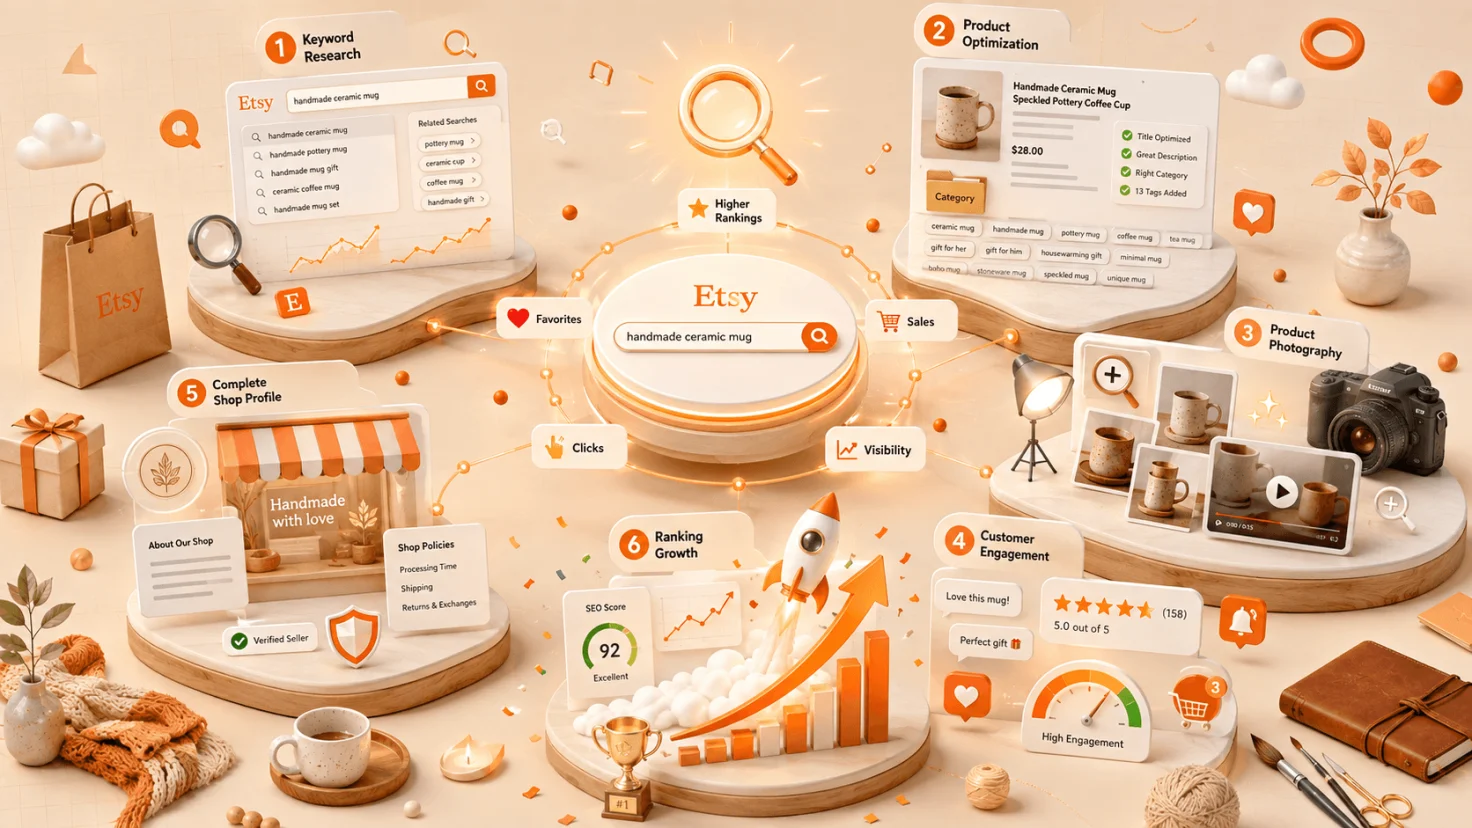
Etsy search rewards two things: matching what a buyer typed, and proving your listing performs. Most advice covers the first and ignores the second. That’s why keyword-perfect listings still sit at zero views. Here’s how to optimize your Etsy listings and shop to attract more potential customers.
Do Keyword Research Inside Etsy
Etsy’s own search bar is the best free tool you have. Start typing like Etsy top selling items, best selling items on Etsy, trending products, etc and autocomplete shows real queries buyers are entering right now. Scroll to “related searches” at the bottom of results pages too because that’s Etsy telling you what it associates with your term.
Understand How Etsy Search Works
Etsy wants to show buyers the most relevant products. It looks at your keywords first. Then it checks how shoppers interact with your listing. Listings that get more clicks, favorites, and sales usually appear higher in search results. That’s why your first few sales are so important.
Write Descriptions for Buyers
Write your product description for real people, not search engines. Explain what the product is made of, its size, how to use or care for it, and when it will ship. A clear description helps buyers feel confident before they purchase. Make your description engaging and informative.
Choose the Right Tags and Categories
Select the category that best matches your product. Then use all 13 tags with phrases buyers are likely to search for. Specific keywords usually perform better than broad words. This attracts shoppers looking for exactly what you sell. Proper tagging boosts your shop’s visibility.
Use Great Photos and Videos
Your first product photo is often the first thing buyers notice. Make it bright, clear, and attractive. Adding a short product video can also increase buyer confidence and encourage more people to click on your listing. High-quality visuals are key to sales success.
Complete Your Shop Profile
A complete Etsy shop looks more professional. Add a shop banner, logo, About section, and clear shop policies. Buyers are more likely to trust a well-designed shop. This can lead to more sales and better search rankings. Don’t forget to link your Etsy app for easier shop management on the go.
Also Read: eBay vs Etsy: Which Platform Is Actually Better for Selling in 2026?
How to Manage Your Etsy Shop After Launch
Opening your Etsy shop is only the beginning. Once your products go live, your daily focus shifts from setting up your shop to running it efficiently. The way you manage your products, orders, customers, and inventory has a direct impact on your reviews, search rankings, and future sales.
Here are the key areas every Etsy seller should manage regularly.
Keep Your Product Listings Updated
Your listings should never stay the same forever. As your business grows, you’ll learn which products sell well and which listings need improvement. Review your titles, descriptions, photos, prices, and tags regularly.
Update product information whenever you launch a new version. Keeping your listings fresh also helps ensure buyers always see accurate information before making a purchase.
Manage Your Inventory Carefully
If you sell products with different colors, sizes, or materials, update inventory for every Etsy product variation. Make inventory checks part of your daily routine, especially during busy seasons like holidays and special sales.
As you expand to multiple platforms, inventory management becomes much harder. Real-time inventory syncing helps ensure every sale updates stock across all your connected sales channels.
Process Orders Quickly
Fast order processing creates happy customers. Buyers appreciate quick shipping and clear communication after placing an order. Check your Etsy order dashboard every day for new orders and try to process orders faster.
Package products carefully, ship them within your stated processing time, and upload tracking information whenever possible. Consistent order fulfillment helps you earn positive reviews.
Respond to Customers Promptly
Customer service plays a big role in building a successful Etsy business. Buyers often have questions about customization, shipping, product details, or delivery times. Try to respond to messages as quickly as possible.
Friendly communication builds trust and shows buyers that you care about their experience. Even if a problem occurs, a quick response can often turn an unhappy customer into a satisfied one.
Monitor Your Shop Performance
Successful Etsy sellers regularly review their shop’s performance. Etsy Shop Manager provides useful information about your traffic, product views, favorites, conversion rate, and sales. Use this data to understand what buyers like most.
If one product receives lots of views but very few sales, consider improving its photos, pricing, or description. If another product performs well, look for opportunities to create similar listings.
When Should You Use Etsy Integration Software?
Managing a single Etsy shop is fairly simple. But as your business grows, things become more complicated. You may start selling on Etsy with Shopify, Amazon, WooCommerce, Square, Clover, or other sales channels. Suddenly, you’re updating products, inventory, and orders in multiple places every day.
That’s where an Etsy integration tool like QuickSync can help. Instead of managing each store separately, QuickSync automatically keeps your products, inventory, images, videos, and orders synchronized across your connected sales channels. It saves hours of manual work, reduces mistakes, and makes it easier to grow your business.
Signs It’s Time to Use Etsy Integration Software
- You’re selling on multiple sales channels. Selling on Etsy, Shopify, Amazon, WooCommerce, Square, or Clover means updating products in several places. QuickSync keeps every connected store synchronized automatically.
- You’re updating product information manually. Editing titles, descriptions, prices, images, or videos on every platform takes time. QuickSync’s product syncing feature syncs information across all connected channels with just one update.
- You’re struggling to manage inventory. Manual stock updates often lead to overselling. QuickSync syncs inventory in real time whenever a product sells. This helps you keep accurate stock everywhere.
- You’re managing orders from different platforms. Switching between Etsy, Shopify, Amazon, and other dashboards slows your workflow. QuickSync’s order syncing feature brings all your orders into one channel, so they’re easier to manage.
- You want to sell on more marketplaces. Expanding your business shouldn’t mean rebuilding every product listing. QuickSync lets you list products on multiple sales channels while keeping them synchronized.
- You want listings that follow Etsy’s rules. QuickSync automatically cleans product titles and tags to match Etsy’s requirements, supports product video syncing, and intelligently handles Etsy’s two-option variation limit by combining extra option groups.
- You’re ready to scale your business. Whether you’re adding new marketplaces or opening a physical store with Square or Clover, QuickSync keeps your inventory, products, and orders synchronized as your business grows.
Conclusion
Opening an Etsy shop is simple. Building a profitable Etsy business takes the right strategy and consistent effort. Create high-quality listings, price your products for profit, deliver excellent customer service, and optimize your shop for Etsy search. As your business expands to new sales channels, managing products, inventory, and orders manually can quickly become time-consuming and lead to costly mistakes.
QuickSync helps you grow without the extra work. It automatically syncs your products, inventory, images, videos, and orders between Etsy, Shopify, Amazon, WooCommerce, Square, Clover, and other supported platforms. With everything kept up to date in real time, you can spend less time managing your stores and more time creating products, attracting customers, and growing your business.