Wondering how to set up your Shopify store without missing any important steps? We’ve got you. A successful Shopify store setup involves much more than selecting a theme and uploading products. Store settings, payments, shipping, SEO, and customer experience all play a role in building a Shopify store that is ready to grow.
If anything is done wrong, it can quietly reduce sales before your business has a chance to grow. That’s why following a structured setup process helps you avoid these costly mistakes.
To help you get everything right the first time, this blog covers every essential step of the Shopify setup process. From how to set up your Shopify store and customize your theme to adding products and launching your business, you will learn everything needed to build a professional store with confidence.
TL;DR: How to Set Up Your Shopify Store
- Setup time: Around 1 to 3 hours for a basic store and 1 to 3 days for a fully configured, launch-ready store.
- Difficulty level: Beginner-friendly. No coding experience is required.
- What you need: An email address, a store name, product details, branding assets, and payment information.
- Core setup steps: Create your Shopify account, choose a plan, configure store settings, customize your theme, create navigation and pages, connect a domain, add products, set up payments and shipping, test your store, and launch.
- After launch: Optimize your store for SEO, install essential apps, monitor performance, and continue improving the customer experience.
- Selling on multiple channels: If you also sell on Amazon, eBay, Etsy, TikTok Shop, or Walmart Marketplace, tools like QuickSync can help keep products, inventory, and orders synchronized across all channels.
What You Need Before You Start Setting Up Your Shopify Store
Before you open Shopify and start clicking through the setup, taking five minutes to gather what you need saves a lot of stopping and starting. We have seen many sellers begin the setup process and then stall halfway through because they did not have something ready. Here is everything to have on hand before you begin.
- A valid email address: Use a business email address if you have one. It makes your store feel more professional and keeps business communications separate from personal ones.
- A store name idea: You will need a store name to create your account. It does not have to be your final brand name, but it helps to have something in mind. You can change your display name later but your myshopify.com subdomain stays fixed.
- Basic product information: Know what you are selling, at what price, and whether your products come in variants like different sizes or colors. You do not need everything perfect to start, but having your first few products ready speeds things up significantly.
- Product photos: Even placeholder images help you see how your store looks. High-quality photos make a real difference to buyer trust and conversion, so plan to invest time here.
- A payment method for your subscription: After your free trial you will need to pay for a Shopify plan. Have a credit or debit card ready for when the trial period ends.
- Bank account details: You will need these to set up Shopify Payments so you can receive money from sales. Have your account number and routing number ready for US sellers or sort code and account number for UK sellers.
- A sense of your brand: Think about the colors, fonts, and overall feel you want for your store. You do not need a fully designed brand guide, but having a general direction makes the theme customization step much faster.
- Optional but helpful: A custom domain name if you have already purchased one from another provider. If not, you can buy one directly through Shopify during setup.
With these things ready, your Shopify store setup will move smoothly from the first step to the last without unnecessary pauses. Now, let us get into the actual process.
How to Set Up Your Shopify Store Step by Step in 2026
Now that you have everything you need, it is time to build your Shopify store. The following steps follow Shopify’s recommended setup flow, helping you configure your store correctly from the beginning. Complete each step to avoid unnecessary rework later and launch with confidence.
Step 1: Create Your Shopify Account and Start Your Free Trial
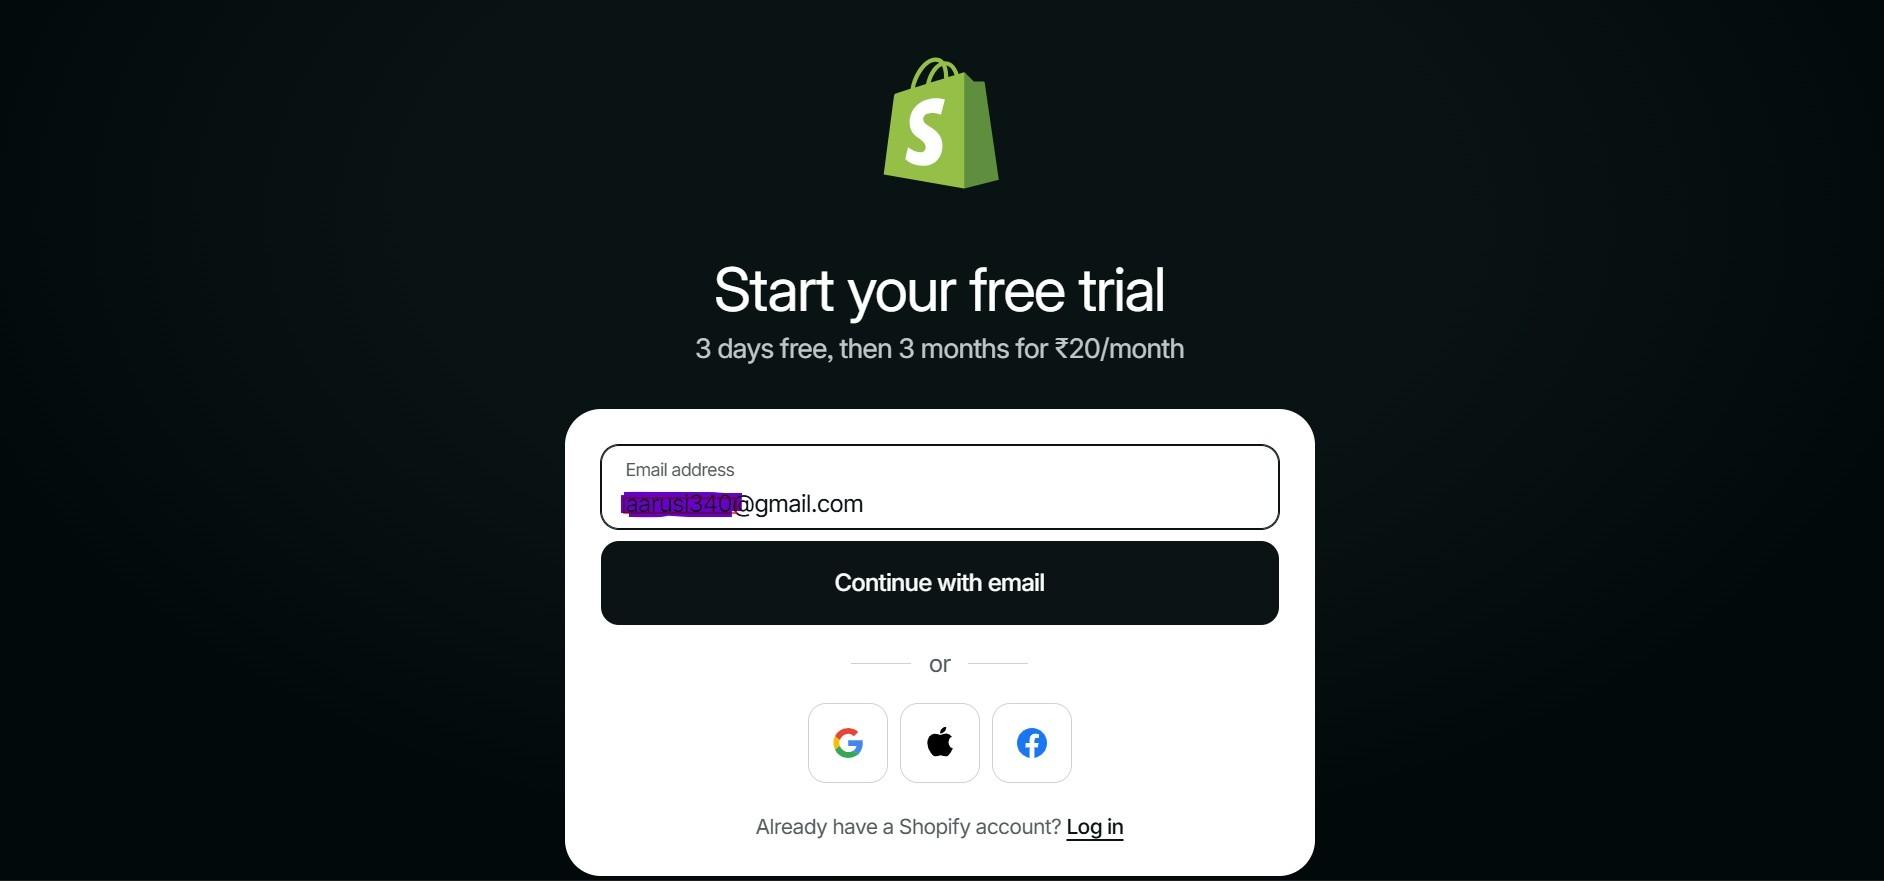
Go to Shopify.com and click the Start Free Trial button. You will be prompted to enter your email address, create a password, and choose a store name. The store name becomes part of your default Shopify URL, something like yourstorename.myshopify.com, so choose something that reflects your brand.
After entering your basic details, Shopify asks a few questions about your business to personalize your setup experience. These might include whether you are just starting out or already have an existing business, and what you plan to sell. Answer honestly, and Shopify will tailor the dashboard setup recommendations to your situation. You can always change things later.
- Free trial length: Shopify typically offers a 3-day free trial followed by a heavily discounted first month on a paid plan
- No credit card required: You do not need to enter payment information to start Shopify’s free trial
Pro tip: If you plan to use a custom domain name that reflects your brand, your myshopify.com URL does not need to match it exactly. Choose a store name that is close to your brand but do not stress over perfection at this stage.
Step 2: Choose the Right Shopify Plan for Your Business
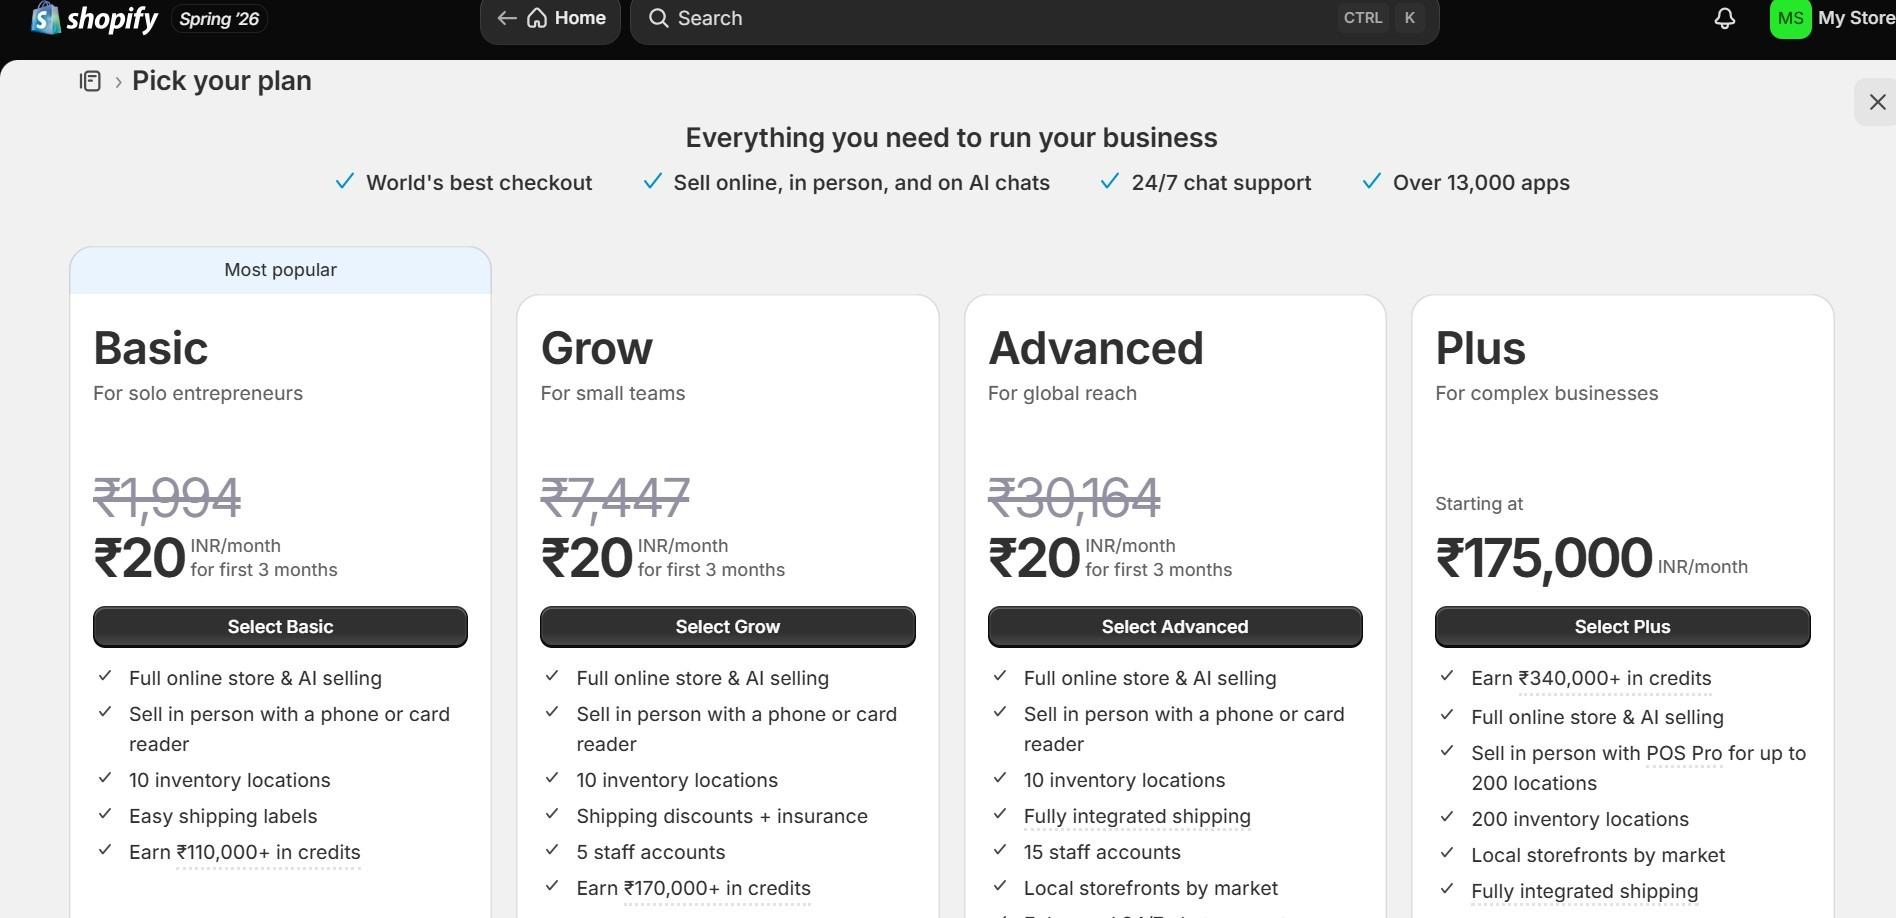
After your trial period, you need to choose a Shopify plan. This is a decision worth thinking through carefully because the plan affects your transaction fees, the number of staff accounts you can create, and the reporting features available to you. Getting this right from the start saves you from switching plans mid-operation.
| Feature | Basic | Grow | Advanced |
| Monthly cost | $39/mo | $105/mo | $399/mo |
| Staff accounts | 2 | 5 | 15 |
| Transaction fees (without Shopify Payments) | 2% | 1% | 0.6% |
| Shipping discount | Up to 77% | Up to 88% | Up to 88% |
| Reports | Basic Reports | Standard Reports | Advanced reports & custom reporting |
| Best for | New and small stores | Growing stores with a team | High-volume stores |
One important thing to understand about transaction fees is that if you use Shopify Payments as your payment processor, transaction fees are waived entirely on all plans. If you use a third-party payment gateway like PayPal or Stripe, the transaction fee on top of the gateway’s own processing fee applies. For most new sellers, Shopify Payments is the simplest and most cost-effective choice.
Step 3: Set Up Your Shopify Account Details
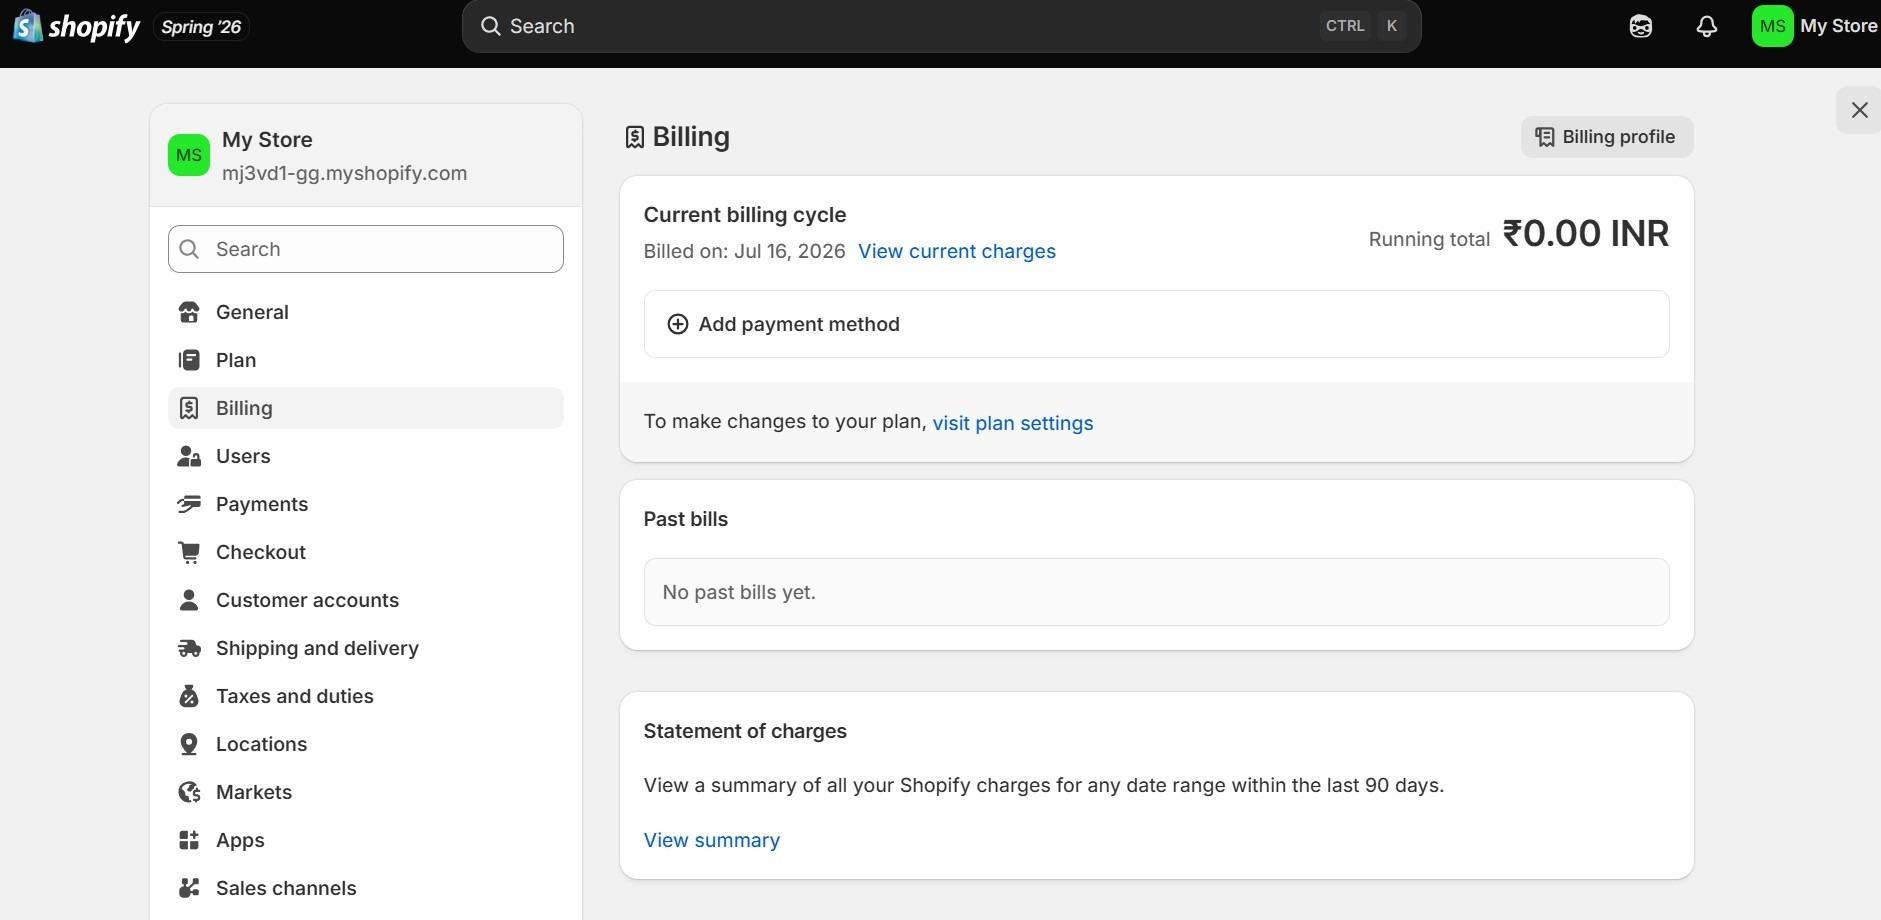
Before you start building the storefront, spend a few minutes in your Shopify store settings to get your account details right. These settings affect everything from how customers contact you to how Shopify processes your payouts.
- Business name and contact information: Go to Settings and then Store Details. Enter your legal business name, address, and contact email. This information appears on customer receipts and legal documents.
- Store currency: Set your store currency to match where you primarily sell. Shopify supports multiple currencies, but your base currency should match your bank account.
- Time zone: Set your local time zone so that order timestamps, analytics, and reports all display in your local time.
- Billing information: Add your payment method so your subscription processes smoothly when the trial ends.
These details sound administrative, but getting them right at the start prevents confusing discrepancies in your orders and financial reports later. It takes ten minutes and pays off every time you look at your dashboard.
Step 4: Choose and Customize Your Shopify Theme
Your theme is the visual framework of your store. It determines the layout, the way products are displayed, how navigation works, and the overall first impression buyers get when they land on your page. Shopify makes theme selection easier than most sellers expect through its built-in Shopify Theme Store.
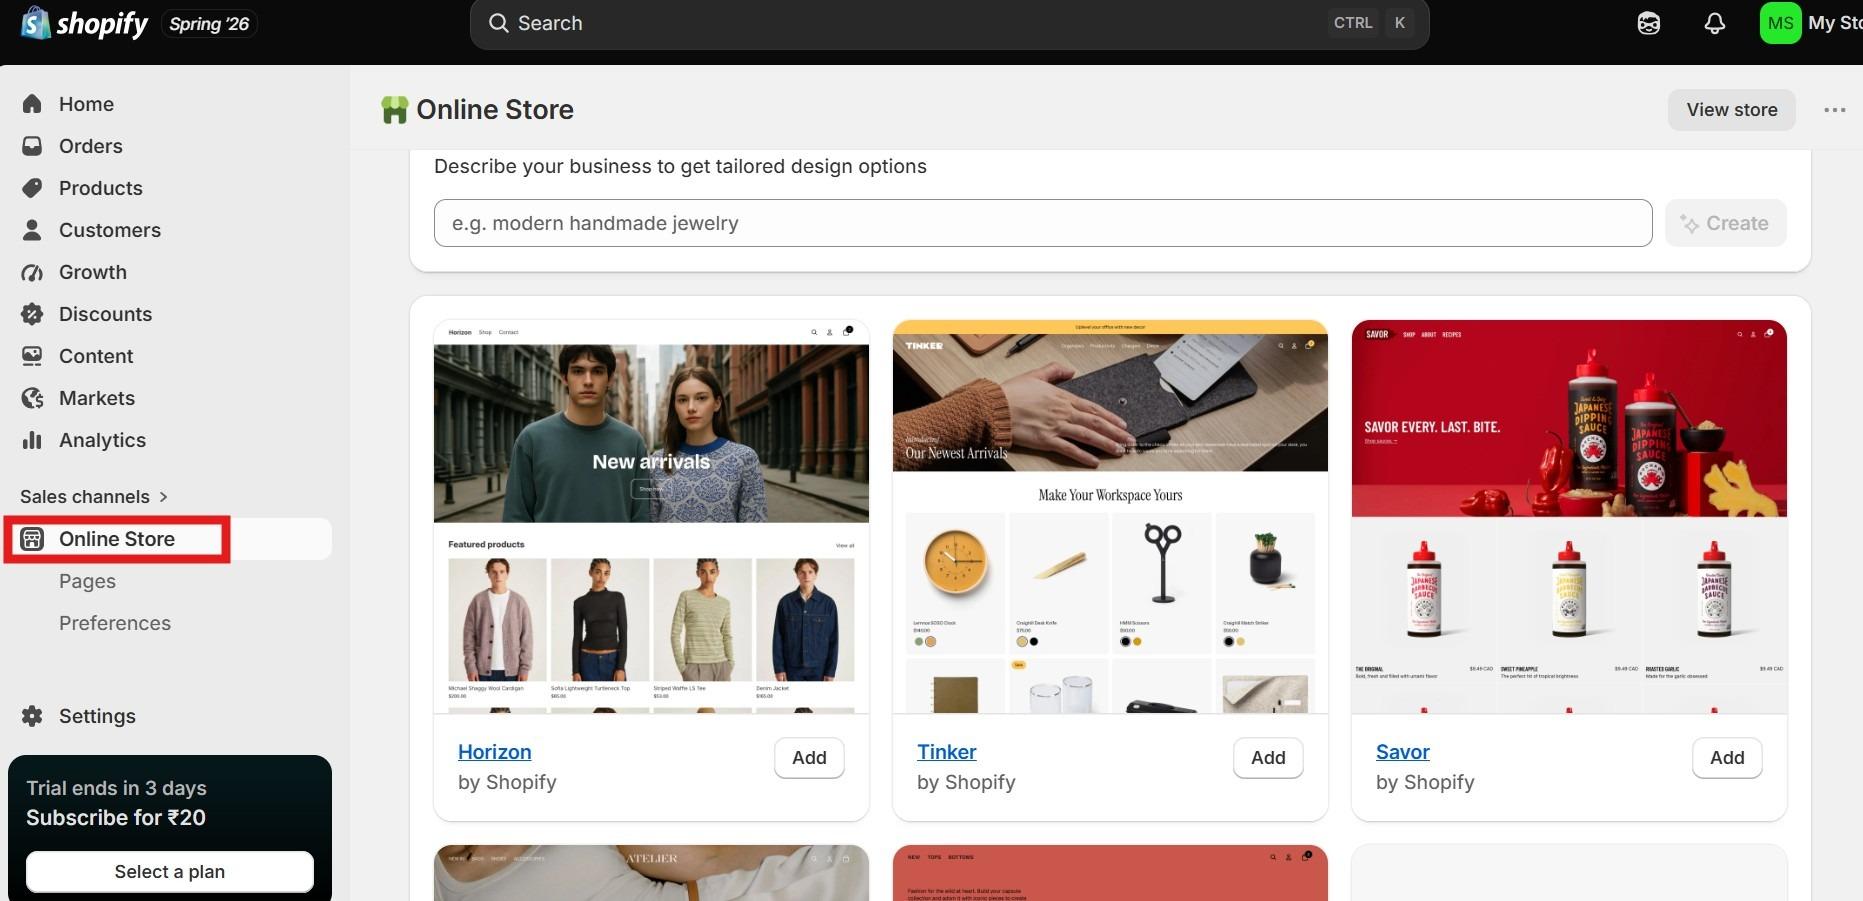
To access it, go to Online Store in your left-hand dashboard menu and select Themes. You will see your current default theme and a button to visit the theme store, where you can browse free and paid options.
Free Themes vs Paid Themes
- Free themes: Most new Shopify stores can start with a free theme. They are clean, mobile friendly, easy to customize, and provide all the essential features needed for a professional online store.
- Paid themes: Paid themes include more customization options and advanced features right out of the box. Although they require a one-time payment of around $180 to $350, they can save time and reduce the need for extra apps as your store grows.
How to Customize Your Theme
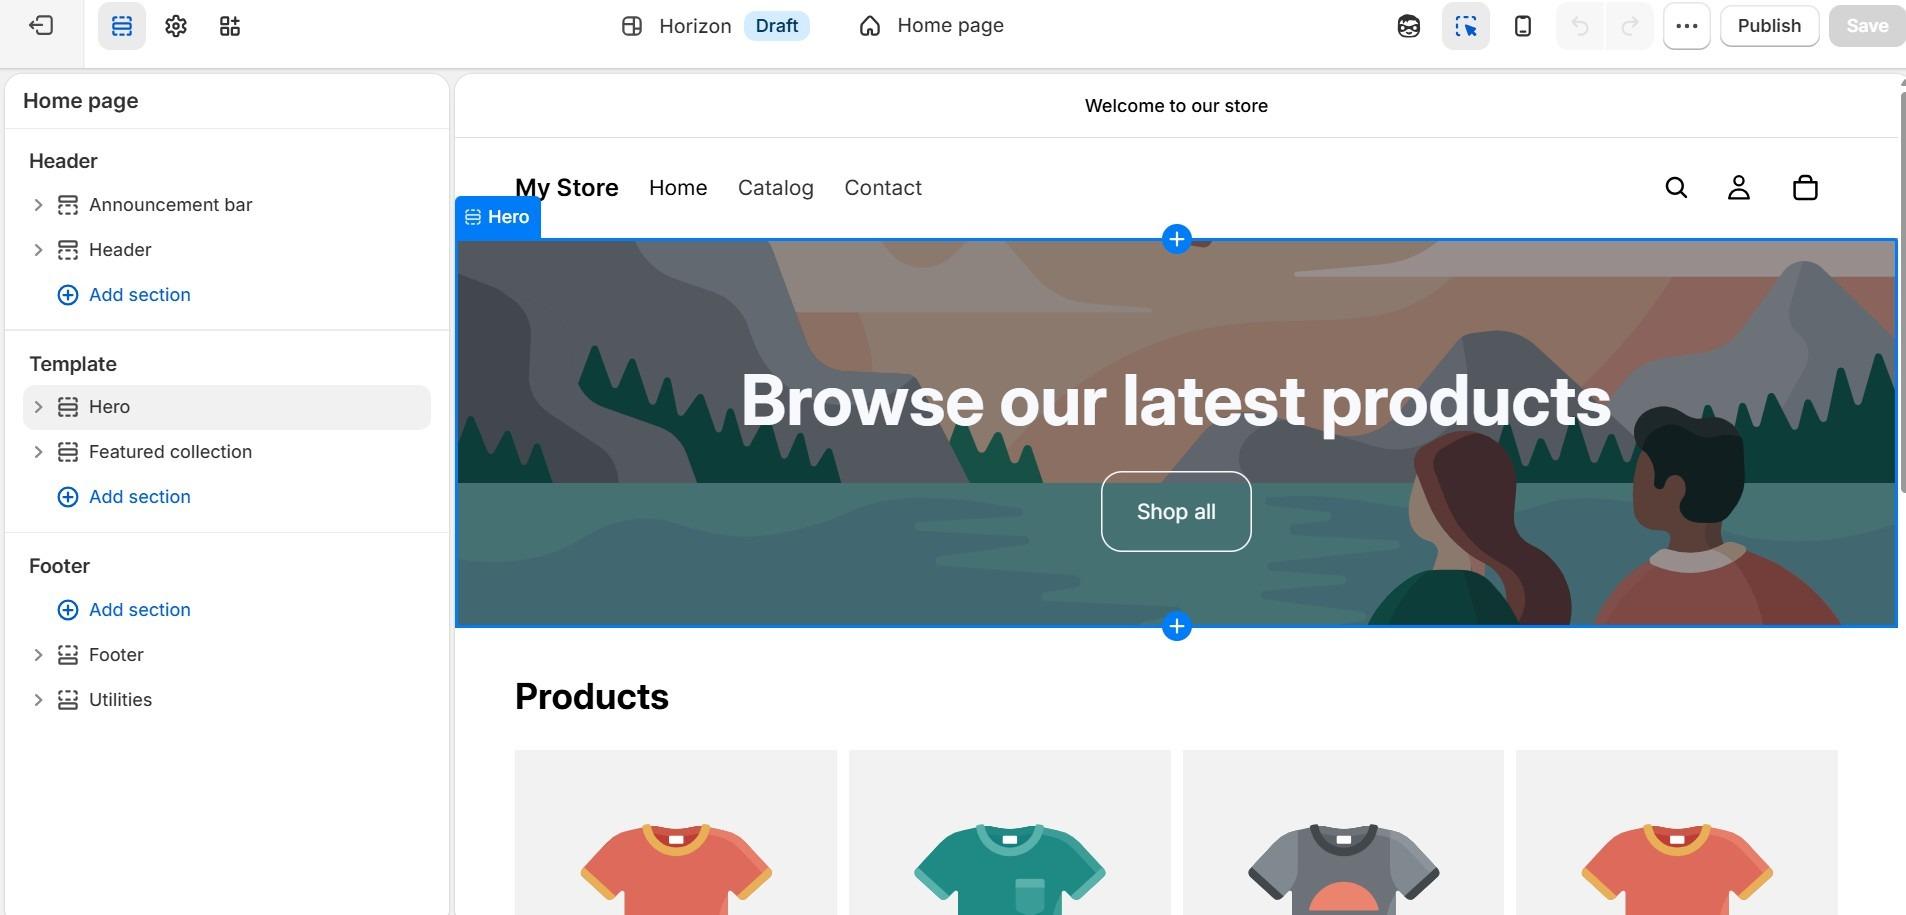
Once you have installed a theme, click Customize to open the Shopify Theme Editor. This is where you make the store yours. You can change colors, fonts, and section layouts without touching any code. The editor shows you a live preview of your store as you make changes so you always know exactly what buyers will see.
- Upload your logo: Go to the “Header” section in the “Theme Editor” and upload your logo file in PNG with a transparent background.
- Set your brand colors: In Theme Settings, find Colors and update the primary and secondary colors to match your brand palette.
- Choose your fonts: In Theme Settings, find Typography and select fonts that reflect your brand personality.
- Check mobile view: Toggle between desktop and mobile preview as you customize. More than 70% of ecommerce browsing happens on mobile, so this is non-negotiable
Pro tip: Do not spend days perfecting your theme before launch. Choose something clean and functional, launch with it, and refine as you learn what your customers respond to.
Step 5: Set Up Your Store Navigation and Pages
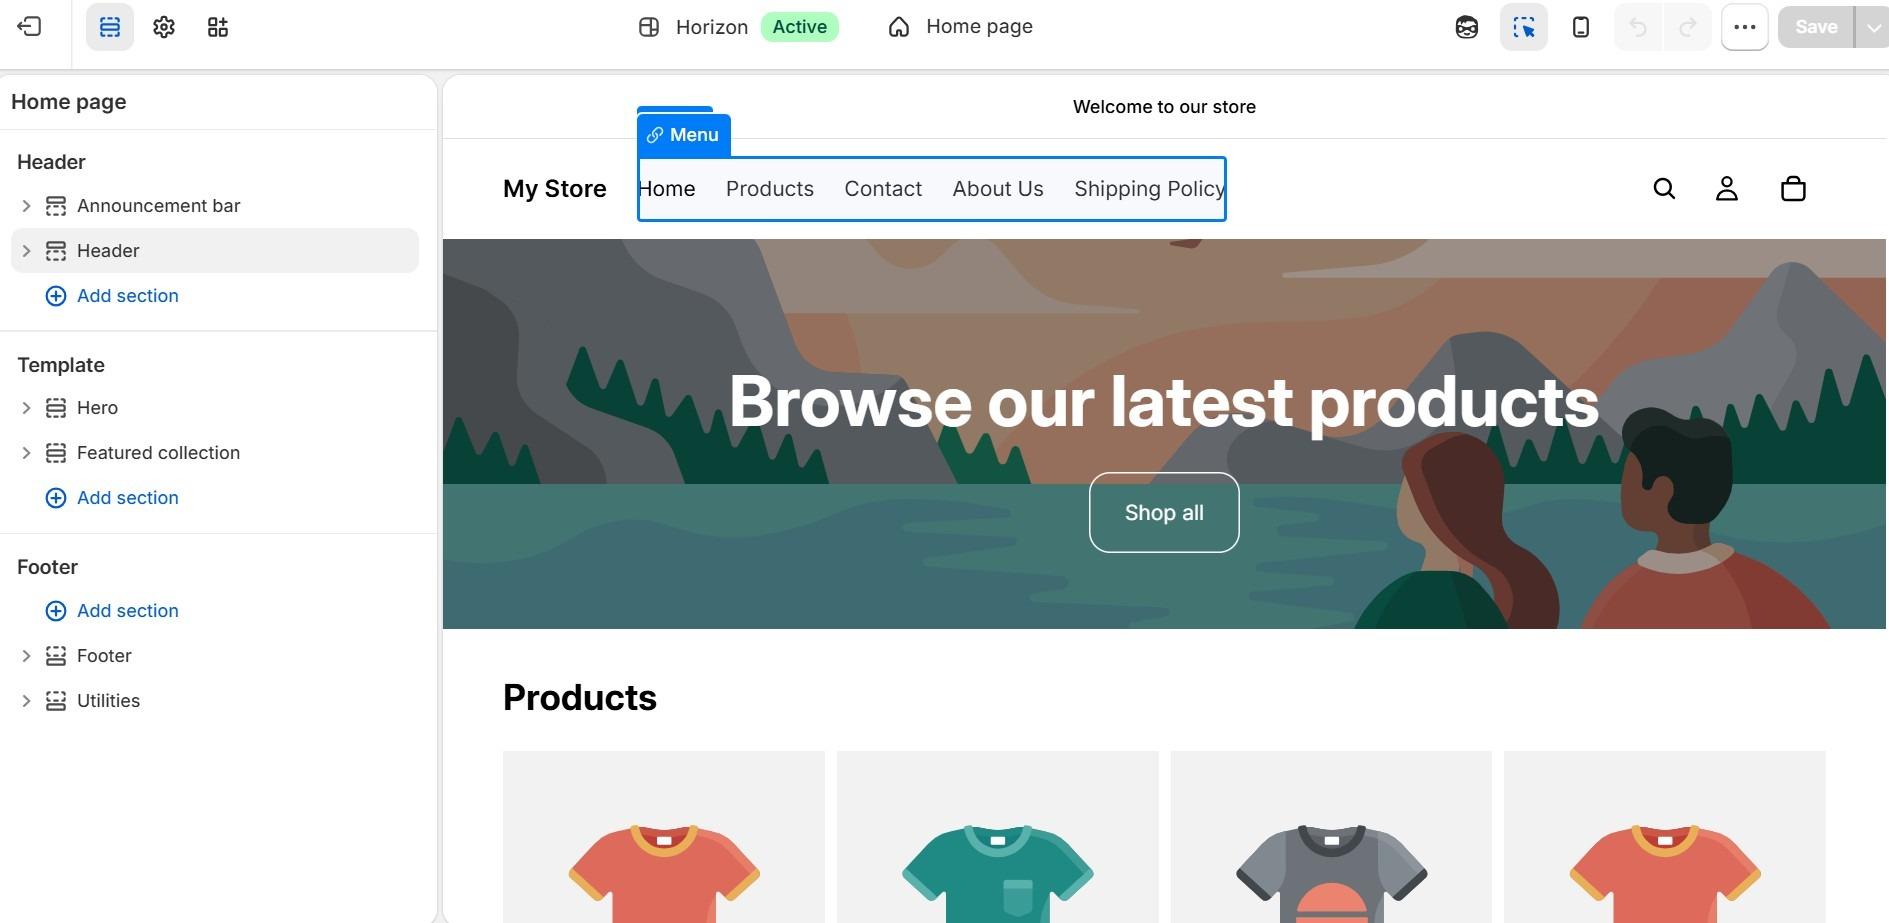
A great-looking store is not enough if customers cannot find what they are looking for. Clear navigation and essential pages make your store easier to browse, build trust, and help shoppers buy with confidence. Before launching, make sure your store is simple to navigate and includes all the information customers expect.
Setting Up Your Navigation Menu
Go to “Online Store” and then “Navigation” in your dashboard. Create a main menu that includes your most important sections. For most stores, this means a link to your full product collection, any major product categories, an About page, and a Contact page.
Most Essential Pages Every Shopify Store Needs
- About Us
- Contact
- FAQ
- Returns & Refund Policy Pages
- Privacy Policy
- Shipping Policy
- Terms of Service
Creating these pages is not the most exciting part of setting up a Shopify store, but they are what separates a store that buyers trust from one they abandon at checkout.
Step 6: Add Your Custom Domain
Your default Shopify URL looks like yourstorename.myshopify.com. That URL works perfectly well for testing, but it signals to buyers that your store is new and not yet fully established. Hence, a custom domain like yourbrand.com looks professional, is actually needed, is easier to remember, and builds buyer confidence from the first click.
Buying a Domain Through Shopify
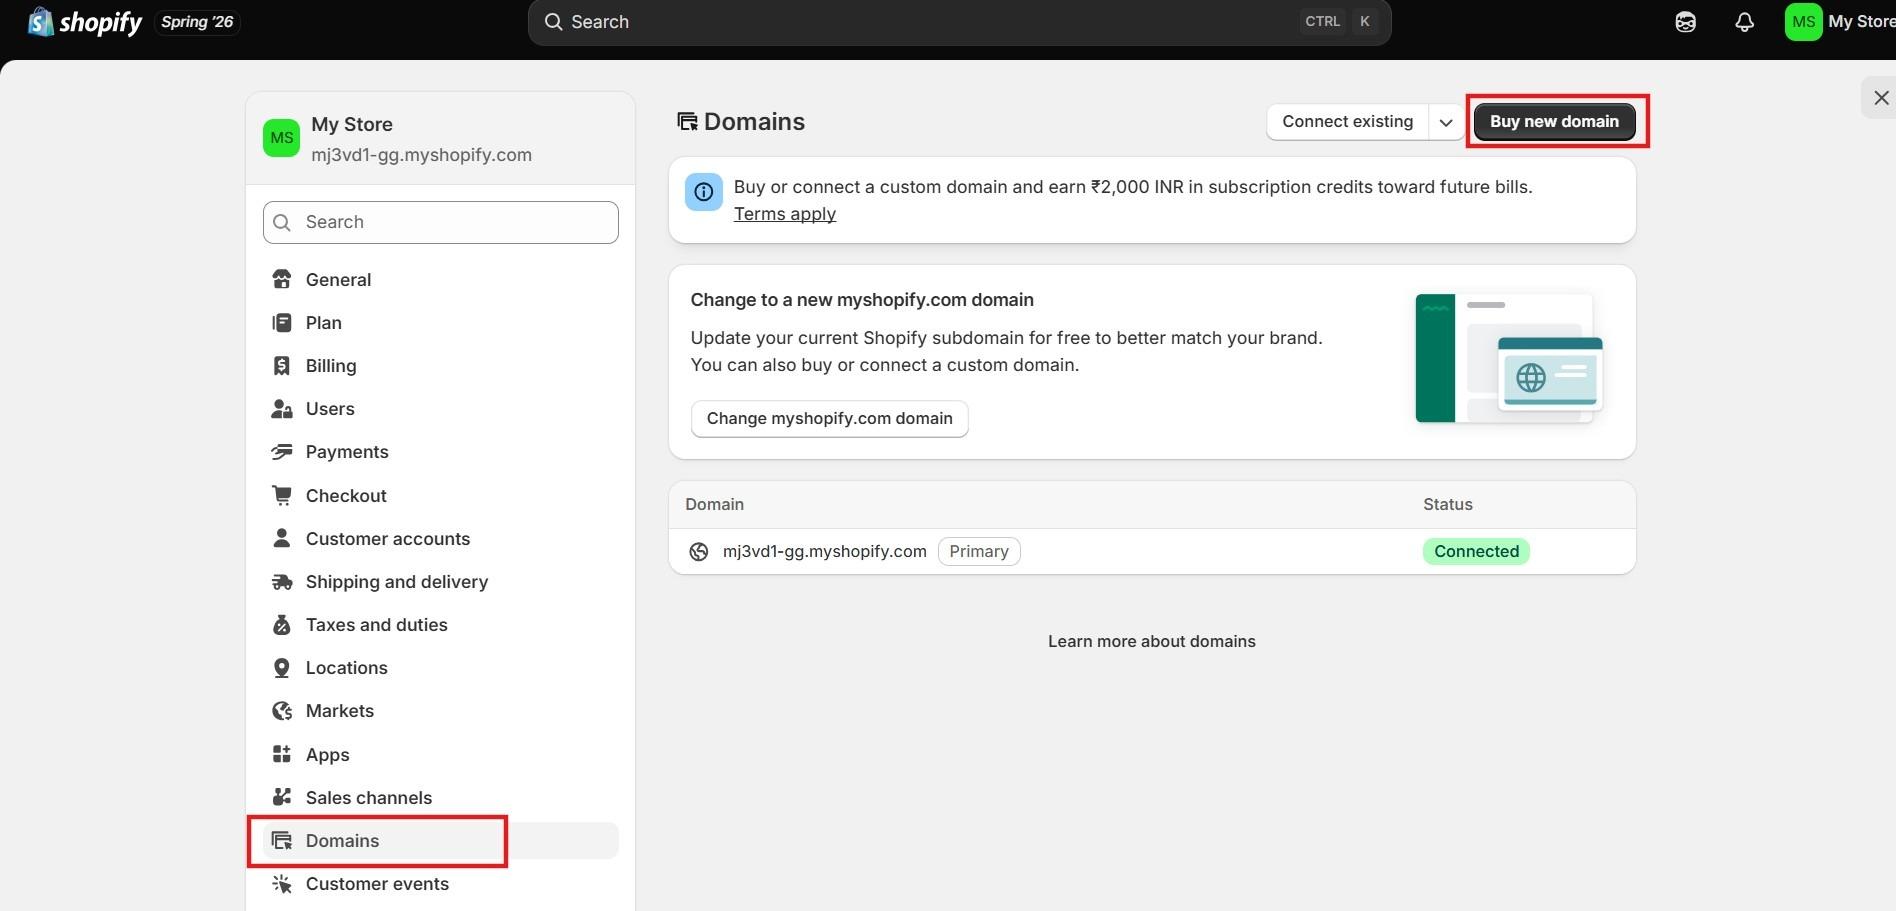
The easiest way to get a custom domain is to purchase one directly through Shopify. In your Shopify admin, go to Settings → Domains, then click Buy new domain. Enter the domain name you want, check its availability, and complete the purchase.
Once you buy the domain, Shopify automatically connects it to your store and handles the technical setup for you. In most cases, your custom domain is ready to use within a few minutes, making this the simplest option for new store owners.
Connecting a Domain You Already Own/ Existing one
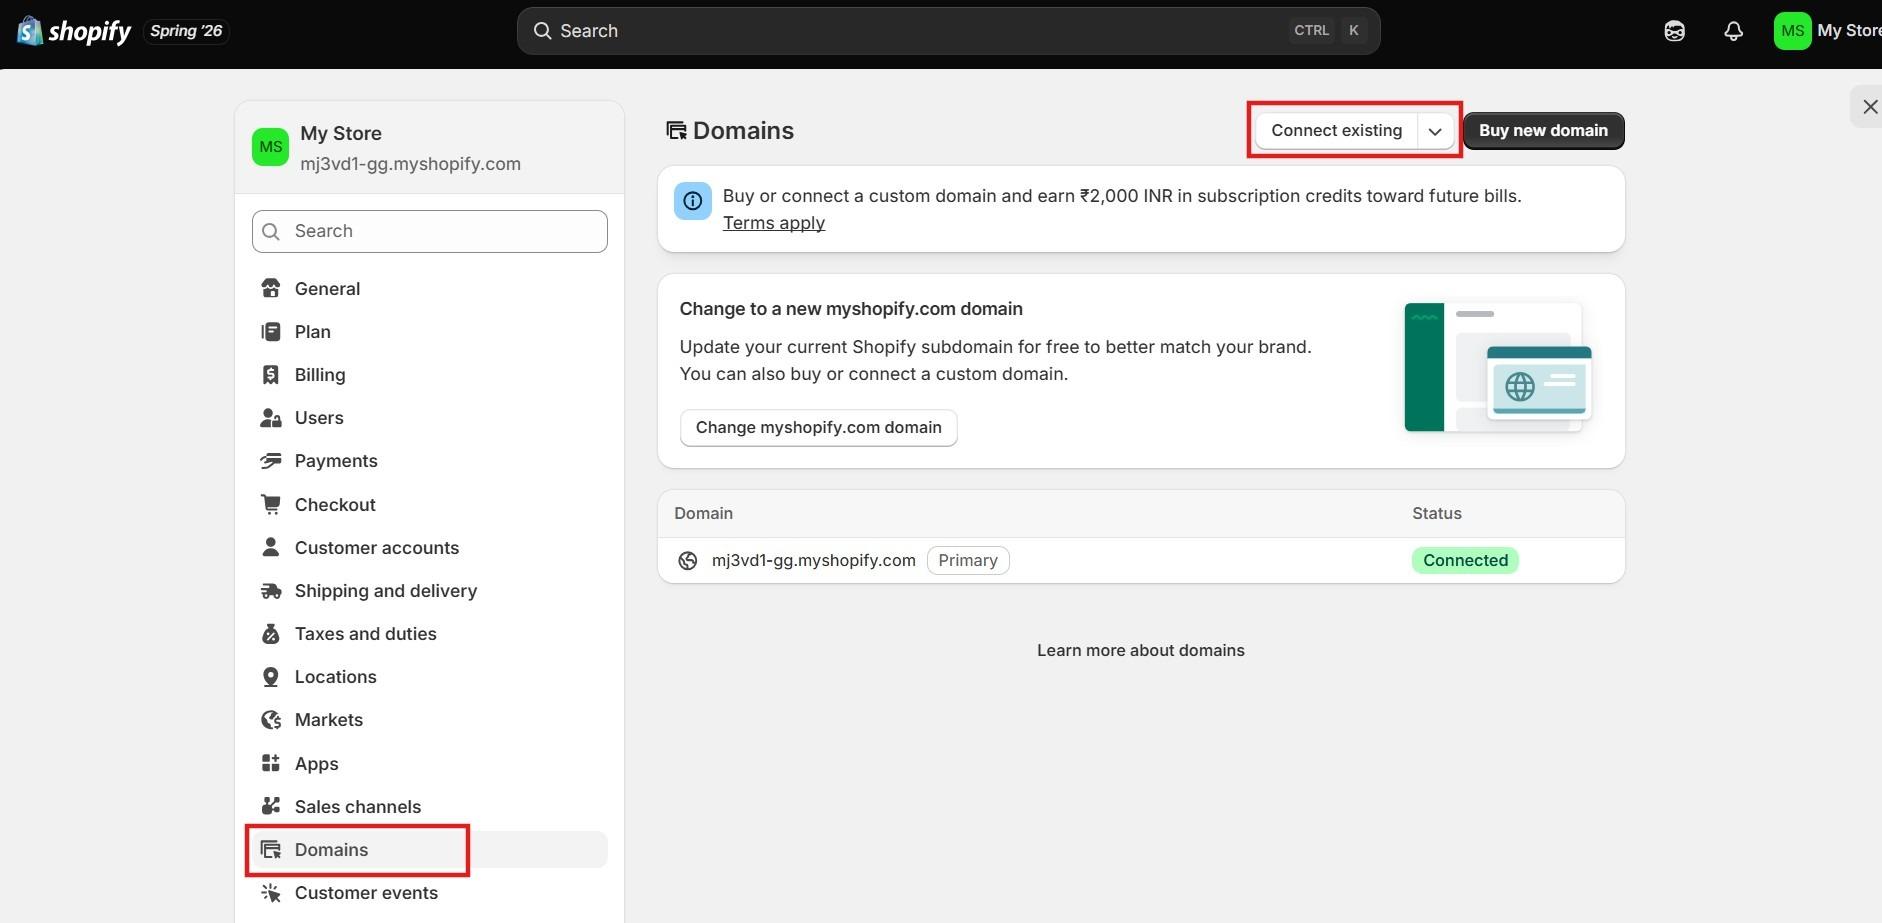
If you already have a domain from a provider like GoDaddy, Namecheap, or Squarespace Domains, you can easily connect it to your Shopify store.
In your Shopify admin, go to Settings → Domains, then click Connect existing domain. Enter your domain name and follow the on-screen instructions. Shopify will tell you which DNS settings need to be updated with your domain provider.
The setup usually takes 15 to 30 minutes, but it can take up to 48 hours for your domain to start working everywhere.
- Pro tip: After your domain is connected, go to Settings → Domains and set it as your primary domain. This ensures visitors always see your custom domain instead of your myshopify.com address, creating a more professional shopping experience.
Step 7: Add Your Products
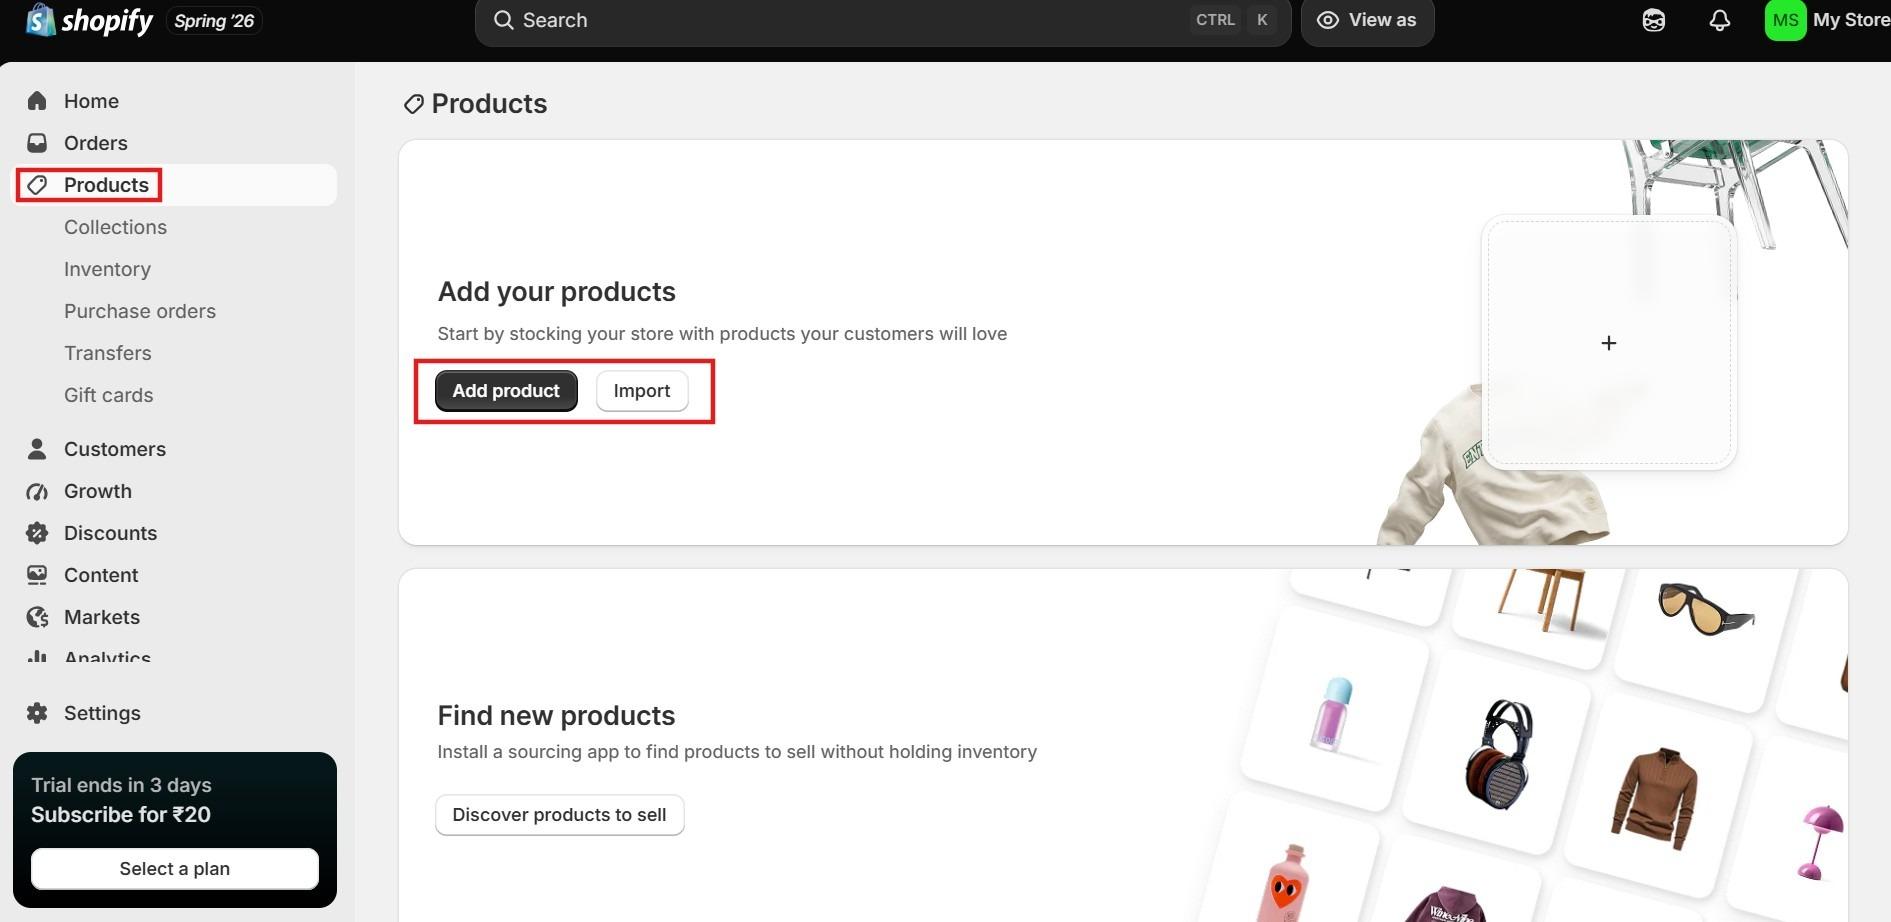
Now it is time to add the products you want to sell. In your Shopify admin, go to Products and click Add product. Fill in the product details, upload high-quality images, set your price, and add inventory information.
Your product pages are one of the biggest factors in whether visitors become customers. Clear descriptions, accurate information, and professional photos help shoppers make confident buying decisions.
What to Add to Every Product Listing
Every product page should give customers everything they need to confidently make a purchase. When adding a product, include:
- A clear product title: Describe exactly what you are selling and use terms customers might search for.
- A helpful description: Explain what the product does, its benefits, and why customers should buy it.
- Great product images: Show your product from different angles and include close-up photos whenever possible.
- Correct pricing: Add your selling price and only use compare-at pricing for real discounts.
- Inventory details: Track your stock and create SKUs to keep products organized.
- Product options: Add product variants for different sizes, colors, or styles.
- Shipping information: Enter accurate weight and dimensions for correct shipping calculations.
Step 8: Set Up Payment Methods
Your store is not ready to sell until customers can complete payments. Setting up the right payment methods ensures buyers can check out smoothly and you can receive payments without issues. Shopify offers several payment options, but for most sellers, Shopify Payments is the easiest place to start.
Shopify’s built-in Payment System
Shopify Payments is Shopify’s built-in payment processor. It allows you to accept major credit and debit cards, Apple Pay, Google Pay, and Shop Pay without connecting a third-party provider.
Benefits of Shopify Payments:
- Quick and simple setup.
- No additional Shopify transaction fees.
- Supports popular payment methods customers trust.
- Direct payouts to your bank account.
How to Set Up Shopify Payments
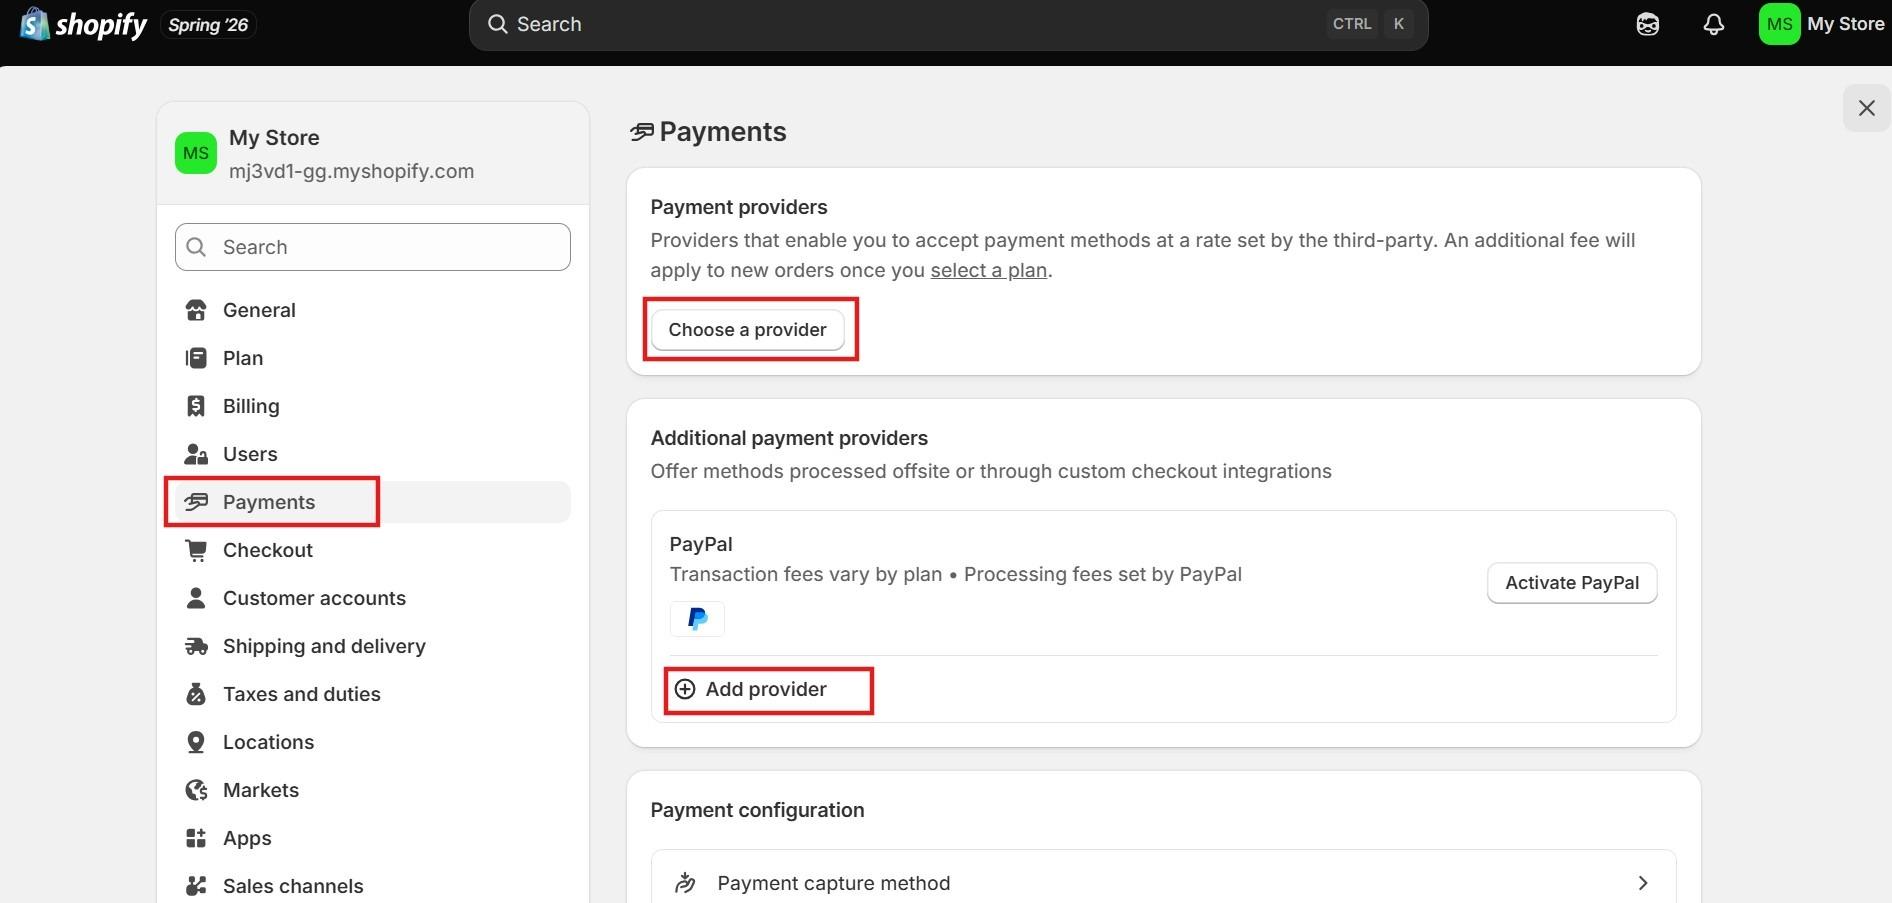
In your Shopify admin: Settings → Payments → Complete Account Setup
Then enter your business details, tax information, and bank account details to start receiving payments.
Note: Setting up payments early allows you to test your checkout before launching and ensures customers can complete purchases without problems.
Choosing the Alternative Payment Gateways
If Shopify Payments is not available in your country or if your buyers prefer other payment methods, you can add additional payment gateways. PayPal, Stripe, and dozens of local payment providers integrate directly with Shopify. Be aware that using a third-party gateway means paying Shopify’s transaction fee on top of the gateway’s own processing fee.
- PayPal: A popular choice that many customers trust when shopping from a new store.
- Apple Pay and Google Pay: Fast checkout options that help mobile shoppers complete purchases more easily.
Configuring Your Checkout Settings
Before launching your store, review your checkout settings to create a smooth buying experience. Go to Settings → Checkout in your Shopify admin to manage how customers complete their orders.
Step 9: Configure Shipping and Delivery
Shipping plays a major role in your customer’s buying experience. If your shipping settings are incorrect, you may lose money by undercharging or lose customers by adding unexpected costs at checkout.
Taking time to set up shipping properly helps you deliver orders smoothly, avoid fulfillment issues, and create a better checkout experience.
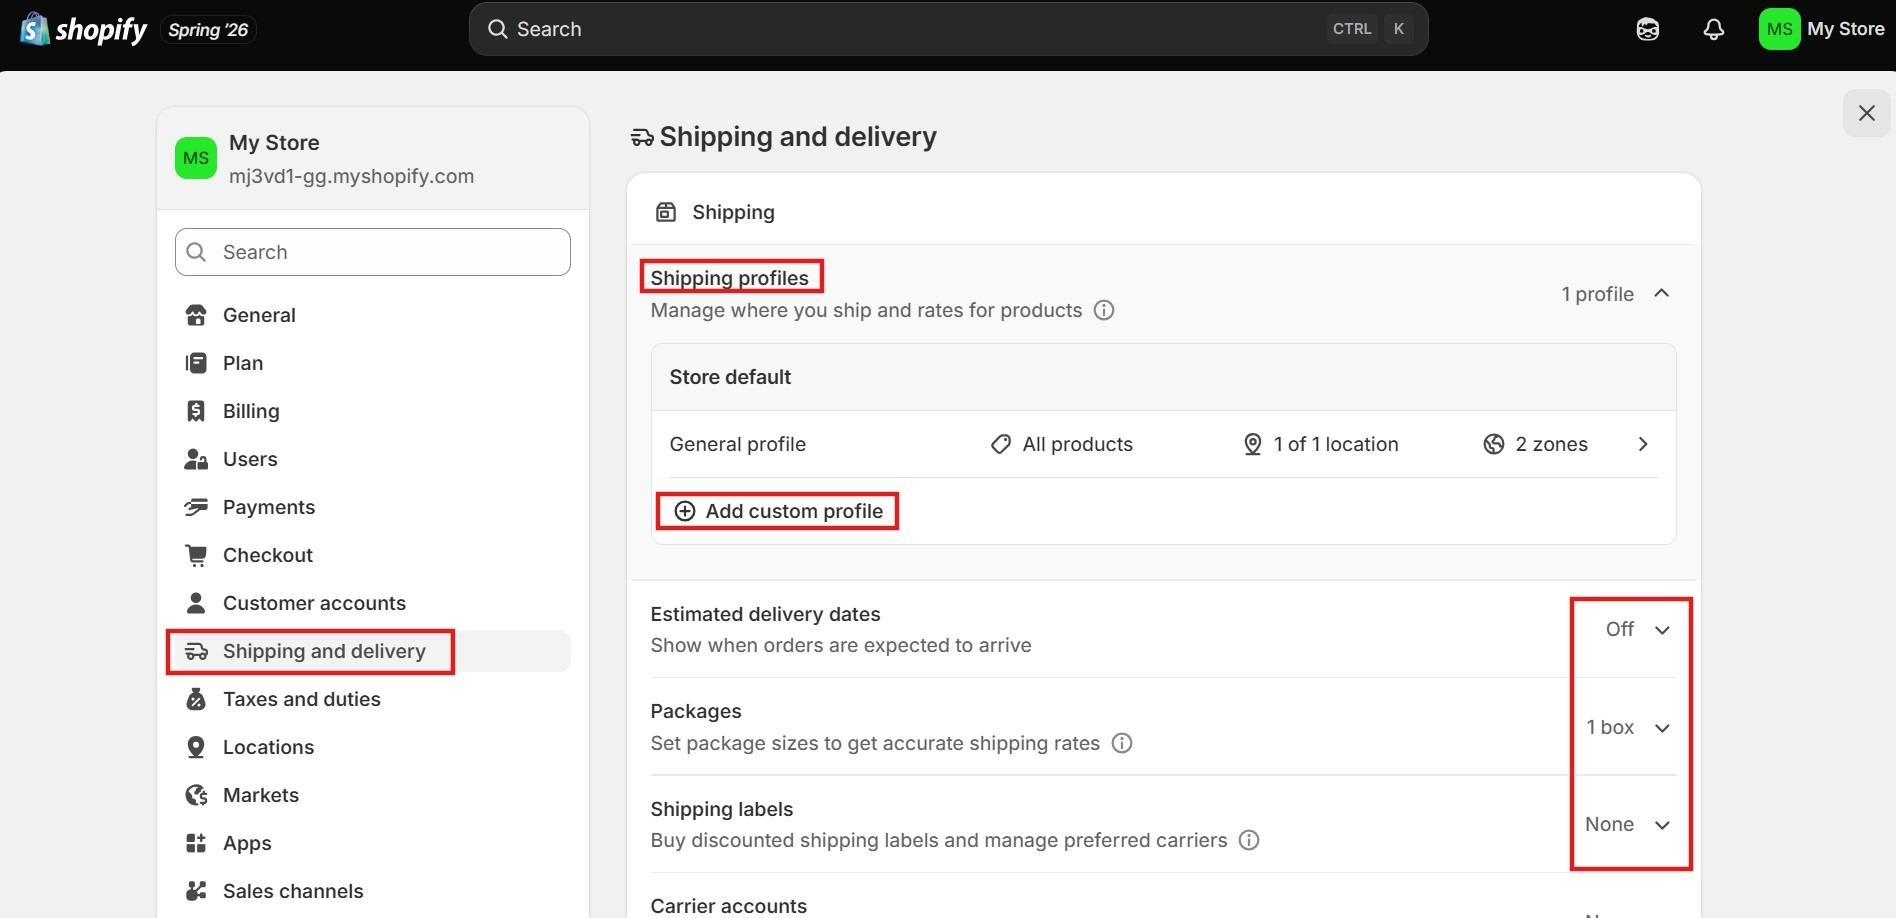
To configure your shipping settings, go to Settings → Shipping and Delivery
From here, you can create shipping zones, set rates, manage delivery options, and customize how customers receive their orders.
Setting Up Shipping Zones
Shipping zones decide where you deliver and how much customers pay for shipping. Each zone can have its own shipping rates based on location. For example:
- Domestic zone: Your main selling country.
- International zone: Other countries you ship to.
You can create different rates for each region. For example, you may offer free shipping within your country, a flat shipping rate for nearby countries, and calculated rates for international orders.
To create shipping zones, go to Settings → Shipping and Delivery → Shipping.
Choosing Your Shipping Rate Structure
Shopify gives you several ways to charge for shipping. The best option depends on your products, margins, and customers.
- Flat-rate shipping: Charge the same shipping fee for every order. It is simple and predictable but may not always match your actual shipping costs.
- Weight-based shipping: Shipping costs change based on the total weight of the order. This works well if your products vary significantly in size or weight.
- Free shipping: A popular option that can encourage more purchases. Many stores offer free shipping after a minimum order value to protect their profit margins.
- Calculated shipping rates: Connect carriers like USPS, UPS, FedEx, or Royal Mail to show customers real-time shipping costs based on their order details.
Note: Do not choose a shipping method only based on what is easiest to set up. Consider your product costs, average order value, and customer expectations before deciding.
Step 10: Test Your Store Before Launching
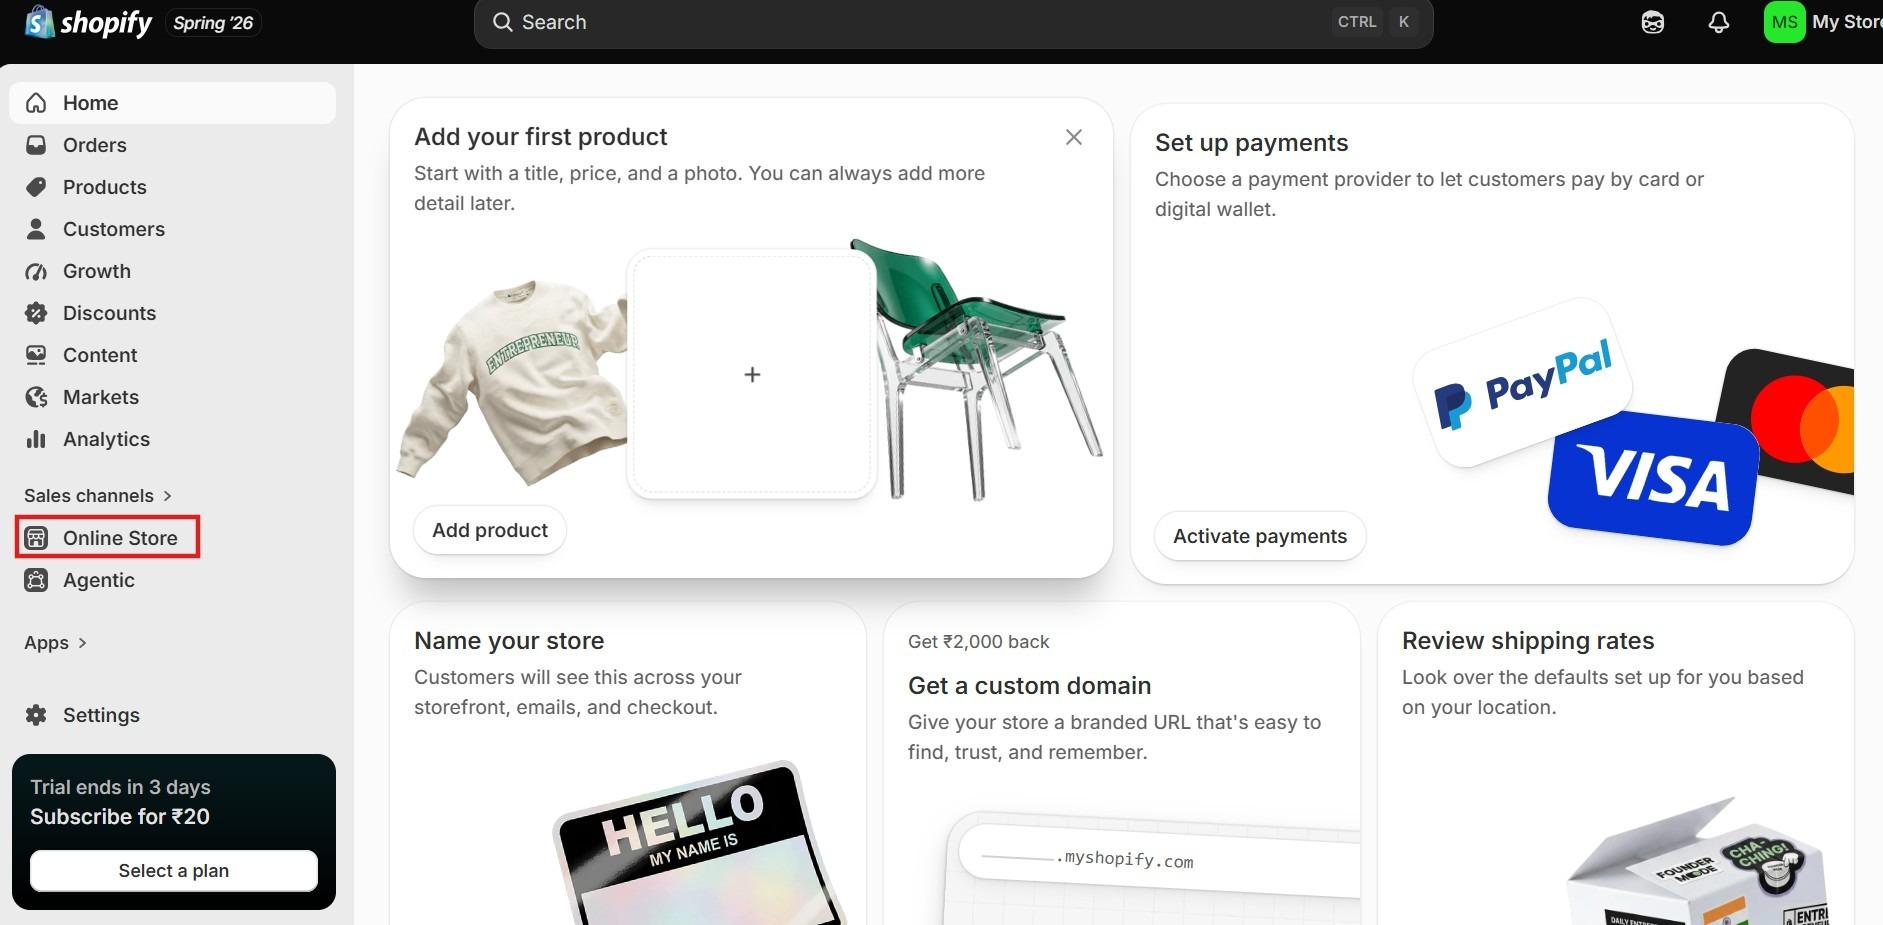
You are almost ready to open your store. Before going live, take a few minutes to test everything from a customer’s perspective. This helps you catch checkout issues, broken links, or confusing pages before they affect real buyers.
How to Place a Test Order
Shopify allows you to test your checkout using a test payment method called the Bogus Gateway. This lets you complete a fake purchase without charging any money.
To enable it, Settings → Payments → Manage payment methods → Enable test mode/Bogus Gateway. Once enabled, complete a test purchase just like a real customer would.
Note: After testing, remember to disable the Bogus Gateway/test mode and switch back to your active payment settings. If you forget this step, customers will not be able to complete real purchases.
How to Launch Your Shopify Store
Your products are added, settings are configured, and your checkout has been tested. Now it is time to make your Shopify store available to customers.
Launching your store is simple, but the steps you take before and after going live can have a big impact on your first visitors and sales.
Steps to Remove Password Protection
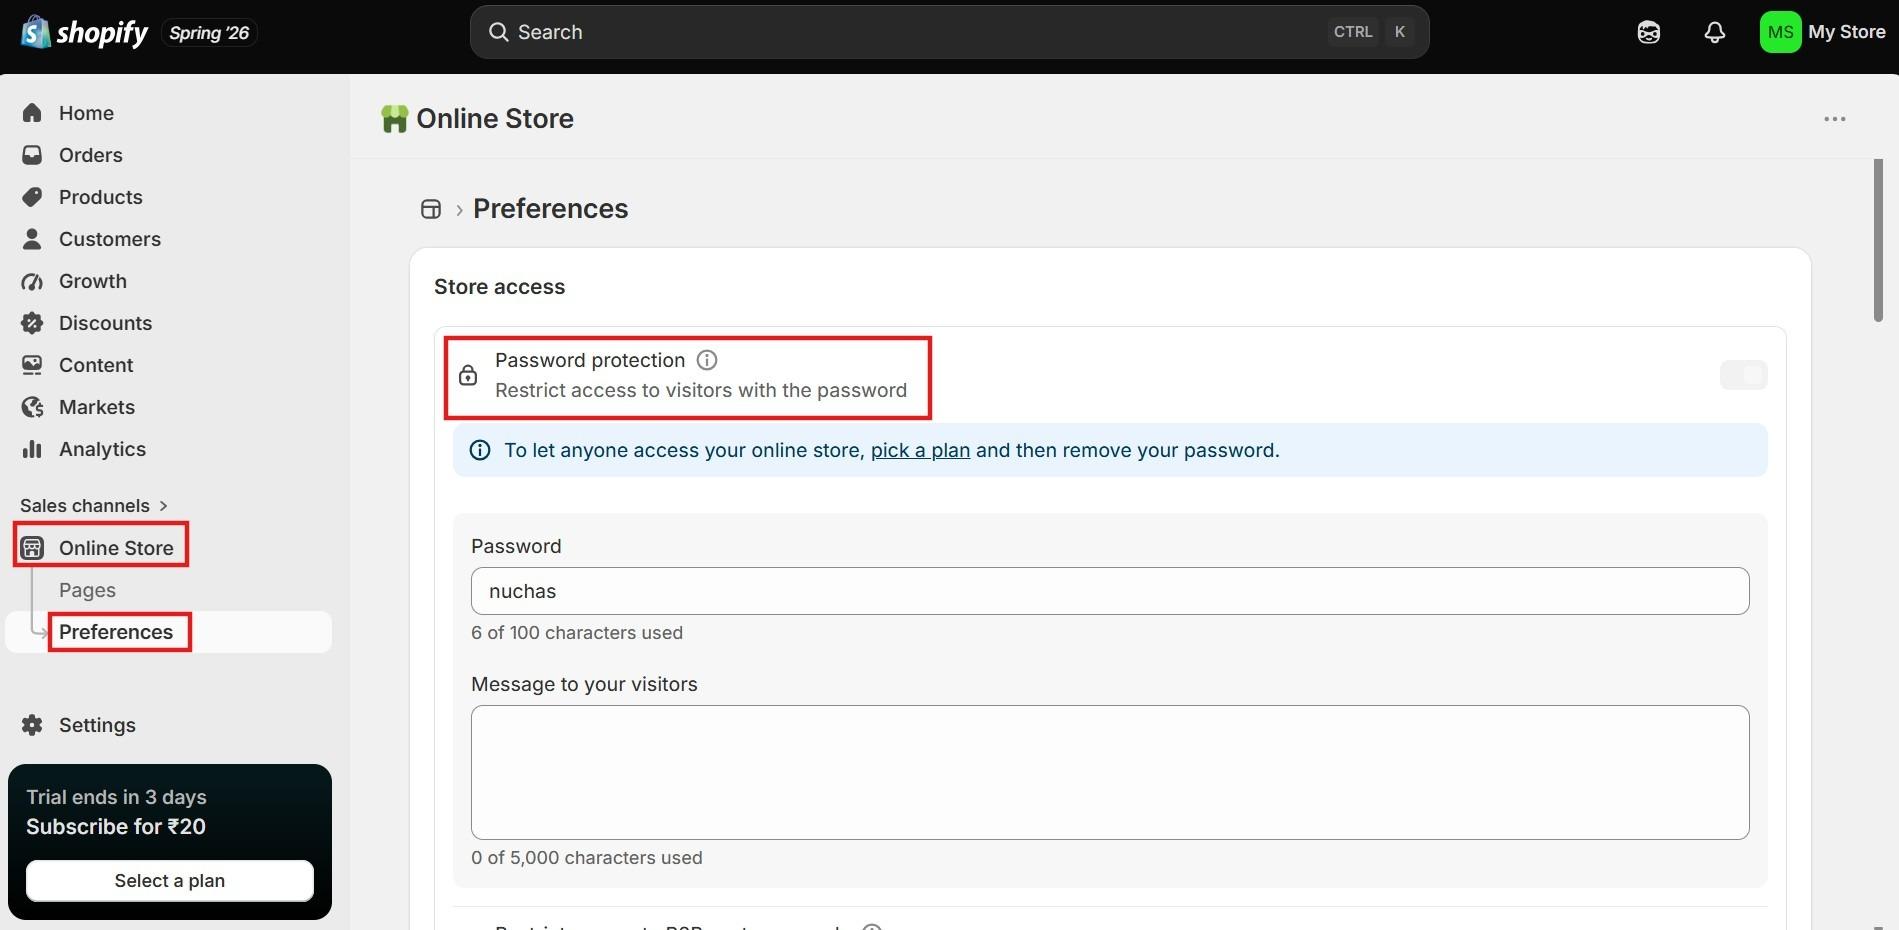
While you are building your store, Shopify keeps it protected with a password so customers cannot access an unfinished version. To make your store live:
- Go to Online Store → Preferences
- Find the Password Protection section
- Disable the password requirement
- Click “Save.”
Your store will now be accessible to the public.
Announcing Your Shopify Store Launch
A common mistake new sellers make is launching quietly and waiting for customers to find them. Your first visitors need a reason to check out your store. Before launch day, prepare your announcement and share it where your audience already spends time.
- Social media: Post on every platform where your target audience is active. A launch announcement, a behind-the-scenes story, and a product showcase all work well
- Email list: If you have been collecting email addresses in advance, send a launch announcement to your list on the day you go live
- Personal network: Tell friends, family, and colleagues. Early purchases and shares help build social proof and can drive word of mouth to people you cannot reach through your own channels
- Google Search Console: Submit your sitemap to Google Search Console so Google can start indexing your store. Go to Google Search Console, add your domain, and submit your sitemap which is typically found at yourdomain.com/sitemap.xml
Setting Up Analytics Before You Launch
Connecting Google Analytics to your Shopify store before your first sale means you have customer data from day one. Go to Online Store and then Preferences and enter your Google Analytics tracking ID. Shopify’s own built-in analytics also tracks sales, traffic, and conversion data from launch without any setup required.
| “The Shopify stores that perform best after launch are not always the ones with the most features or the most apps. They are the ones that focus on the basics: clear product images, honest descriptions, and a smooth checkout experience. These three elements have a direct impact on customer trust and conversion rates.” – Marija Bacelic, COO at QuickSync and Multichannel Ecommerce Expert |
How Long Does It Take to Set Up a Shopify Store?
This is one of the most searched questions about Shopify setup and the one that gets the vaguest answers online. We want to give you a realistic picture so you can plan your time properly.
| Setup Task | Time Required | Notes |
| Account creation and plan selection | 15 minutes | Fastest part of the whole process |
| Theme selection and customization | 1 to 3 hours | Longer if you are picky about design |
| Adding the first 10 products | 1 to 2 hours | 30 minutes per product on average |
| Essential pages and navigation | 30 to 60 minutes | Policies, About Us, Contact |
| Domain setup | 15 to 30 minutes | Slightly longer if connecting from another provider |
| Payment and shipping setup | 30 to 60 minutes | Depends on shipping complexity |
| Testing and pre-launch review | 30 to 60 minutes | Do not skip this step |
| Total for a basic store | 1 to 3 hours | With a small product catalog |
| Total for a fully configured store | 1 to 3 days | With a larger catalog and full customization |
Several Factors that Affect Shopify Store Setup Time
Not every Shopify store takes the same amount of time to build. The difference usually comes down to how many products you sell, how customized you want your store to be, and how complex your operations are.
- Product catalog size: Every product needs accurate information, images, pricing, and inventory details. More products mean more setup time.
- Store design and customization: A clean theme with minor changes can be ready quickly, while a fully branded storefront requires more work.
- Domain setup: Shopify domains connect quickly, but external domains may need additional time for DNS updates.
- Shipping requirements: Basic shipping is simple, but international rates and multiple delivery options require more configuration.
How to Maintain Your Shopify Website After Launch
Launching your store is the beginning, not the end. A Shopify store that gets attention and care after launch performs dramatically better than one that gets set up and forgotten. Here is a practical maintenance routine that keeps your store healthy without taking over your schedule.
Weekly Tasks
- Check your orders and fulfillment: Make sure all orders from the past week were fulfilled correctly and that there are no outstanding issues.
- Review customer messages and reviews: Respond to any customer questions or feedback promptly. A fast response time builds repeat buyer loyalty.
- Check inventory levels: Update stock quantities for any products that are running low. An out-of-stock product that still appears available creates a frustrating experience.
Monthly Tasks
- Review your Shopify Analytics: Look at your traffic sources, conversion rate, and top-performing products. Understanding what is working helps you do more of it.
- Update your product listings: Add new products, update descriptions or photos that are not performing, and remove products you no longer offer.
- Check your theme for updates: Keeping your theme and apps updated ensures security patches are applied, and new features are available.
- Review your shipping rates: Carrier rates change regularly. Check that your shipping rates still cover your actual costs, especially if you use weight-based or carrier-calculated rates.
Quarterly Tasks
- Review and update your policies: Your returns, shipping, and privacy policies should reflect how your business actually operates. As your processes evolve, update your policies to match.
- Check for broken links: Use a free tool like Broken Link Checker to identify any links in your store that lead to 404 error pages and fix them.
- Back up your store data: Shopify does not have a built-in backup feature so use a backup app from the Shopify App Store to keep a copy of your product data, customer information, and order history.
Common Mistakes to Avoid When Setting Up a Shopify Store
A smooth Shopify launch depends on getting the small details right. Common setup mistakes can lead to checkout issues, poor customer experience, and wasted time fixing problems after launch.
Based on experience working with Shopify sellers, these are the mistakes worth avoiding from day one.
Choosing a Theme You Cannot Customize Easily:
Some themes look impressive in the Theme Store preview but become frustrating to work with during actual customization. Before installing a theme, click the demo store link to see a live version and check whether the sections and settings you want to customize are accessible without code.
Skipping the Test Order Before Launch:
Every seller who skips the test order has a story about something that went wrong on the first real transaction. A payment setting in the wrong mode, a confirmation email that never sent, and a shipping rate that did not calculate correctly. The test takes 15 minutes and catches problems before they affect real buyers.
Not Setting Up a Custom Domain Before Launch:
Launching with a myshopify.com URL is fine for testing but signals to buyers that the store is not yet fully established. Set up your custom domain before your launch announcement so every link you share from day one points to your permanent address.
Writing Product Descriptions That Only List Features:
Features tell buyers what a product is. Benefits tell buyers why they should care. A candle that burns for 60 hours is a feature. A candle that fills your bedroom with lavender for two months without needing to buy another one is a benefit. Rewrite any product descriptions that read like specification sheets.
Setting Shipping Rates That Do Not Cover Actual Costs:
Underestimating shipping costs is one of the most common financial mistakes new sellers make. Before setting your shipping rates, get actual quotes from your preferred carriers for your typical order size and weight. Then add a small buffer for packaging materials. Offering free shipping that you genuinely cannot afford to subsidize erodes your margins from your first sale.
Installing Too Many Apps Before Understanding What You Need:
Start with three apps or fewer: a reviews app, an email marketing app, and one other specific to your product type if needed. Add more only after you have identified a specific conversion problem that an app would solve.
Setting Up Shopify as Part of a Multichannel Strategy
For many sellers, Shopify is not just an online store. It is the central hub of a broader selling operation that includes WooCommerce, eBay, Etsy, TikTok Shop, LightSpeed, and potentially a physical retail location. Setting up Shopify correctly from the start makes this multichannel expansion significantly smoother than building on a fragmented foundation.
The reason Shopify works so well as a multichannel hub is its combination of strong product management, reliable order processing, and open integration with third-party tools. You manage your product catalog in Shopify and push it out to every other channel. Orders from every channel come back into Shopify. Inventory updates in Shopify ripple out to every connected platform.
The Operational Challenge of Multichannel Selling
As your Shopify store grows into a multichannel business, keeping inventory updated across every platform becomes one of the biggest challenges.
A customer buys your last item on Amazon, but your Shopify, eBay, or Etsy listings still show it as available. Another order comes in, and now you have oversold inventory, canceled orders, and unhappy customers.
Manual updates cannot keep up for long. An automatic inventory sync solution such as QuickSync.pro ensures every channel stays updated the moment a sale happens.
How QuickSync Keeps Your Shopify Store Connected Across Channels
Once you start selling across multiple commerce platforms, keeping everything updated manually becomes difficult and time-consuming. This is where automation becomes essential.
QuickSync connects your Shopify store with channels like Amazon, eBay, Etsy, and more, keeping your products, inventory, and orders synchronized automatically, within a few minutes on Etsy and eBay. When a sale happens on one platform, inventory updates across connected channels automatically. When you make a product change in Shopify, it is reflected everywhere without extra manual work.
What QuickSync Syncs Between Shopify and Other Commerce Platforms
- Inventory sync: Stock accuracy across Shopify and every connected channel, within seconds on most and within a few minutes on Etsy and eBay.
- Product sync: Product names, descriptions, images, variants, pricing, and SKUs stay consistent across Shopify, Amazon, eBay, Etsy, and all other connected platforms automatically.
- Order sync: Every order from every connected channel appears in your Shopify dashboard for centralized fulfillment.
- POS sync: If you also sell in a physical store using Clover or Square, in-store sales update your Shopify inventory instantly, and online sales reach your register immediately.
- Accounting sync: Every transaction creates the correct record in QuickBooks automatically, keeping your books accurate without manual entry.
On top of that, with QuickSync, integration setup takes under 20 minutes, and your Shopify store stays in sync with every other channel you sell on from day one.
The Bottom Line
Learning how to set up your Shopify store is simpler than most sellers expect. With the right steps, you can launch a professional store within hours and continue improving it as your business grows. Do not wait for everything to be perfect before going live. The best sellers launch, learn from real customer behavior, and optimize over time.
If you sell across Shopify, Amazon, eBay, Etsy, TikTok Shop, or other channels, QuickSync keeps your products, inventory, and orders synchronized automatically, within a few minutes on Etsy and eBay.