Exporting Shopify data sounds simple until you need more than one CSV file. A growing Shopify store can have products, variants, customers, orders, inventory, collections, pages, blogs, and custom fields spread across different areas.
Shopify gives you native export tools for many of these records. You can download CSV files, open them in Excel, or move them into Google Sheets. But exports are snapshots. They do not keep another store or sales channel updated after the file is created.
That difference matters for multichannel retailers. If Shopify is connected to Amazon, Etsy, eBay, Square, Clover, or WooCommerce, a one-time export will not keep inventory current.
In this guide, I’ll show you how to export Shopify data, where Shopify’s native tools work well, where they fall short, and when automated syncing makes more sense.
Key Takeaways 📌
- Shopify lets merchants export products, customers, orders, inventory, collections, pages, blogs, and metafields.
- CSV exports are useful for backups, reporting, bulk edits, and one-time data transfers.
- Scheduled exports can automate file creation, but they still provide data snapshots rather than live synchronization.
- Multichannel sellers need more than exports when stores must stay updated after sales, returns, price changes, or inventory adjustments.
- QuickSync automates product, inventory, order, and price syncing between Shopify and supported sales channels, reducing repetitive CSV exports and manual updates.
What Is Shopify Data Export?
Shopify data export is the process of downloading information from your Shopify store into a usable file. The most common format is CSV, which works with Excel, Numbers, Google Sheets, and other spreadsheet tools.
You can export different types of Shopify store data separately. Products, customers, orders, inventory, and reports each have their own export process. Shopify also lets you filter some records before creating the export file.
Let me explain the important difference here.
An export gives you a snapshot of your store data. It does not create a live connection between Shopify and another platform. If you export inventory at 10 AM, that file will not change when another order arrives at 10:15 AM.
For backups, audits, spreadsheets, migrations, and custom reports, that is often fine. For multichannel selling, it can quickly become limiting.
Here are the main things to know:
- Shopify exports different data types from different admin areas.
- CSV is the most common native Shopify export format.
- Large exports may be emailed instead of downloaded immediately.
- Product exports can include variants, prices, SKUs, and other fields.
- Inventory exports can include location-specific inventory levels.
- Shopify reports can also be exported into several file formats.
- Exported files are snapshots, not continuous data connections.
Shopify also supports CSV exports for products, customers, inventory, orders, and several other records. Its reports can support CSV, XML, JSONL, and Parquet exports, depending on the report.
What Data Can You Export From Shopify?
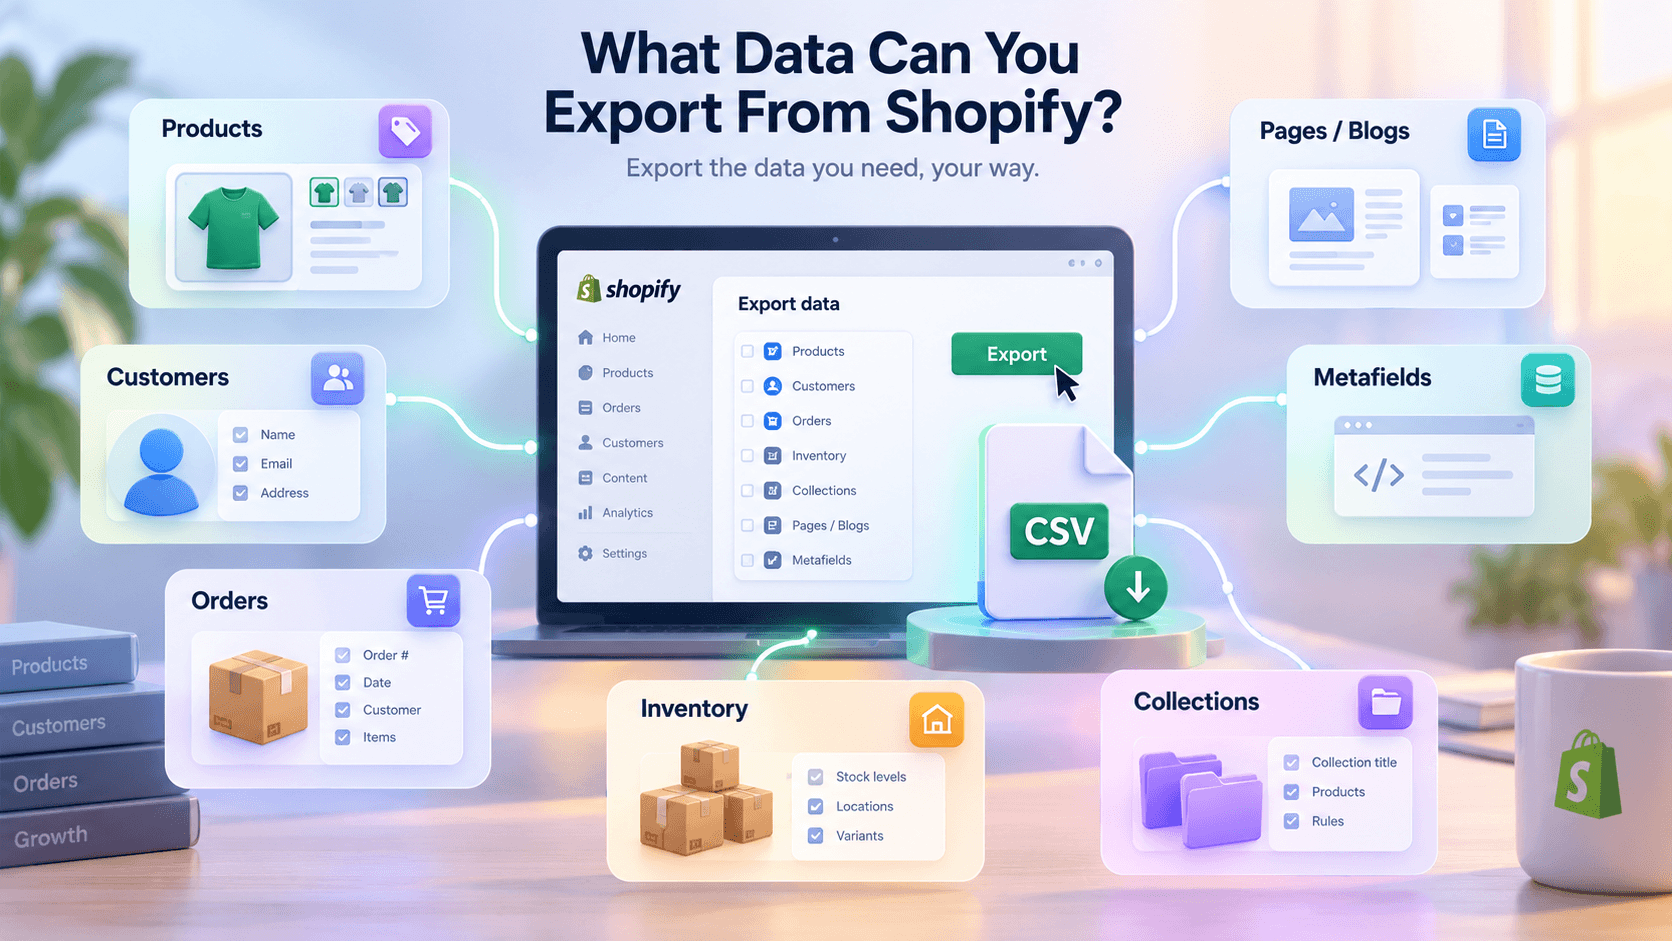
Shopify gives store owners several ways to export store data from the admin. The exact fields depend on the data type and export method.
Here’s what you can commonly export and why each dataset matters.
Products
Product exports contain the information behind your product listings. This can include titles, handles, descriptions, vendors, product types, tags, variants, SKUs, prices, weights, and inventory-related fields.
Product CSV files are useful for backups, bulk edits, migrations, and transferring product listings between Shopify stores. Shopify also lets you filter products before exporting them.
Customers
Customer exports give you a structured view of customer profiles. Depending on the export, you can include names, emails, addresses, phone numbers, tags, and supported customer metafields.
This data can help with segmentation, analysis, migrations, and marketing workflows. Shopify limits customer CSV imports to 15 MB, so larger datasets may need multiple CSV files.
Orders
Order exports provide a broader view of your sales history. You can export orders from the Orders page and choose options such as date ranges and transaction history.
This makes order CSV files useful for accounting checks, sales analysis, fulfillment reviews, and historical records. Large order exports may take longer to prepare.
Inventory
Inventory exports show stock information across your Shopify locations. You can export current inventory quantities and choose specific locations or all locations.
This is especially useful for bulk inventory updates. Shopify’s inventory CSV can also show states such as incoming, committed, unavailable, available, and on-hand quantities.
Collections
Collections help organize products into groups within your Shopify store. Exporting collection-related information can help during store migrations, catalog cleanup, or large-scale product management.
For more complex transfers, you may need additional tools or APIs. Shopify’s native CSV workflow does not provide one universal export file containing every collection relationship.
Pages/blogs
Pages and blog content are part of your Shopify store data, but they do not follow the same simple CSV workflow as products.
This matters during a migration. Shopify recommends using migration apps or relevant APIs for pages and blog content when moving between stores or platforms.
Metafields
Metafields hold custom information that standard Shopify fields may not cover. They can store extra product, customer, or other resource data.
Metafield support varies by resource and export method. If your store relies heavily on custom fields, check the export structure before assuming everything will appear in a standard CSV.
Also Read: How to Reconcile Shopify in QuickBooks: A Full Accounting Workflow Guide
How to Export Shopify Data Manually
For many stores, Shopify’s built-in export tools are enough. You do not need an app just to download a product list or order history.
The process depends on what you want to export. Products, customers, orders, and inventory each have separate export controls inside Shopify admin.
Here’s how I recommend doing it:
Step 1: Open your Shopify admin
- Log in to your Shopify account and open the admin dashboard. From there, go to the section containing the data you want.
- For products, open Products. For customers, open Customers. For orders, open Orders.
Step 2: Filter the data first
- Filtering before exporting can make the final file much easier to use.
- For example, you might want only active products, products from a specific category, or orders from one date range. Shopify supports filtering before exporting products and orders.
Step 3: Click the Export button
- Look for Export in the relevant Shopify admin section.
- The available export choices depend on the data type. Products, for example, can be exported as all products, selected products, current-page products, or products matching your filters.
Step 4: Select the file format
- Choose the CSV format that matches your next step.
- Shopify provides spreadsheet-friendly CSV options for several exports. These work well with Excel, Numbers, and similar spreadsheet programs.
Step 5: Click Export
- Click the relevant export button, such as Export products.
- Small exports may download directly. Larger exports may be prepared and sent to your email instead. Shopify uses this approach for several large exports.
Step 6: Open and review the file
- Open the exported CSV in Excel or Google Sheets.
- Check the column headers before changing anything. This is especially important if you plan to import the file back into Shopify.
Step 7: Save a clean copy
- Keep the original exported file untouched.
- Then create a second copy for edits. This gives you a clean backup to save before making a bulk update if something goes wrong.
Shopify warns that changing CSV structure or sorting certain product data incorrectly can cause problems during reimport.
Limitations of Shopify’s Native Export
Shopify’s export tools are useful, but they are not designed to be a complete data synchronization system. Here’s what most store owners miss: exporting data and syncing data are two different jobs.
The following are some of the major limitations of Shopify native export.
Exports Create Snapshots
A CSV represents your store at the time you created it. The file does not keep updating after the export finishes. If inventory changes later, the old file still contains the previous quantity. You need another export to get the newer data.
Different Data Needs Different Exports
Shopify separates products, customers, orders, inventory, and reports across different areas. That means you may end up managing multiple CSV files for one project. Each file can have different columns, filters, and update rules.
Large Exports Can Become Difficult
Large stores may need to split exports into smaller files. Shopify notes that product exports with thousands of variants can time out and may need to be filtered into multiple CSV files. That creates extra work for store owners managing large catalogs.
CSV Files Need Careful Handling
CSV files are simple, but they are not foolproof. Encoding, column structure, variant relationships, image URLs, and required fields all matter. Shopify specifically warns that spreadsheet edits can cause data problems when files are prepared incorrectly.
Exports Do Not Sync Other Channels
This is the biggest limitation for multichannel sellers. Exporting Shopify inventory does not automatically update Amazon, Etsy, eBay, Square, or Clover. You still need to move that information somewhere else and update the destination.
That is where multichannel selling software becomes much more useful.
Also Read: 10 Best Multichannel Listing Software for Ecommerce Sellers in 2026
How to Automatically Export & Sync Shopify Data
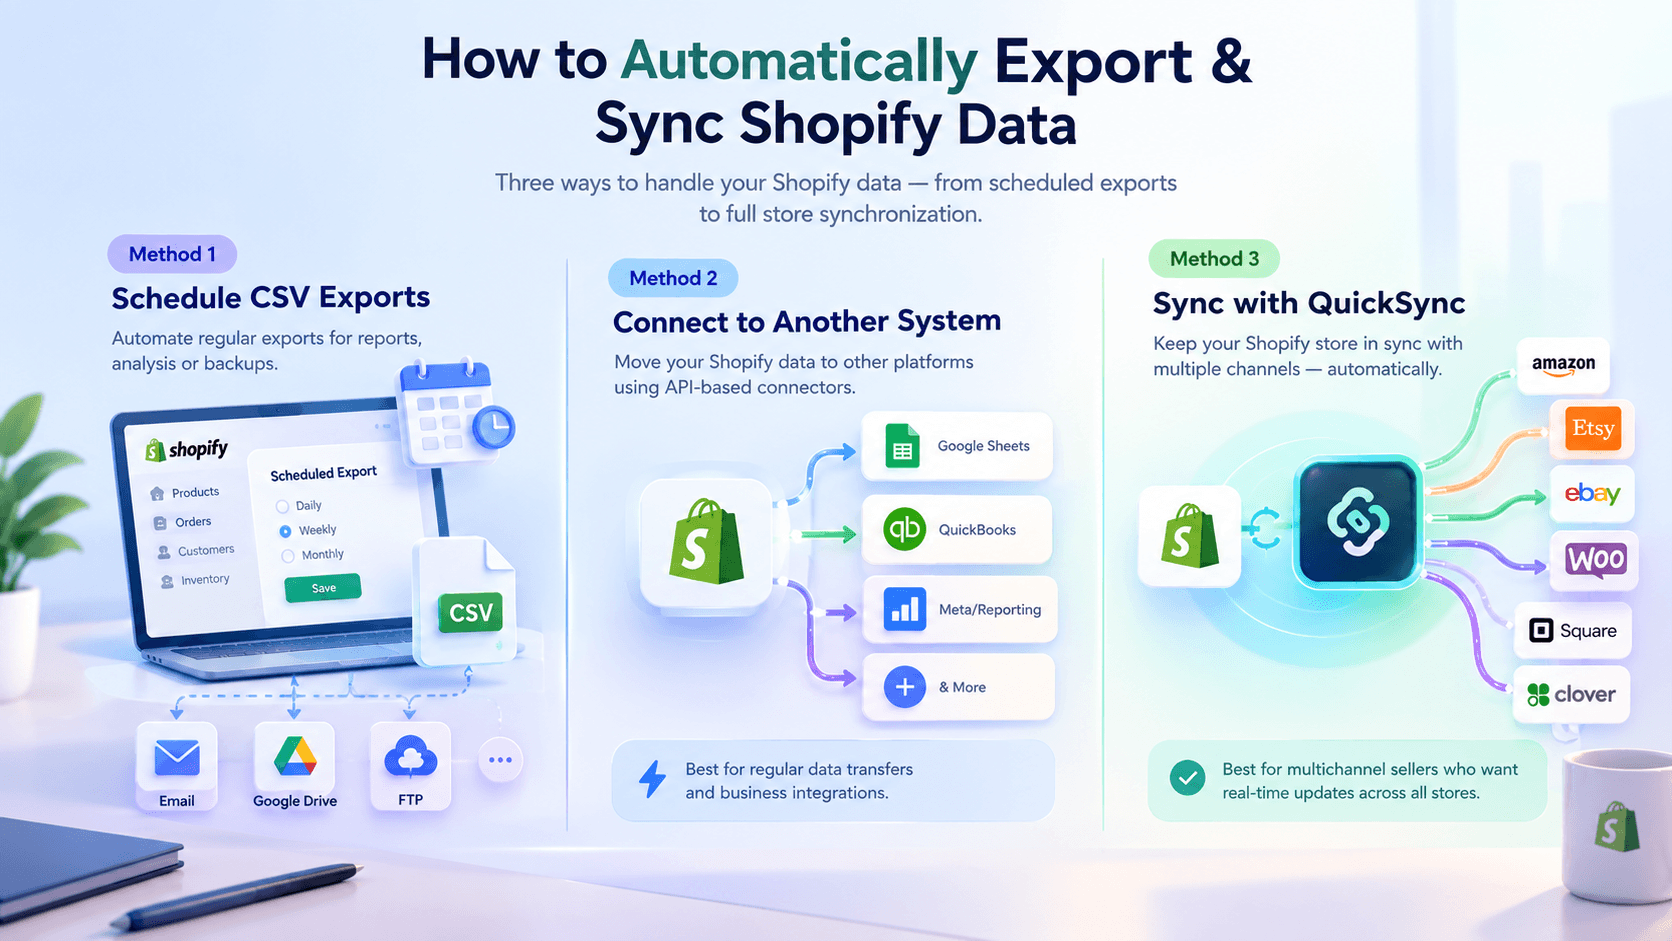
Exporting Shopify data once is easy. The challenge starts when you need that data regularly. Repeating the same export, download, and import process can quickly become part of your daily workload.
Fortunately, you have several ways to automate Shopify data workflows. The right choice depends on whether you need a file, want to move data, or need multiple stores to stay updated.
Method 1: Schedule Shopify CSV Exports
The first option is scheduling regular CSV exports through a Shopify data export app. Some export apps let you schedule report types to run hourly, daily, or weekly. Instead of manually downloading the same report each week, the app creates the file for you on a set schedule.
- This approach works well when your goal is reporting, analysis, or backups.
- You can export product data, orders, customers, inventory, and other supported information.
- Some tools can also send the files to email, Google Drive, FTP, or other destinations.
However, scheduled exports still create files rather than live connections. If your Shopify inventory changes after the export, the CSV will not update itself. You still have a snapshot of the data, not an automatically synchronized store. Some tools also let you keep export setups saved as presets for reuse.
Method 2: Connect Shopify With Another System
The second option is connecting Shopify directly with another system. This removes some of the manual work involved in exporting CSV files and importing them elsewhere. Connector tools can use the Shopify API to pull data into other systems, and platforms such as Coupler.io support over 400 data sources and over 10 destinations through their API-based workflows.
- This method can work well when Shopify data needs to reach accounting, reporting, spreadsheet, or business systems regularly. These connections can also be scheduled for hourly or daily exports.
- Depending on the connection, product, order, or customer data can move automatically instead of being downloaded each time. In connected reporting workflows, custom formulas can calculate profit, cost, and margins.
The main thing to check is what data the connection actually supports. Some tools focus on reporting, while others handle specific types of data. A connection designed for reports may not keep your ecommerce inventory or orders synchronized.
Method 3: Use QuickSync to Sync Shopify With Other Stores
The third method is different from exporting data. Instead of creating files, you connect Shopify with other sales channels and keep the stores synchronized.
This is where QuickSync becomes the better option for multichannel sellers. QuickSync offers various Shopify integrations with other channels so your key data stays synced between channels automatically in real-time. It can connects Shopify with Amazon, Etsy, eBay, WooCommerce, Square, and Clover. QuickSync can automatically sync products, inventory, orders, and prices across supported stores.
That means you don’t have to export a new CSV every time something changes.
Also Read: How to Sync Shopify, eBay and Amazon
Sync Shopify → other apps/platforms
This is where QuickSync becomes much more useful. You can connect Shopify with supported marketplaces, ecommerce stores, and POS platforms. QuickSync offers Shopify eBay integration, Shopify Etsy integration, Shopify Clover integration, etc. That can replace some tasks merchants often try to solve with third party apps from the shopify app store after a long search.
Automated Syncing
QuickSync removes the need to remember to export every morning. Once stores are connected, the system handles the data movement based on the enabled sync settings. Shopify can act as the main store, with product and inventory syncing to other connected channels.
Also Read: How to Sync Inventory Between Two Shopify Stores
Avoid Repetitive CSV Exports
This is the practical win. Imagine updating a price in Shopify, exporting a product CSV, editing another file, then uploading it to another platform. That workflow does not scale well.
QuickSync lets merchants connect stores once and sync inventory, products, orders, prices, etc. Its product syncing can also use a master store and match existing listings.
Which Shopify Export Data Method Is Best?
Each method has a different purpose. CSV exports are useful when you need a file or a snapshot of your Shopify data. Direct connections make more sense when data needs to move into another system regularly.
But if your main goal is keeping multiple ecommerce stores updated, QuickSync is the strongest option. It replaces repeated exports and imports with automatic synchronization across supported sales channels.
Instead of asking, “How do I export Shopify data again?” you can focus on running your stores while the connected data stays updated in the background.
Shopify Data Export vs. Data Sync
These terms often get mixed together. They should not be. A Shopify export creates a file you can use elsewhere. Data synchronization creates an ongoing connection between systems.
The table below will help you understand the difference between Shopify data export and Shopify data sync.
| Shopify Data Export | Shopify Data Sync | QuickSync |
| Creates a snapshot | Keeps data updated | Keeps commerce data aligned |
| Usually uses CSV files | Uses an ongoing connection | Connects multiple sales channels |
| Good for backups | Good for live operations | Built for multichannel retail |
| Manual or scheduled | Usually automated | Automated inventory, products, orders |
| Useful for Excel and reports | Useful between platforms | Supports Shopify, Amazon, Etsy, eBay, Square, Clover and more |
| Does not react to new sales | Updates connected systems | Keeps connected stores in step |
For reporting, Shopify’s native export tools can be enough. For Shopify merchants who are multichannel selling, a synchronization tool is a good choice.
How QuickSync Helps Sync Shopify Data
Once you decide to sync Shopify with another store, setup is straightforward. You only need to connect your stores and choose what to sync. QuickSync then handles the ongoing updates between your connected stores.
Here’s how to get started with Shopify data syncing.
Step 1: Create Your QuickSync Account
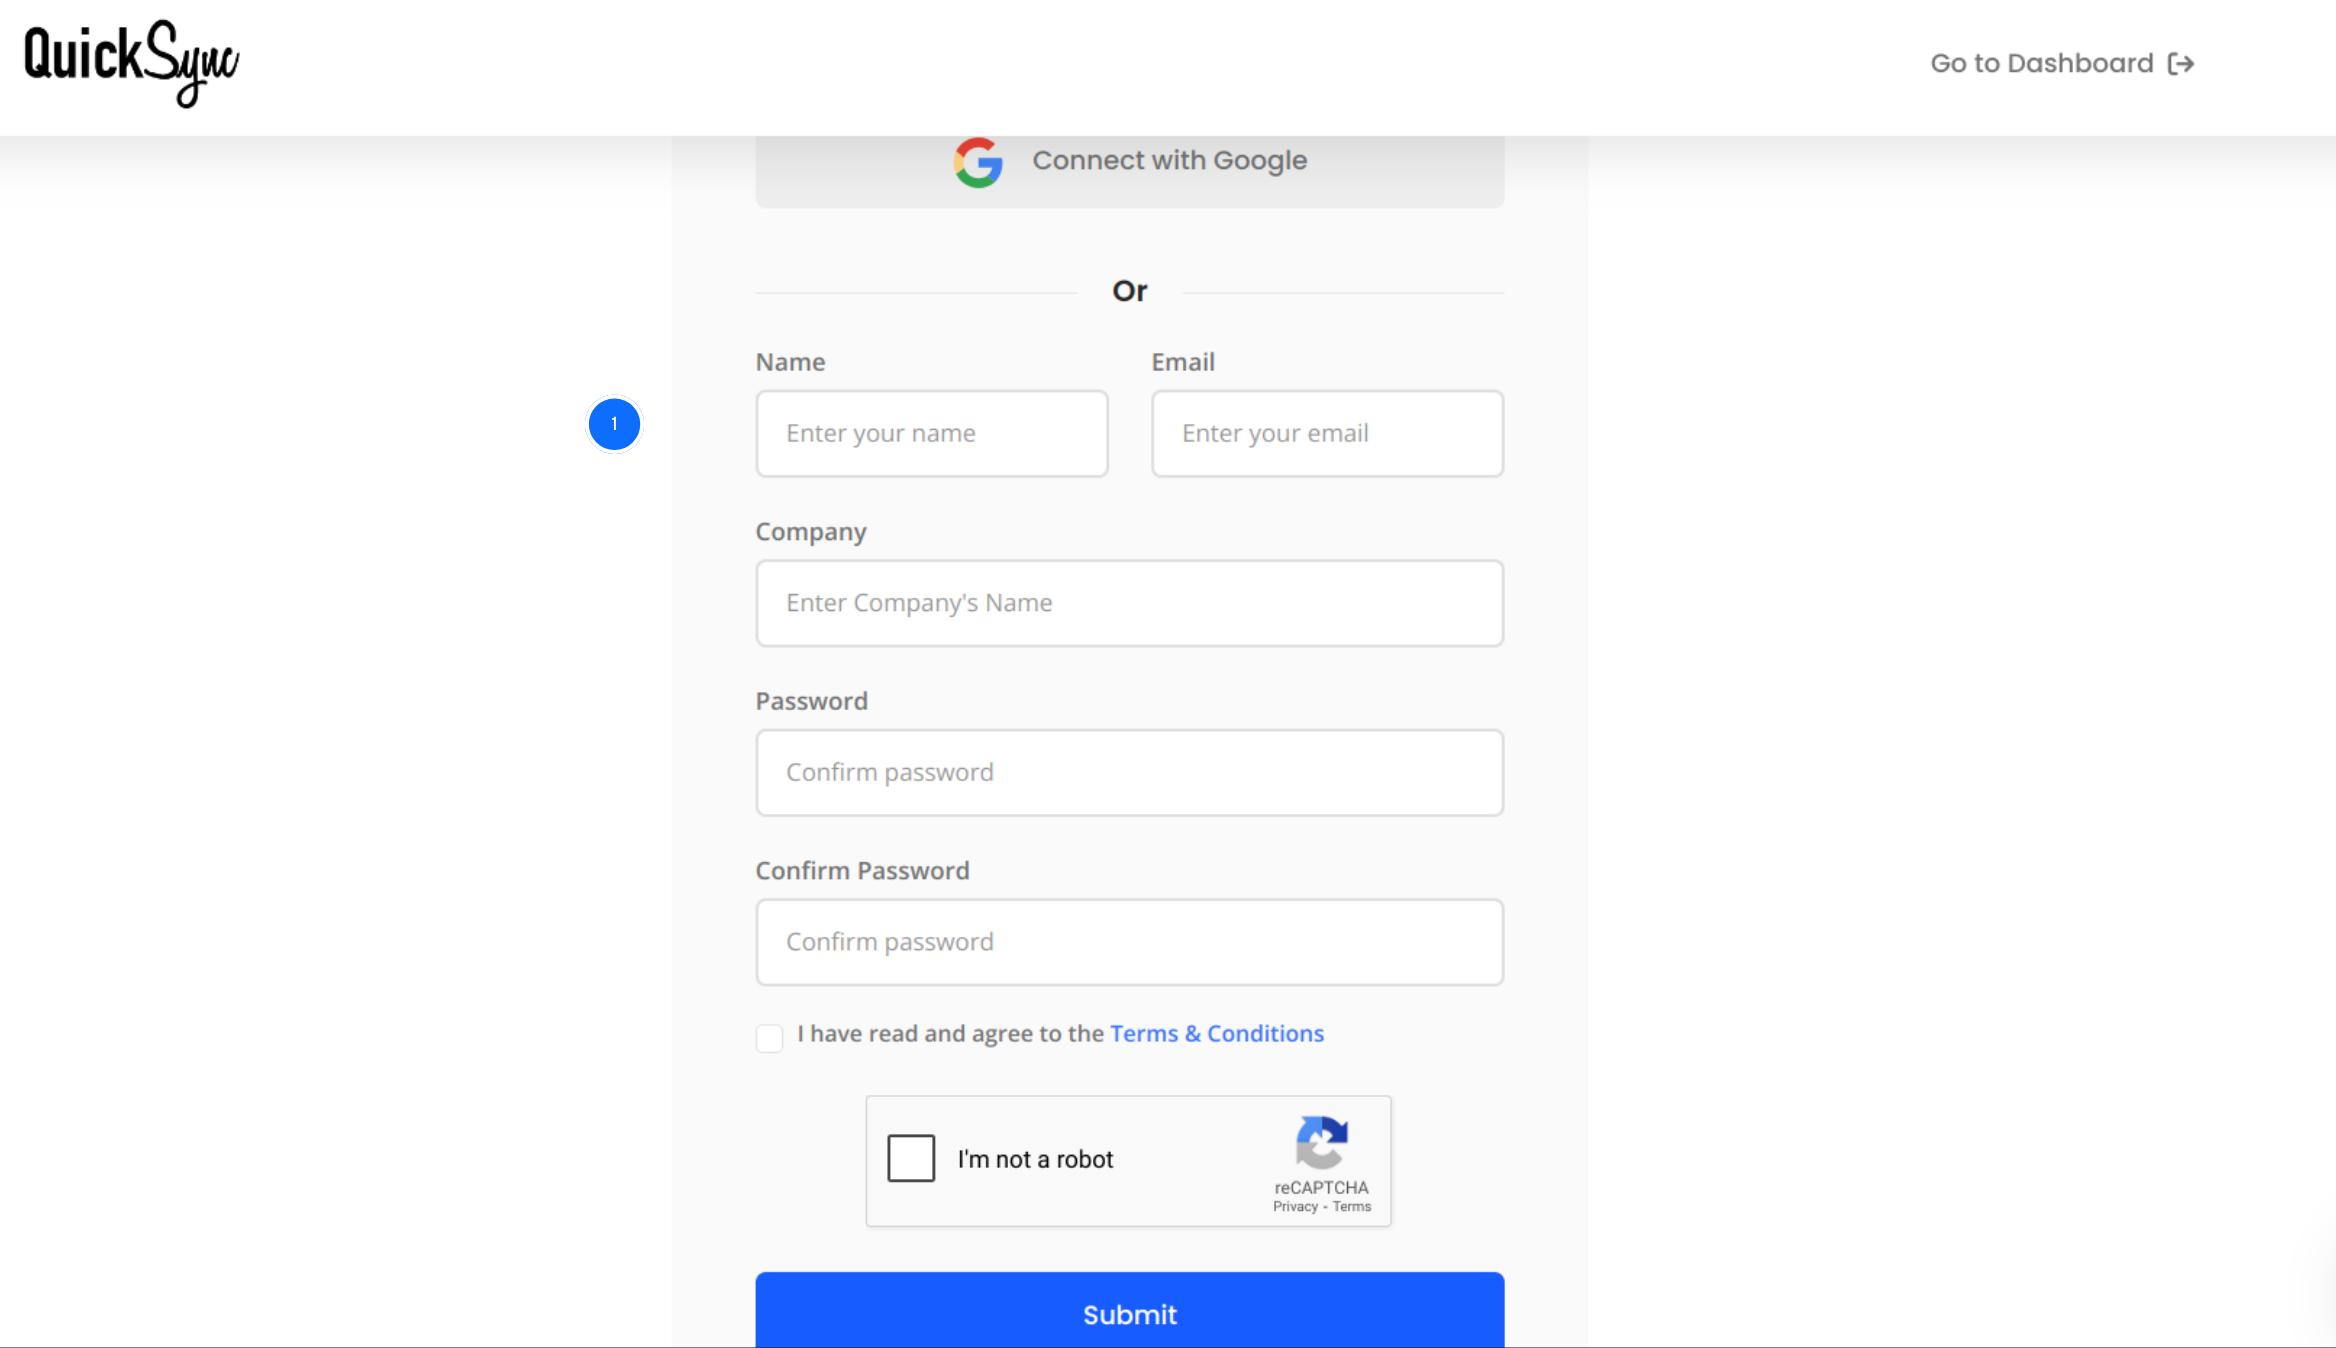
- Start by creating your QuickSync account. Visit QuickSync.pro and select Sign Up to create your account.
- Complete the sign-up form and use your login details to access the QuickSync Dashboard.
Step 2: Connect Your Shopify Store
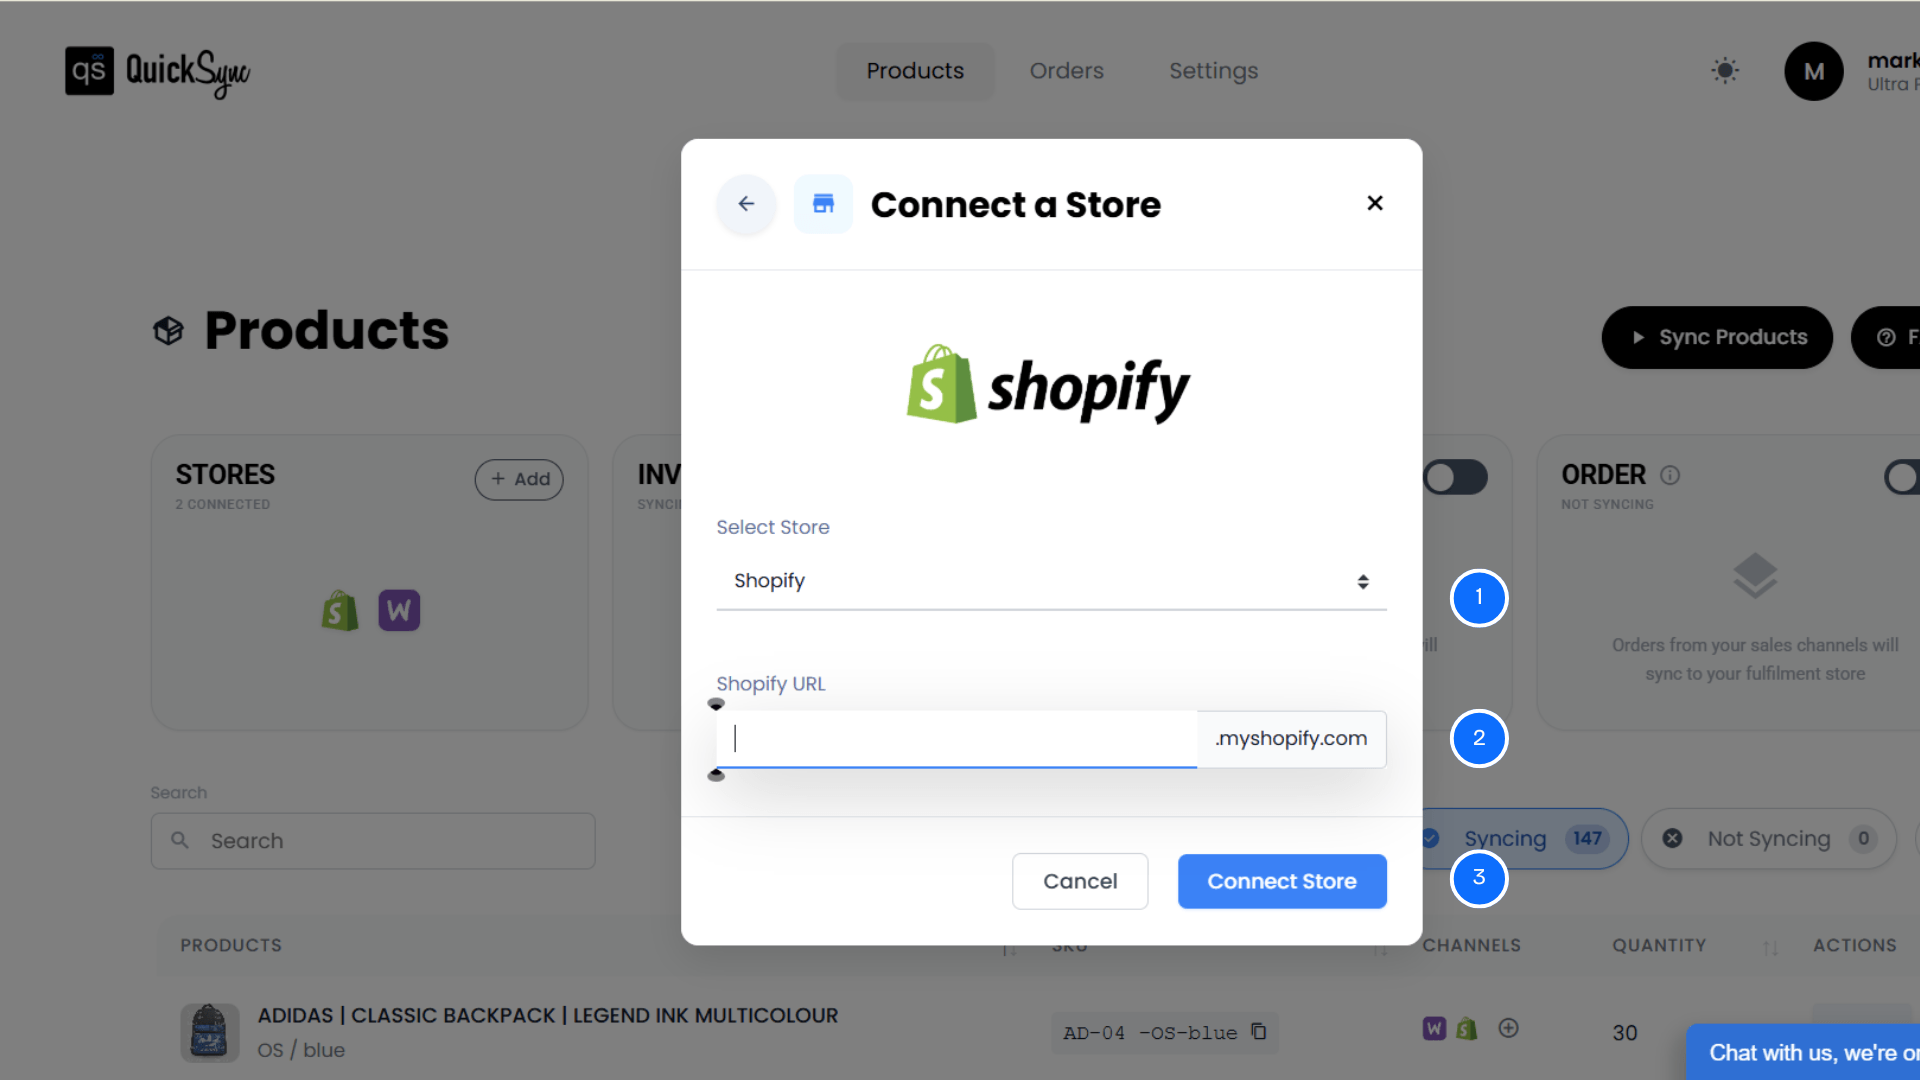
Once your account is ready, connect the Shopify store that you want to use.
- Go to Dashboard → Sync Products → Add a Store and select Shopify from the available platforms.
- Enter your Shopify store URL, then select Connect a Store and sign in to your Shopify account.
Shopify will ask you to approve the required permissions. Allow access to products, images, inventory, and orders so QuickSync can sync the data you need.
Step 3: Connect Your Other Ecommerce Store
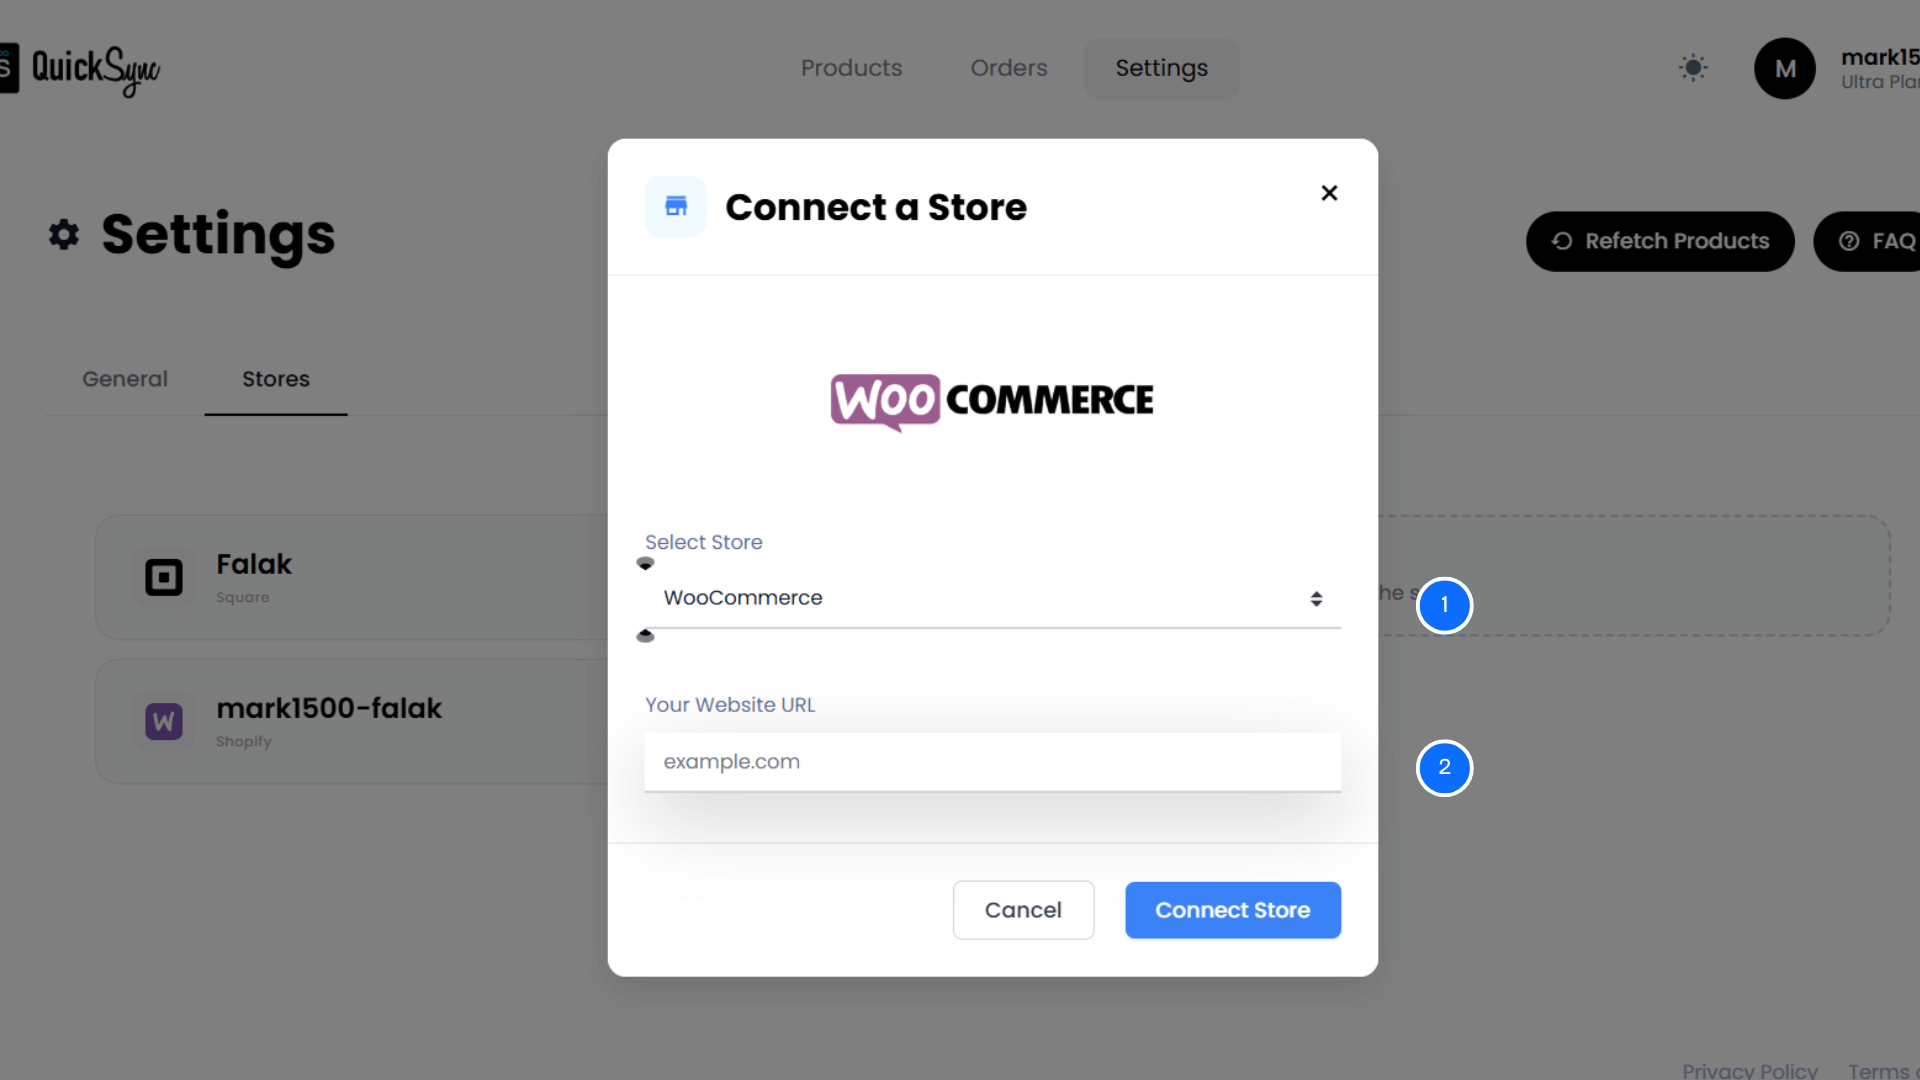
Next, connect the store where you want to sync your Shopify data.
- For example, you can connect WooCommerce by going to Dashboard → Sync Products → Add a Store and selecting WooCommerce.
- Enter your website URL and select Connect a Store.
- Follow the authorization steps to allow QuickSync to access the required products, images, inventory, and orders.
QuickSync then imports your WooCommerce store settings, categories, attributes, and products. Your Shopify and WooCommerce catalogs can then be matched and mapped, allowing the sync to begin.
Step 4: Choose What Shopify Data to Sync
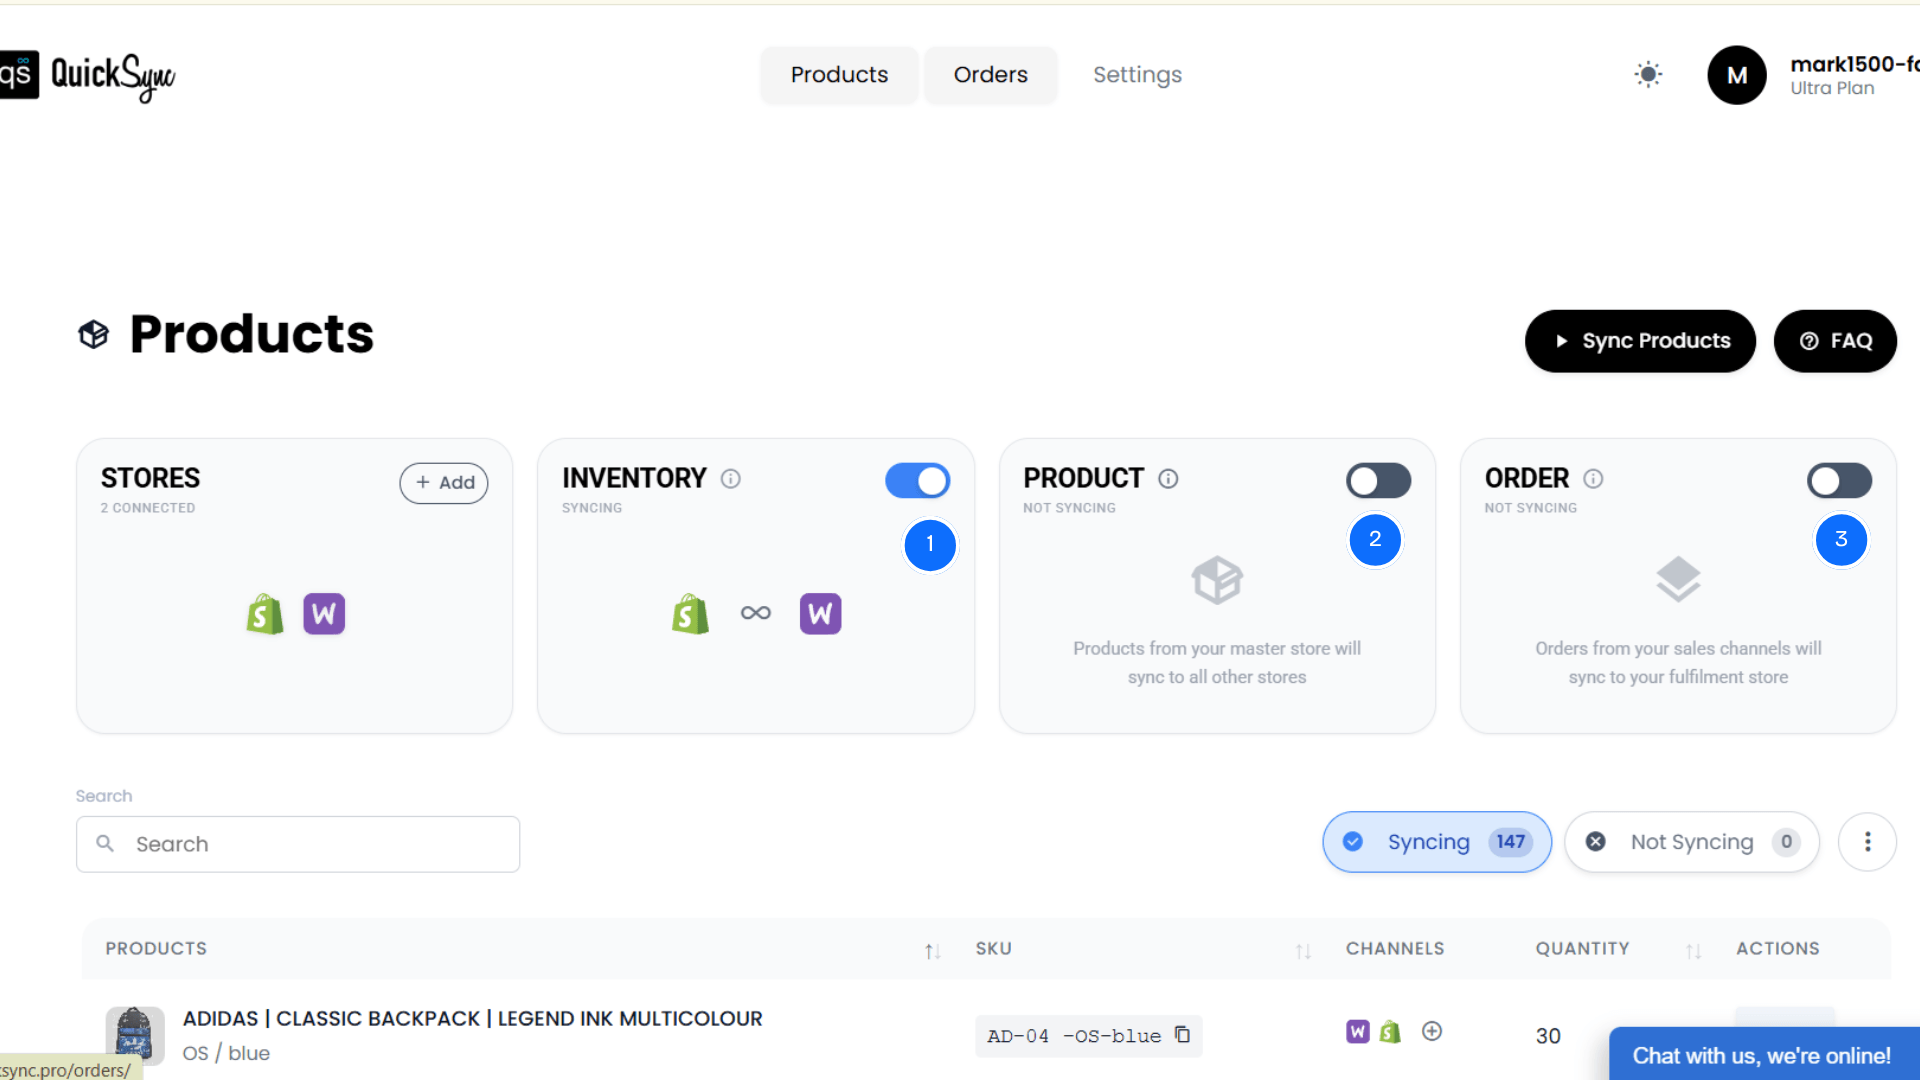
Once both stores are connected, choose how you want your Shopify data to sync. QuickSync supports different types of store data, so you can configure the workflow around your business needs.
- Inventory Sync: Inventory syncing is automatically enabled when you connect your stores. Stock levels can stay updated across connected stores after sales, returns, or manual inventory changes.
- Product Sync: Choose a Master Store to control your product information. Changes to titles, descriptions, images, prices, SKUs, and variants can then sync to the connected store automatically.
- Order Sync: Orders from your connected store can sync into Shopify for centralized fulfillment. Important details such as line items, shipping information, and order details move with the order. Tracking information can also sync back to supported channels.
Once these settings are configured, QuickSync handles the ongoing sync for you. You no longer need to repeatedly export Shopify CSV files, download them, and upload them to another store.
Instead, your products, inventory, and orders stay connected automatically, giving you a simpler way to manage Shopify alongside your other sales channels.
Also Read: Shopify vs WooCommerce Comparison: Pros, Cons, Costs, and Key Differences Explained
When Should You Use Shopify Export vs. QuickSync?
The answer depends on what you are trying to accomplish.
If you need a file, Shopify’s native export is often the simplest choice. If you need connected stores to stay updated, an automated sync is more practical.
Use the table below to decide wisely.
| Your need | Better choice | Why |
| Download products for backup | Shopify CSV export | Simple and built into Shopify |
| Edit many product fields | Shopify CSV | Useful for bulk product updates |
| Review historical orders | Shopify export | Easy to download and analyze |
| Create a spreadsheet report | Shopify CSV or reporting tool | Better for analysis |
| Send Shopify data to Google Sheets | Spreadsheet connector | Built for spreadsheet refreshes |
| Move products to another Shopify store | CSV or migration tool | Useful for one-time transfer |
| Keep Shopify and Amazon aligned | QuickSync | Ongoing product and inventory sync |
| Keep Shopify and Etsy aligned | QuickSync | Automates supported inventory and order workflows |
| Keep Shopify and Clover aligned | QuickSync | Connects ecommerce and POS operations |
| Keep Shopify and Square aligned | QuickSync | Supports product, inventory, and order syncing |
| Manage several sales channels | QuickSync | One synchronization workflow |
| Stop repeated manual CSV updates | QuickSync | Automation replaces repeated transfers |
The simple rule is this: Export when you need a file. Sync when you need your ecommerce channels to stay connected automatically.
Final Thoughts
Shopify makes basic data export easy. You can export products, customers, orders, inventory, and reports without installing another tool.
The bigger question is what happens after the export.
If you need a CSV for Excel, a backup, a report, or a one-time migration, Shopify’s native tools can work well. If you need data to move repeatedly, manual exports quickly become another operational task.
That is where I would separate exporting from syncing. Exporting gives you a file. Syncing keeps channels connected.
For multichannel retailers using Shopify with Amazon, Etsy, eBay, Square, Clover, WooCommerce, or other supported channels, QuickSync is designed for that second job. It keeps supported products, inventory, prices, and orders moving between connected stores automatically.
QuickSync offers a 14-day free trial with no credit card required. Its current plans include automatic inventory syncing, while higher plans add product and order syncing.